Showing posts with label tutorial. Show all posts

Friday, January 18, 2013

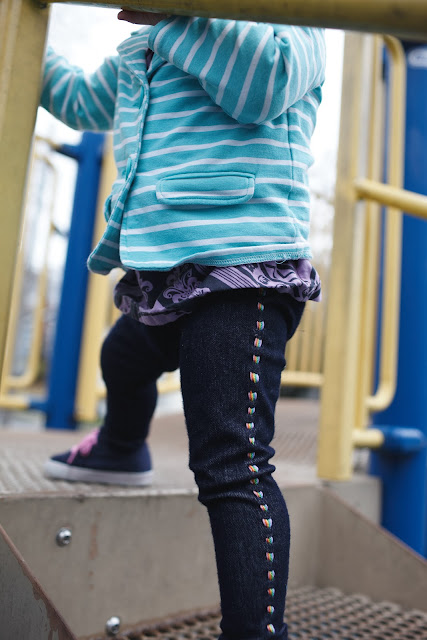
Rainbow Road Leggings


This post is part of the fantastic Stretch Yourself series hosted by Miriam of Mad Mim and Miranda of One Little Minute. (I feel like they should have called it "Mmmm... Knits." But that's actually not very catchy. This is why I've never hosted a series before. I actually suggested to a friend tonight that she call her series Fashion Unicorns. I was mostly serious.)

Today I'm talking about embellishing a basic. For the past few months I've been kind of fixated on hand embroidering designs onto knits. It's not something I ever would have taken the time to do when I first started making my kids' clothing, but now I visualize stitches on everything. And when it comes to stitching onto stretchy knits, it's not as problematic as you would think. All you have to do is be careful not to stretch too much as you stitch.


Leggings are kind of the ultimate knit basic for girls this time of year. I wish I had 3 dozen varieties of them for my daughter Elsie, all hanging in the closet on one of those automated tie racks. I made this pair using the Go To Leggings pattern, which was so great and has some wonderful options and tips for knits. I so enjoyed this pattern and will use it for years, I'm sure.

The hand stitching was really not as time intensive as you might think, and the small detail adds big appeal.


First let's talk about the supplies. You will need a hand stitching needle with a large eye, like pebble or tapestry needles. You can use regular embroidery floss or perle cotton. These are inexpensive and fairly easy to find. I've been growing my small collection of thread colors and now I usually have what I need on hand. My little rainbow consists of pink, orange, yellow, green, blue, and purple. 


Put your legging pieces together and hem the bottoms. Do not put the elastic waistband in yet. Press a nice crease into the sides of the legs. 


Thread your needle and knot the end of the thread. Starting where the crease meets the stitch line on the hem, bring your needle up through the wrong side. I began with green because that's in the middle of my rainbow.  


Go back into the fabric about 1/4' up and go in and out a couple more times before pulling the needle all the way through. This is called a running stitch and it goes pretty fast because you can do a few at a time like this. Just make sure you are only going through one layer of your pants!


Here is what it looks like after you pull the needle through. I use fairly large 1/4" stitches here so that they are more visible on the pants. 


Continue until you reach about 1.5" from the top. Tie it off on the wrong side with a knot.


Start with your next color and use your first line of stitching as a guide to where the needle goes in and out. I did the blue and then purple on the front side, then went back from the green with yellow, orange, and pink.


 This girl.

Trouble.


And since I know you are going to ask, that super cute blazer is from Target, I didn't make it. But I'd love to try making this pattern with a knit.


Now you can head over to check out the (Whoa, infinitely more talented than me, wtf?) super lovely Lladybird for something a little more grown up. Not that grown ups can't wear jeggings with rainbows stitched up the sides, they totally can. And should.


125

Saturday, November 24, 2012

Color Blocked Kid Pants Tutorial

Just bringing home a tutorial I did for KCWC on Elsie Marley this fall. Enjoy!


Hey, I'm Jessica from A Little Gray, and I'm downright chuffed to be kicking off the pre-KCWC festivities. I love this event so much, but in the spring I didn't get to participate because I was competing in Project Run & Play. (Which is going on again right now, by the way. Lots of inspiration there.) But this time around, I am all in!

You should know that I love to sew boy clothes. I have a little girl too, but for some reason the boy sewing comes much more naturally to me. Color blocking has been a great trend for a while now, but it seems like girls have been having all the fun with blocked skirts and dresses. When I saw this new collection from Michael Kors, I knew my 3 year old needed to rock some color blocked pants.


This first pair is inspired directly by those Kors men's pants that are different colors on the front and back. Using Dana's fantastic kid pants pattern, I simply cut the front pattern piece from peacock blue corduroy and cut the back from navy. Not much to explain there, but it's something I never would have thought to do before. 

I also cut them a little skinnier (see below) and added back pockets with contrasting bright blue topstitching. I think back pockets are such a great way to make pants look much more polished and professional. I basically make mine like this tutorial. You can use an existing pair of pants to make a pocket pattern. 


I couldn't stop at just one pair of CB pants, (despite my husband's looks of great concern for my sanity) so I decided to try it with contrasting bottoms this time. They look pretty cool cuffed with some chucks.  The result is just like this pair, but pieced instead of painted. That's what I'm going to show you how to make today.


But first you can very easily make them fit slimmer if you prefer. I did this by marking a line on the bottom of each pattern piece, 1.25" in on the inseam side. Continue to draw the line up so that it's perpendicular to the other straight side of the pants. Then as you get closer to the crotch, ease the line into that curve. Make sure you measure the same amount in on both pieces, and your pants will line up without a hitch.


Now I've cut the new shape out of my pattern and I'm going to figure out where to cut again for color blocking. First, cut a piece of string to the length you want the main fabric of your pants to be before the contrast color starts. I wanted my contrast well below the knee and I cut my string to 11.5". However, my son is tall and I have to add a few inches onto the bottom of this pattern for him. So if your child fits the pattern as is, you might want to take 2-3" off of that length.

Use your string to start at the point of the crotch and measure down the inseam to mark the pattern at the end of the string. Of course, you want to keep it flush against that curve, which I wasn't able to photograph very well.


Use a ruler to draw a line at that mark all the way across the pattern, keeping it perpendicular to both sides. Cut the pattern on that line and repeat the same process with the string on the other piece. It's also helpful to write "front" and "back" on those bottom pieces now so you don't get them confused. 


Now cut all your pieces from the two fabrics, cutting two pieces on the reverse from each like normal. HOWEVER: be sure to add 3/8" for seam allowance to the bottom of the main pieces and top of the contrast pieces. In other words, on the edges where you cut the pattern apart. 


Sew all the contrast pieces onto the bottom of the corresponding main piece, using that consistent 3/8" seam allowance. Finish the seams and topstitch them down on the contrast side with matching thread.

Now you are ready to sew the pants together as usual. But when you sew the inseam, pin very carefully so that the contrast seams match up perfectly. Do the same when you sew the outside seams, hem as usual, and you are done!


If you like this look, you should also check out Blue-Eyed Freckle's tutorial for how to add a contrasting bottom to existing pants.


Thanks so much for having me Meg, I can't wait to see what pops up in the flickr group. Maybe I'll even get to see some color blocked pants? Happy KCWC sewing everyone!


Monday, November 5, 2012

Charlie Brown Christmas Ornaments Tutorial

!!! Update: You can now buy your own set of Charlie Brown ornaments from my Etsy shop, RIGHT HERE !!!


This week for the Holiday Craft Bash, I made ornaments just for the kids. My projects so far have mostly been tributes to my favorite Christmas movies- how selfish! Hendrix was obsessed with Charlie Brown Christmas last year. We watched it every day into February, when Hulu finally got rid of it (thank goodness.) But then it was replaced with Charlie Brown Valentine's Day... not quite an instant classic, believe it or not. 

I actually got the idea for this from a set of cookies made to look like ornaments. So naturally, I decided to try the innovative idea of making ornaments that look like the cookies that look like ornaments. Creative genius over here. I added the faces of Charlie, Linus and Lucy to the mix, but I liked her idea of making some to look like their shirts too. 


I'm learning that there is nothing you can't recreate with some felt and a little perle cotton. It's my new favorite combo, essential for holiday crafting especially. 

Here's what you'll need to make your own CB ornament set:
  • Peach felt, white felt, and scraps in black, red, green, yellow, and blue.
  • Black perle cotton
  • Hand stitching needle
  • Water soluble marking tool
  • Pattern sheet- print here. 


Cut out the felt shapes- from the ornament shape, cut 6 peach, 5 white and one each red yellow and blue. Each ornament will have a front and back main piece, as shown. Cut 7 of the ornament toppers from black, as well as Charlie's shirt stripe, Snoopy's ears, and Lucy's hair. Cut out Linus' hat from green.


Machine stitch the little topper pieces on every front ornament piece, as well as Snoopy's ears, Lucy's hair, Charlie's shirt stripe, and Linus' hat. 


Draw the faces and details on with a water soluble marking tool. Remember if you aren't happy with your drawing the first time, you can blot it out and start over.


I added Linus' hair with machine stitching before starting the embroidery so that it would look extra scraggly. I also did his shirt stripes with a  zig zag stitch on my machine. 

Now embroider the faces and details on each piece using backstitches, french knots for eyes, and a satin stitch for Snoopy's nose and eyes. These are not hard stitches to learn, and you can find great instructions right here. 


Cut a piece of your perle cotton about 8" long for each ornament. Fold it so the ends are together and glue it to the inside of the back piece. 


After the glue dries, place the fronts and backs together so that the glued string is sandwiched inside. Machine stitch all the way around each one and your ornaments are complete!


Since we definitely don't have a tree up yet, I decided to let the kids have some fun with a little felt tree taped on the wall. Mine is about 25"by 20".


The kids love arranging the ornaments this way, and they will get to hang them on our real tree as well. The wonders of felt. 

If you missed my other Christmas movie-inspired felt projects, check them out:


Now that Halloween is over, I think we are going to start seeing even more great projects in the Holiday Craft Bash flickr pool. Don't forget to add yours!

Monday, October 15, 2012

Abominable Snowman Stocking Tutorial


Welcome to our first Holiday Craft Bash tutorial! This week is all about stockings, and as you can see, I've made a stocking honoring Bumble, the abominable snowman from Rudolph. Who doesn't love that old claymation tv special? It's just one of those nostalgic things that brings back great Christmas memories. 


And yes, we know it's only halfway thru October, but now you have plenty of time to create your own Bumble stocking. As you can see, this project involves a lot of machine appliqué, but I've scanned my drawings for you to download and easily use yourself. You will need to print Bumble's face template and the hands and star template. (Please let me know if those links aren't working for you and I'll see if I need to change something.)


Supplies:
- 1/2 yard fabric for the outside of the stocking. It's best to use a darker solid or near-solid. I used Essex yarn-dyed linen in black. 
- 1/2 yard lining fabric. 
- Small amount white felt and blue felt. I would advise getting a wool blend, not those little squares of craft felt. Stockings should last through the years!
- Gray scrap for the star
- Red scrap for the tongue
- Black perle cotton or embroidery floss. And red is optional for the star. 
- Stocking shape pattern. These are very easy to make by tracing an existing stocking and adding 1/2" for seam allowance all the way around. Just make sure the straight part of your stocking is at least 9" across unfinished to have room for this Bumble design. 


Cutting:
First let me talk about cutting your shapes out and securing them on the stocking. There are basically two ways you can do this. 

The first is to use two-sided fusible web. (If you have not used this before, sorry that's not part of this tutorial. But you can find lots of other tutorials on it, or just follow the package directions.) You can trace the templates onto the paper side of the fusible web, iron it onto your felt, and then cut them out and they are ready to fuse onto the stocking. Just make sure you trace the hand in two mirror images. On the other pieces, direction doesn't really matter. 

The second way is what I did, and that's use fabric spray adhesive or quilting spray baste. Whenever I have a project with several different pieces to appliqué, I prefer this method rather than messing with fusible web. Plus I always have spray around. I traced the shapes onto the matte side of freezer paper, ironed that onto the front of the felt and then cut out the pieces. Then they are ready to be glued on with spray. 

Also remember to cut out a circle about 6" in diameter from the blue felt for the background of Bumble's face. This is not included in the templates. 

Use your stocking pattern to cut out 2 from the main fabric, and 2 from the lining. Then cut a piece from your lining that is 2.5" x 9" for the hanging loop.


Iron both lining pieces down to the wrong side by 1/2" at the very top. Create a good crease and then unfold again.


Pin the two lining pieces right sides together, and sew around the sides and bottom, leaving only the top open. Use 1/2" seam allowance. After stitching, trim that seam allowance down to 1/4".


Now make the hanging loop. Take the 2.5" x 9" piece and fold it wrong sides together so that the long edges meet. Press. Open it up and fold both long edges in to meet that crease in the center you just made. Press. Fold it on the center crease again so that the long raw edges are inside and press again.


Stitch down the open side very close to the edge so you are left with a little strap to use for hanging. Set aside.


Now take the front piece of the stocking and arrange your cut shapes where you want them. remember that 1/2" will be lost all the way around to seam allowance. Once things are generally where you want them, take off the white parts and spray/fuse down the blue parts along with the star.


Machine stitch around the edges of each piece. Felt won't fray, so just use a straight stitch. I even used a straight stitch on my cotton scraps because I want them to fray a little, but use whatever appliqué stitch you'd like. The fingers are curvy, so go slowly!


Once all the blue pieces are stitched down, add the white pieces and the red tongue. (Just cut a small half oval shape for the tongue that fits under the lower teeth.) Stitch around these pieces staying as close to the edge as you can. Notice that I didn't try to go stitch to the edge of every tiny tooth, just stayed close. 


Don't forget to add the fur cuffs to each hand. You want these to hang off the edge of the stocking a little.


Almost there, now we are just going to add a little hand embroidery for the features. He wouldn't be Bumble without those crazy eyes and that turned up nose. I used a satin stitch for his eyes, and backstitch with French knots for his nose. Don't really know how to do those things? That's ok, I don't either, I just kinda wing it. But Wild Olive's stitch tutorials help me a lot.


I also added claws with backstitching and a red running stitch around the star. Don't be afraid of the hand stitching, it's really worth the time and it doesn't need to be perfect at all.


Now put the outside of the stocking together the same way we did the lining. Create a 1/2" crease at the top first, then sew right sides together and trim the seam allowances down. Be sure to clip into the curves this time, and then turn it right side out and press.


With the lining still inside out, stuff it down into the outer stocking, so that wrong sides are together. Refold both pieces so that the tops are creased to the wrong sides again. Line up the side seams and pin all the way around the top.


At the outside seam, stuff both ends of the loop piece down between the layers and pin.


Sew all the way around the top, very close to the edge with the lining facing your presser foot and the outer against your needle plate. Reinforce your stitching where the hanging loop is. 


Ta-dah! How fun is that stocking? All your friends will think you got it somewhere kitschy like Cracker Barrel, but be sure to tell them it's not so. 


If you do make this, or any other project you see over the next few weeks in our Holiday Craft Bash, be sure to add them to the flickr group. Anyone who adds pictures of stockings they made by next Monday will be entered to win this beautiful felt and perle cotton prize package from Sewn Studio.  


And there will be new prizes up for grabs each week for those who sew along on Flickr. Be sure to head over to Olivia Jane Handcrafted to preview three more beautiful stocking projects you will have to choose from!


Monday, August 6, 2012

Boy's Muscle Tee with Reverse Applique Tutorial

Today I'm posting a tutorial I did earlier this summer for Delia's Color Your Summer event. Enjoy!


So happy to be celebrating a colorful summer with you today! I'm a big fan of the men-wearing-purple trend right now. But it's still not something you will likely find in the boy's section at Target.

So when Delia invited me to play at CYS, I knew I wanted purple, and I knew it would be something for my boy!


This little muscle tee has become my go-to summer wardrobe staple to make for my 3 year old, Hendrix. They are so cute and hip, super wearable, fast to whip up, and the possibilities for embellishment are endless. 


So today I'm going to show you how to make the basic tee, and how to add a little hand-stitched reverse appliqué flair. I used to avoid hand stitching anything at all costs. But these days I'm addicted to embroidering on my kids clothes. It's really not as time consuming as I used to think, and it adds such a special look to knits. As you can see, my stitches are far from perfect, but that's the look we want here!

And yes, I did make my kid a "purple rain" shirt. It wasn't the original plan, but I really can't resist a weird pop culture reference on a three year old :)


Ok, here's what you need:
  • 1/2 yard of interlock knit (More for a kid bigger than 4t,  or you can always upcycle an old adult tee.)
  • 1/4 of contrasting rib knit
  • Thread that matches the interlock
  • Embroidery floss or perle cotton that contrasts the interlock
  • Chenille needle, or other embroidery needle with a large eye
  • 1/4 of Pellon Wash-n-Gone, or other stabilizer
  • Chalk or marking tool
  • Stretch machine needle


First make the pattern. I traced this shirt that I made for the PR&P finale because I know I like the way it fits. If you don't already have a muscle tee, you can just trace a regular tee and leave the sleeves off. Make sure to add about .5" all the way around for seam allowance, and a little less than that on the arm holes. I don't hem these shirts, but if you prefer to hem, add that to the pattern as well. I leave my hem raw and cut it to curve down a little in the middle for a cuter fit over little tummies. 

*KNIT TIP: I like to trace my patterns onto freezer paper when I am sewing with knits. Draw on the matte side, then iron the shiny side down onto your fabric and it sticks. This helps me cut the knit more accurately without pulling and stretching. 

Cut out your pattern piece and cut two of them from your main fabric. 

**KNIT COMMANDMENT: You must cut out the fabric so that the most stretch is going across  the body. Just think of the way your t-shirts stretch.


The front of the neckline needs to go lower than the back, so take just one of your cut pieces and draw a lower curve at the neck, taking off about 2 inches at the lowest point. Cut.


Now pin your two pieces together at the shoulders and the sides. (Right sides together, if your fabric has right sides.) Sew these seams with a 3/8" seam allowance and make sure to backstitch at the bottom of the side seams, since we are not hemming the shirt.

*KNIT TIP: I like to change my machine to a narrow zig-zag stitch with a width of 1.0 and length of 3.0. This way the seams have a little bit of give in the stretch fabric. (Learned this one from Figgy's!) On my machine, this also gives me a 3/8" seam allowance, which is perfect. 

*KNIT TIP: If you are having trouble with your machine "eating" the fabric at the edges, just start your seams in the middle of the fabric, then go back and finish the rest from that point. 

**KNIT COMMANDMENT: Use a stretch needle. If you don't, you'll likely see your needle holes start to tear after a couple washings. 


Press all seams toward the back of the shirt and topstitch the shoulder seams to reinforce.

At this point, I always try it on Hendrix to see if I need to cut a little more off the neck or armholes. I almost always need to cut the neck bigger than I think for his giant head.


Now it's time to cut the ribbing for finishing the arm and neck holes. Measure around the neck by using a string or thread to find the exact distance around. Subtract 1" from that number and that's how long your ribbing needs to be, times a width of 2". For example, my neck was 12.5" around so I cut it to 11.5" inches (with the stretch) by 2" wide. So the most stretch is going from left to right in this picture.


Sew the short ended together on all three pieces. (Don't get your neck and arm pieces confused!)


Now fold the circle you have so that the long raw edges are together and the seam allowance is sandwiched inside, so wrong sides together.


Start with the neck. You are going to match up those two raw edges of the ribbing with the raw edge of the neck on the right side of the shirt.

Begin by pinning the seam on the ribbing to one of the shoulder seams. Then find the exact opposite point on the ribbing and pin that to the opposite point on the neck hole (which is not necessarily the other shoulder seam, since the front of the neckline cuts lower.) Keep pinning in quadrants, stretching the ribbing slightly to match the shirt. The idea is to distribute the stretch evenly around the hole.

*KNIT TIP: Use lots of pins for this. LOTS! And just sew over them, much easier than trying to finagle them out while sewing in a tight circle.

Sew all the way around the hole, with the ribbing down against your needle plate, and the shirt fabric facing your presser foot. This way, you can make sure you don't get any puckers in the main fabric and also make sure you aren't stretching that fabric at all as you sew. Remember, it's the ribbing that is stretching slightly to match the neck hole, but if you pin well that will take care of itself.


Flip the neckband up and press. Now repeat the same process for each armhole. Hem it if you want, but otherwise, your shirt is sewn!


Time to make it your own with reverse appliqué. Decide on a simple shape or two that you want to use and draw the design lightly in place with chalk or a water-soluble marking tool.

Now cut a piece of Wash-n-Gone stabilizer and a piece of your contrast knit (the ribbing is fine for this) both large enough to cover the space of your design. Turn the shirt inside out and simply pin those down behind the design. The knit will be against the shirt, and the stabilizer on top of that.


Turn the shirt right side out again and use your perle cotton or floss (You only need three of the six strands in the floss) to stitch your design on. There is no magic skill to it, just use a running stitch or a sloppy-ish backstitch like I do. You can find a great tutorial on these stitches right here.


Very carefully pull apart the two layers of fabric in the middle of your shapes and cut out the middle of the top layer.


Finally, turn your shirt inside out again and cut the excess from around your stitches. Here you can see what the Wash-N-Gone looks like on the back, but after you wash it... it will be gone. Hence the name.


Oh so cute, and oh so PURPLE.


Thanks so much for having me today on Color Your Summer Delia!