If you aren't completely sick of potholders by now, you might want to make this useful 2-handed version. Like I said, I am no genius for figuring this out, it's just a variation on
Prudent Baby's prettty potholder.
I particularly like it for holding onto the handles of the pots that I have just boiled pasta in as I take them over to the sink to drain... Or even handling pretty dishes of shrimp pasta from my husband's restaurant that aren't really hot just for a photo. :)
Gather and cut supplies. You need:
One piece 24"x8" terry cloth. You could use an old bath or dish towel for this if you want.
Six pieces 5"x8"- 2 in the terry cloth, 2 quilt batting, and two in the pretty fabric you want to use. This top layer could be any manner of patchwork or piecing. Also, if you don't have batting lying around, don't sweat it, just use another layer of terry.
A package of double fold bias tape, I used 1/2 inch.
First quilt together the layers of your two outside pockets, terry on the bottom, them batting, then fabric. If you are doing an applique in your design, like I did with the fork and knife version, first do that on just the top layer. Then quilt it to the others. For that pink one, I stitched around the design on the fabric. Here, I just did lines about 5/8" apart.
Place your pocket pieces back on the long piece so you can figure out which edge you want facing in, which are the edges that need bias tape. This might not matter to your design, but for instance if you want to have a fork on the left and a knife on the right, you don't want to mess this up. Cut strips of bias tape about 8" long for these inner edges.
Now, if you don't know how to attach bias tape, I definitely could not explain it any better than
Prudent Baby (have I mentioned I am bound to love them forever and ever now?) or
MADE already have. Both make it really easy to understand. Go. Learn. Do.
Now you have bias tape on the inside edges of the pockets. Pin the corners back onto the long piece. The time has come to attach more bias tape all the way around the whole thing.
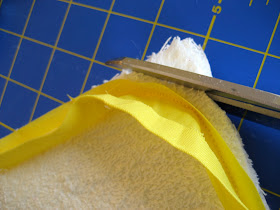
You can do the corners however you like, but I like them rounded. I've found that it's easier for me to leave them uncut like this, then pin the first side of the tape down in a curve.
Then I sew and then cut the corners after, so that all the layers are even with the edge of the tape. Stitch down the other side of the tape and you are done.
You can attach a loop in the very center on the top side if you want. Or you can bypass a loop altogether if you plan on hanging it over your oven handle like a regular dishtowel.
Have fun holding hot things with not only one hand, but TWO!


