Saturday, March 31, 2012

LTTSA: The Final Link-Up!

This is a bit sad isn't it? But not too bad, because I know we've all made some new friends thru this little sew-along and we'll keep the fun going in other ways. And I promise that I will soon work on updating the Little Things to Sew Along page on my blog so that it links to all our old posts. That way it's here for people's reference. For instance, summer hat time is coming again and you might want to make bucket hats with no hand stitching. Or you might want to make a backpack for your preschooler in the fall and need guidance on the zipper.

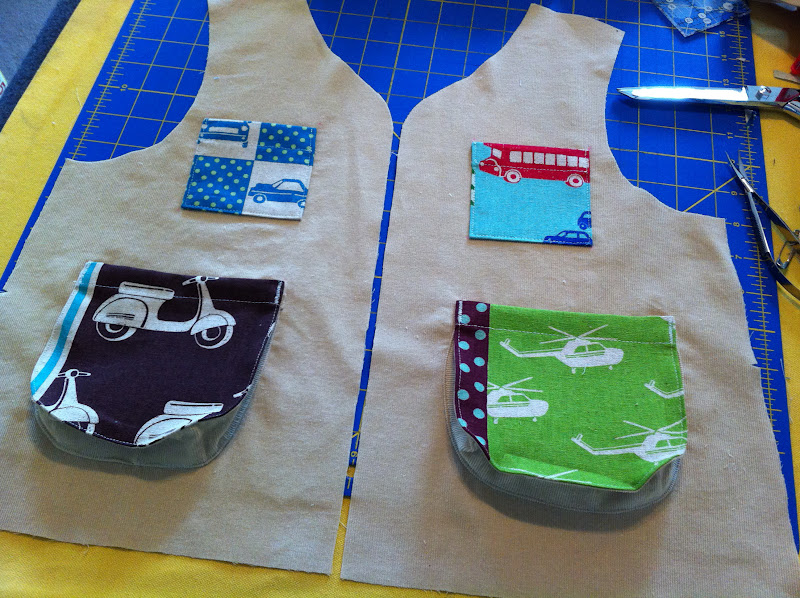
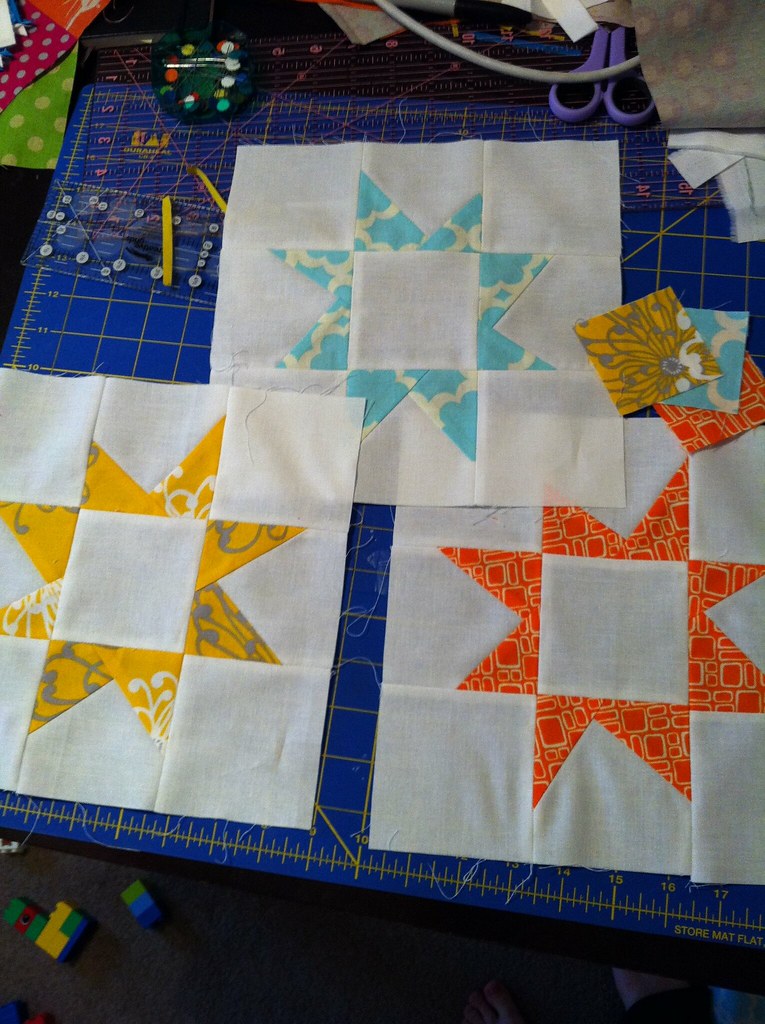
Anyway, onto the vests and other pretty projects!


I didn't even need to tell Hendrix that this was the way to model a vest. He just said, "Hey, what you looking for? You've seen my watches? I've got sunglasses too... very good price." What a worldly two year old.


You may notice that my buttons are not at all spaced evenly. Blurg. I made the bottom button hole first, then I went to do the middle one and my buttonhole foot would not move over the thick pocket layers. I tried and failed many times. So there was nothing else to do but move the top two buttons up some so they weren't aligned with the pockets. Hopefully you don't make the same mistake if you make the vest. I also kind of regret using crunchy pre-made binding on the armholes. I should have made something a bit more fun. No biggie though.


Can't wait to see your final projects for the sew-along!

Remember, link up by next Saturday and you could win your own copy of Growing Up Sew Liberated.

(P.S. I'm soooooo sorry that this link party won't have thumbnail pictures. My inlinkz account expired and I didn't want to renew since this is the last one. I know, cheap. Please make sure you visit other's links even though you can't see a pretty preview of it! It's actually kind of fun and mysterious this way... No? Ok, you're right. Sorry.)


Friday, March 30, 2012

Quick Tip: Transferring Pattern Marks


This was a total "duh" moment I had while making Elsie's skirts the other day, so I thought I'd share with you real quick.

I've never had a very precise way of transferring important markings from pattern pieces to the fabric. Then I thought, "Hey I should just hold it up against the window." It worked. I was able to mark exactly where the lines should be on the side panels for perfecto pleats.

I always trace my pattern onto freezer paper, which then sticks to the fabric. But I imagine it would work with other tracing or pattern paper, it would just be a little trickier to hold everything in place. Maybe you could tape the paper to the window.

I should also share that marking tool I'm using is my new-ish favorite after a long search. It's a Bohin refillable chalk pencil. I love it because the chalk is strong and doesn't wipe away too easily, even though it always washes off. It also comes with lots of colors you can stick in the pencil part so that there's always something that will show up on whatever color fabric you are using. I've also used it for marking quilting lines. So anything that helps with quilting and garment sewing is indispensable in my tool belt.


Hope everyone has a fun and productive sewing weekend. And I hope all the projects I've committed to magically complete themselves, so I can get down to designing some more kid's couture meant purely for showing off :)


Tuesday, March 27, 2012

Music Class Skirts (or a drunken midget lives in my house)

That line is directly from Bossypants by Tina Fey which I just finished (I know, like a year after everyone else and their sister.) I liked it so much I kind of want to immediately read it again. My husband always says I'm such a Liz Lemon because I do real classy things like put on elastic waist pants as soon as I get home or crave cheese at night. Now I know how right he is.

Anyway, babies first learning to walk really do resemble small and inebriated people. And if those babies are girls, you may really get excited about them being able to wear dresses and skirts because they won't just crawl all over them now. And if you sew, you may really get excited by the world of girly girl sewing that has just opened up to you.


At first I had my doubts about how the design of this skirt would come across on such a wee one. I was wrong to doubt. It's the Oliver & S Music Class Skirt and it's pretty much essential for girls of any age.


And when sitting down? The pleats are killing me on those knees. Killing me dead. And there is still plenty of room for her to crawl, which is about 60% of the time nowadays. 


I didn't necessarily mean to make it yesterday, but then this pretty stack arrived from Pink Castle fabrics. The pattern was just sitting there because I had borrowed it from work. It was like a compulsion. I had just finished a really grueling project for PR&P and needed some distraction sewing... I think I'm going to make a top of some sort to go with it out of the yellow woodgrain and the triangles. 


It was so quick and easy I made this red one too. Whoops. 


Monday, March 26, 2012

Solids Swapping

A couple of weeks ago I sent off a little package of solids goodies to Allegory for the "For the Love of Solids" Flickr swap, the star of which was this wall hanging:


You may be thinking that my squares look lined up really really well in the above picture. Or you may be thinking, "No, I wasn't thinking that. But I am now." Or you may be thinking you would still beat me in a seam-line-up-off any day. Either way, I used trickery to create this patchworkery. Pellon makes a product called Quilter's Grid that is a light fusible interfacing covered in a grid of one inch squares. Mine started at 2 inches each, and i just arranged them on top of the grid, fused them down, then folded each seam over on itself, sewing a quarter inch seam. First you do all the horizontal seams, then all the vertical. or vice-versa. It's kind of hard to picture, but I think Elizabeth Hartman has done some tutorials on it recently.

Without the fusible grid stuff, this would have taken me ages. Mostly because I am horrible at keeping rows of patchwork organized. Also, my seams would not have looked half this good.


**ETA: I forgot to mention this design is totally a rip off of part of Carmen's AWESOME quilt.


I had to include this picture of the back, mostly to point out that bigger pucker I got on the top right. I feel the need to do this on the blog sometimes for keeping-it-real type purposes and all that :)


I started out with a completely different project for this swap, but changed direction once I realized that my partner got extremely excited about anything in the group pool that was video game and geekery related. So even though that's not really my thing, I just had to make it for her and I'm really glad I did. I got to learn a new trick with the quilter's grid, my husband really liked something I made, and I was 99.9% sure Allegory would love it as well, which is all that matters. Swaps are good for making you go outside your normal style and comfort zone sometimes.


And this is the very awesome package I received from Katy! She picked the perfect colors and arrangement for my mini- so cool! It's looks perfect on my TV table. She also made this cute drawstring bag, which I love. Thanks Katy!!!


Lately, I've just been working on super-secret things for Project Run and Play. OOOOOh secrets...
Can't wait to spill!


Fresh Poppy Design

Tuesday, March 20, 2012

LTTSA: Making Bellows Pockets


Let me just say first off- If you are making the vest this month and still hee-hawing about whether to do the bellows or not, just do it! Yes, this took extra time, but to me it's totally what makes this vest explorer-ish. I love the way mine came out and they really aren't hard to do. I'm sure Hendrix will like wearing it when I convince him it's just like Diego's vest. "SAY BELLOWS! SAY IT LOUDER! EVERYBODY SCREAM!" Most stressful kid's show ever. 


So first, you press one long edge of the bellows to the wrong side by a 1/2 inch, then pin the other raw edge to the pocket, right sides together. Clip into the bellows piece on the curved parts and stretch it to fit, just like we did on the bucket hats so long ago.


Here's what the front of your pocket will look like after you sew that seam and press. I found it easiest to press the seam allowance towards the bellows.


Now turn the pocket back the the wrong side and hem the top as instructed. You'll notice the the first fold you made is still there, but the rest of the bellows piece is not folded into the hem. The diagrams in the book are actually really clear for all these steps, but real fabric pictures help a little too.


 Then you are going to topstitch the seam around the pocket and bellows. It's easiest to do it with the bellows on the top. Take it nice and slow around the curves so you can get the extra fabric out of the way without getting any puckers.

I didn't take a picture of this step, but then you are just going to pin and topstitch the other long side of the bellows (still folded under) to the vest where you transferred the marks from the pattern.


Lastly, add bar tacks (a tight zig zig stitch) on both sides of the hem so that the top lays flat and doesn't hang open. I haven't done it yet in this picture, just pointing out what the sides will look like. 


My front pockets are all bellowed up and just need flaps. I'm so happy to have learned a new type of pocket because I LOVE pockets. Who doesn't?


Link party for your explorer vests and other projects from Little Things will begin on the last day of the month and you will have a week from then to add yours. Remember, you could win the wonderful book, Growing Up Sew Liberated.


Also, I wanted to let you guys know I was interviewed this week over on Krista's awesome blog, Thar She Sews. It's all about the stuff you care about- fabric and sewing. Check it out right here.


Monday, March 19, 2012

Mug Rugs Swapped


Last Wednesday at our Cincy MQG meeting we had a big 'ol mug rug swap. This is my first mug rug, and I can now see why people say these are so fun to make. (It's because they are, in case you couldn't connect the dots there.) It was a random swap, so I hoped my little sewing machine would appeal to most anyone there. I also hoped it would be distinguishable as a sewing machine... hmmm.


I was inspired by the bird mini quilt my mom made me for Christmas that used this style of messy free-motion stitching for appliqué. It was really fun to do. Messy is definitely easy for me. And it's one little risk-free exercise that helps me feel that much more comfortable with fmq. Baby steps. 

I used the cheater method for binding, just cutting the back a little bigger and folding it over the front. I was also happy to use all scraps for this, so I'm entering it into the Scrap Attack. (I wish I could say the same about my Japanese + & x quilt, but that is not happening. Sheesh.)


And this is the lovely mug rug I got from Debbie. I don't know if you can tell, but the lines criss-crossing are pleated pieces. It's a cool effect I'd like to try sometime.


After finishing up some other sewing commitments last week, today is dedicated to attacking my to-do lists hardcore so that I can finally start on my first PR&P outfit. It's been living in my brain for a week, begging to come out and I can't wait to start!


Monday, March 12, 2012

LTTSA: Explorer Vest Part 1 and Important NEWS!


First off, you sew-alongers are waiting very patiently for a winner...

It's #8 Grandma G! I'm so happy she won because she has participated almost every month, if not all of them! I'll be emailing you about which fantastic Figgy's Pattern you would like.


Moving on to March's sew-along, I've actually got my fabrics cut out in the first half of the month- I'm not a loser! I'm using khaki corduroy leftover from these pants and Echino prints for the pockets. I think those really fit the whole explorer thing. I'm using that brown stripe for lining, just haven't cut those pieces yet. (Ok, so maybe I'm a little loser-y.) I plan on doing the bellow pockets because I want to learn how, so I'll throw up some pictures of the process for you next week.


Now, originally I had planned on also making the cape this month and then people could do either. They still can, but I will only be making the vest. Also, this will be the last month of the sew along :(

But it's not because I don't love sewing along with you guys! I actually have a really good excuse. I'm going to be competing in this season of Project Run & Play! Yes, it came as a BIG shock to me too :) I'll have to post more on my feelings about this whole business another time soon, but I wanted to make sure everyone knew this would be the last month of the sew along because this contest is going to take A LOT of sewing and blogging energy, so there is no way I'll be able to lead a little quilt-along too (even if I don't last very long!)  So if you have been putting off joining, do it now!!

This month's prize will be a gift just from me to show my gratitude for you guys being so enthusiastic about this with me. I'm getting the random winner a brand new copy of Growing Up Sew Liberated! It's a fantastic book and I think anyone who loves Little Things To Sew will really enjoy this one.


So are you guys making the vest this month? Who are you making is for and what are you using?


Sunday, March 11, 2012

Supermodel Documentary Hour!

I really needed to have a for-real "about me" page like a for-real respectable blogger, so I asked my coworker Rachael to bring her camera to work at the last minute Friday morning for a little photoshoot. I'm the worst at this kind of thing. I have no idea how to act in front of a camera. We stood out in front of a coffee shop next door and looked like awkward dorks while people walked by. Well, I did anyway, she was mostly wondering if I was having some kind of seizure or something. At one point I apologized to Rachael for being such a goober, and the lady walking by thought I was apologizing to her and said, "It's ok! I think it's awesome!" Really? You have low standards for awesome.


This ended up being the money shot. You can pop over here to read my new little bio and about where my blog name came from. 


And of course you need goofy outtakes. I'm really glad I was smart enough to wear something that makes me look as wide as possible across the middle.

"Let me show you how I take my free throw shots."


"I am so thoughtful and whimsical, aren't I? And hungry."


"Make sure you get one that shows off how freakishly long my neck is!"


A million and a half points to whoever knows what stupid movie that post title is from, which my weird friends and I quoted obsessively in high school.


Wednesday, March 7, 2012

Doing Good Stitches Lately

Here's what I've been up to for the do. Good Stitches charity bee lately. I love getting to make these blocks every month. I get to try all kinds of things I normally wouldn't think to try, and the girls in my circle are awesome. 


 For example, Diane is so awesome that she designed a whole new quilt for us this past month, complete with mock-up graphics and tutorials for two different types of blocks. It's going to be the "Candyland Quilt." Could not be a more appropriate name.


Do good stitches January
And Leigh is so awesome that she assigned us these very fun and easy wonky stars in January. She knew we needed a break after frantic holiday sewing season. 


I, on the other hand, am so un-awesome that I still haven't put together my quilt from back in November. Everyone did such a great job on these blocks, but I really wanted to make this into a twin sized quilt for Project Linus. So I kind of log-cabined each block with different shades of aqua blues. It added a lot of size, plus kind of unified the different background colors. I like the look of it, but I think it needs another color. 

It still needs some size, so I was thinking a golden/ mustard yellow border? Would that be weird? I was this to have a boyish look overall, like something a teenager could use on their bed... should I just do a white border? I don't know, I think it needs some warmth. HELP me! Either way, I'm going to bind it in this great oversized black and white houndstooth we have at the shop. I need to at least finish this sucker before it's my turn to be quilter again in May!


For March I still need to make some heart blocks for Melissa. I've been working on some curves lately so maybe I'll tackle a curvy pieced heart. 

What about you? Have you been working on any new skills lately? Are you in a bee that encourages you to? Find out more info about do. Good stitches right here. 


Thursday, March 1, 2012

That Time I Made Clown Pants


Ok, so they are not really clown pants. They appear to be somewhat cute little boy pants when they are innocently hanging on the wall there.


These are the Treasure Pocket Pants from the book Sewing For Boys. This is the third pattern I've made from the book, and like the others, this was a GREAT pattern. (Just make sure you check out the pattern update here if you try it.) So many great finishing details like the faux fly and hem facings. All while keeping in mind what a little boy would like- lots of easy to access pocket space for little boy belongings. 


The problem is that I cut them a size too big, and Hendrix looks like he's wearing harem pants/ MC Hammer pants/ chef pants/ mall rat JNCO's. (anyone?)

He really loved wearing them, they just look a bit too goofy for me to stomach taking them out into the world. Of course, that's much better than making them too small, I was just really excited about him wearing these right now. And this almost-3-year-old just keeps outgrowing everything, so maybe it won't be too long after all.

It's a funny thing making clothes for your kids. Sometimes I don't know what I enjoy about it more, the process itself, or getting to see them wear it... maybe the process here served me well enough and I don't need him to wear them that bad. Unless he just really wants to take up sagging.