Showing posts with label DIY. Show all posts

Monday, April 18, 2011

Easter: Baskets, Grass, Eggs... and Neuroses

Hi, my name is Jessica and I have a problem. I can't leave well enough alone. Why did I get caught up in this unnecessary Easter basket makeover project the week before having a baby? Who knows. Sometimes making things just gets a little compulsive. I'm sure some of you can relate. This craft blogging thing is really one big support group for a very neurotic bunch. It feels good to admit.


I found these baskets for the kids in the dollar section at Target. They are not spectacular, but really are a pretty cute find. They didn't need a makeover, but in my neurotic state I decided they did. 


I was inspired by Delia Creates to spray paint them. Her painted gray baskets look awesome. I had this yellow paint that didn't work for another project. Turns out it didn't work for this one either. So no thanks, I don't want the Easter baskets looking like a fungus-infected toenail. 


Thankfully, I also had some red paint leftover from this project. At first, I thought I wouldn't like it because it's not exactly the most Easter-y color. But after I made the gray liner I loved the color combo. It's a manly basket. And I was actually smart enough to leave the girly one nude. 


To make the liners I just used the old ones as a pattern to figure it out and added the bias tape trim. And even though it was completely unnecessary, I do love the way they look now. Hopefully, they can be used for many more years. 


Now a word about Easter grass. It's evil. Everyone knows it. Does anyone even buy that stuff anymore? You end up still finding pieces of it around the house in October. Good grief. But my baskets are quite deep, and goodness knows I'm not filling them with that many goodies. I need some kind of filler. 


We recently got a new coffee maker that uses special filters, so we have about 200 of these lovely unbleached ones sitting in the pantry. 

DIY it:
1. Take 3-4 filters at a time and separate the edges out, but keep them stacked. 
2. Cut between every second ridge, leaving about an inch of uncut area in the middle.
3. Bring the fringy stuff together like a flower and staple at the bottom. 


Fluff them up and it only takes a few to fill up a basket. I used five of these quick clusters. And the best part is, they are in units that are big enough to locate and dispose of. They won't be migrating around your home well into the yuletide. Well, unless you have the kind of home that appears on Hoarders or something... then you really should find a support group, the non-virtual kind.


Now the baskets are ready for the kids' bunnies and a few small treats. We just need to decorate some eggs. I'm thinking we'll try this method. How do you do your eggs?


Wednesday, April 13, 2011

How To MacGyver Some Cupcake Toppers (or fun with Post-its)

I don't know if I mentioned we were having a party for H's second birthday this past Sunday. Well, we did and it was super-fun for the all the kids because it was at a nice playground on a sunny day and there were pizza and cupcakes. What more does a kid need?

Me, being very much with child, I did not have huge amounts of energy or expectations for cutesy extras surrounding said party. But, in my mind a kid's party at least needs some kind of banner marking the honoree, and something dressing up the tops of the cupcakes. Those two simple things go a long way in dressing up the celebration, so that was really all I attempted in that vein.

Lacking money as well as energy, I was determined to use only things I had on hand already. I went to print out some cupcake topper freebies, only to discover I needed new ink cartridges. Hmm, not going to spend $50 on that this weekend. So I came up with this little Post-it note version, which worked well with his favorite colors green and orange.


With the sticky part on the left side, insert your toothpick in between as you fold the paper down. I cut a little length off. I then added stickers that spelled out "happy birthday."


Turns out, Sunday was WAY too windy to set cupcakes out on a nice display or even bother with my little flags, so we just kept them in the box. Turns out, cupcakes are still delicious without any paper decor on top. Oh well, I still thought it was a good idea when you don't have access to a printer.

Obviously, it was also much to windy to hang up a banner outdoors, but luckily I only made it say "Hendrix" and nothing pertaining to his birthday, so maybe I'll still put it in his room for a while.


Yesterday, he and I had a little more fun with the pad of post-its. It's almost like he was trying to make a message.... crazy huh?  :)


Moral: When crafty cutesy plans fall through, it doesn't really matter. Also, sometimes it's fun to stick paper all over the wall. (Like this.)


Friday, February 18, 2011

On the Interwebs

Yeah, I know everyone does linkity-link posts on Fridays, but I want in. Let's face it, Friday is a throw away day blog-wise. So why don't I just recycle some of my interweb findings for you?


Might have to make one of these chalkboard wall calendars from black contact paper. Except, I'm pretty sure we would never be able to keep track of the chalk... and any attempt I make at household organization usually fails... Still a cute idea though.


In another life I would live in NYC and dress like this.


I don't eat nearly enough flank steak. This recipe shall remedy that.


Whether you were really excited about Arcade Fire winning the Grammy, or you had no worldly idea who they were, you WILL find this video funny... or a hipster will kill you. (Some language.)


I'm sure you know it's the time of year to go boy crazy again, but have you heard about Once Upon a Thread? Children's lit + children's clothes= I'm interested.


Project ReStyle
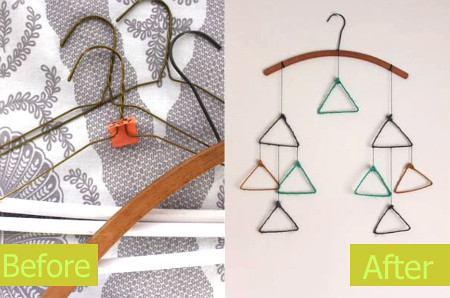
I've been thinking about mobiles lately. Kind of dig this geometric upcycled version.


I really love everything in this new Venice fabric collection.


And finally, if you like a little thoughtful reading, and you have ever wondered why the heck we do all this crafty blogging crap, this article was the best explanation for it I've found. It focuses on the power of online video at first, but it's really about the power of any online community focused on one interest to accelerate creativity and development. Whoa Jessica, Wired Magazine? I just came here for a tasty, fast-melting DIY morsel. Whatever dudes, it's a really good article.


Monday, October 4, 2010

A Baby Room

So I guess "I Love Cincinnati Week" only lasted two days. You see, this is why I'm no good at regular features or pre-planned themes. Oh well, I'll probably just show you the rest of the cool places I like around here whenever I feel like it.

But for today, something I actually made. YAY! I cannot wait until I am back to making on a regular basis. Not being at my sewing machine at least every other day is really making me feel weird. That, and the small precious parasite growing inside me- I also blame that.

Here are the pictures from my friend's baby boy room. I made curtains, a crib sheet using the MADE method, a crib skirt from instructions in this book, and a changing pad cover using Prudent Baby's tutorial.


She already had that white ladder in the room and had the idea to use scraps of our fabrics to hang the frames from. I think it came out very cute. 


Here you can see the sheet and skirt a little better. The skirt in Amy Butler's book just had solid panels, but I broke each side up into three strips so we could show more of the colorful fabrics. I especially love that green herringbone by Joel Dewberry.


I made the changing pad cover with soft white minkie at the top for that newborn noggin.


These are the first curtain panels I have made using blackout fabric to line. It definitely makes it a little trickier to sew, but it's so worth it for a baby room.


And here is the lamp she picked at Ikea. It matches the orange fabric perfectly. 


When she first asked for my help and I was obsessing over fabric choices on the internet, I told her she was making me want to have another baby. Little did I know, I was already preggers. But here's the thing about this baby's room- it will have to be shared with my sewing room. I think. It's either that or put both the kids in one room, which doesn't sound like a great option to me. 

Anyone out there share their creative space with a babe? How does it work? I'd love to hear anyone's experience with it. Or any experience with a newborn and toddler sharing a room. Or any experience getting someone to gift a four bedroom house to your family, no strings attached...


Tuesday, August 3, 2010

Wanting to Work with Wood lately...

Here are three DIY projects that I saw on Ohdeedoh just today that make me wish I didn't suck so bad with a drill. Oh, and also make me covet a garage and some manly tools to go with it.


This Merry Go Round book caddy might be the cutest book organization ever. We have serious book chaos in our house. You will step on a Sandra Boynton if you spend any time here.


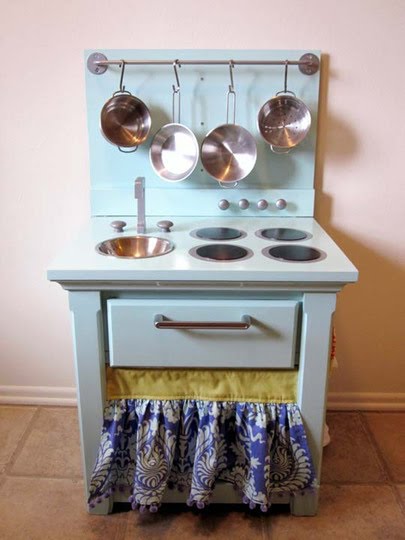
One of the best and simplest night-stand-turned-play-kitchens I've seen. I've already decided HG is getting a play kitchen for Christmas, and hopefully it will be one we DIY instead of one we buy. Too early to make any commitments though, so don't hold me to that one.  :)


And this kid chair is made out of two thrifted picture frames! GENIUS!! This one actually looks pretty easy to do, maybe I'll be attempting soon. Just add it to the list of a gazillion projects I want to try.