Showing posts with label knits. Show all posts

Friday, January 18, 2013

Rainbow Road Leggings


This post is part of the fantastic Stretch Yourself series hosted by Miriam of Mad Mim and Miranda of One Little Minute. (I feel like they should have called it "Mmmm... Knits." But that's actually not very catchy. This is why I've never hosted a series before. I actually suggested to a friend tonight that she call her series Fashion Unicorns. I was mostly serious.)

Today I'm talking about embellishing a basic. For the past few months I've been kind of fixated on hand embroidering designs onto knits. It's not something I ever would have taken the time to do when I first started making my kids' clothing, but now I visualize stitches on everything. And when it comes to stitching onto stretchy knits, it's not as problematic as you would think. All you have to do is be careful not to stretch too much as you stitch.


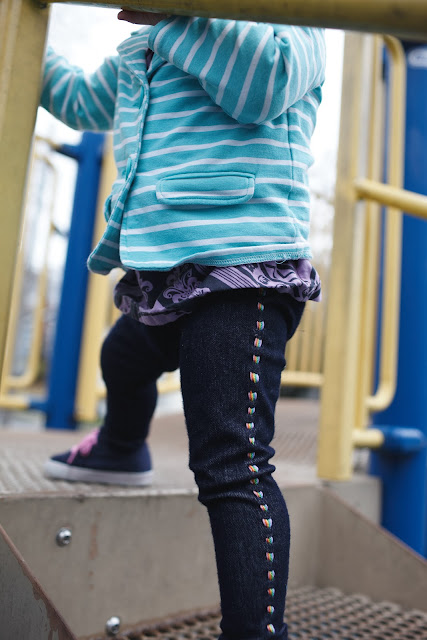
Leggings are kind of the ultimate knit basic for girls this time of year. I wish I had 3 dozen varieties of them for my daughter Elsie, all hanging in the closet on one of those automated tie racks. I made this pair using the Go To Leggings pattern, which was so great and has some wonderful options and tips for knits. I so enjoyed this pattern and will use it for years, I'm sure.

The hand stitching was really not as time intensive as you might think, and the small detail adds big appeal.


First let's talk about the supplies. You will need a hand stitching needle with a large eye, like pebble or tapestry needles. You can use regular embroidery floss or perle cotton. These are inexpensive and fairly easy to find. I've been growing my small collection of thread colors and now I usually have what I need on hand. My little rainbow consists of pink, orange, yellow, green, blue, and purple. 


Put your legging pieces together and hem the bottoms. Do not put the elastic waistband in yet. Press a nice crease into the sides of the legs. 


Thread your needle and knot the end of the thread. Starting where the crease meets the stitch line on the hem, bring your needle up through the wrong side. I began with green because that's in the middle of my rainbow.  


Go back into the fabric about 1/4' up and go in and out a couple more times before pulling the needle all the way through. This is called a running stitch and it goes pretty fast because you can do a few at a time like this. Just make sure you are only going through one layer of your pants!


Here is what it looks like after you pull the needle through. I use fairly large 1/4" stitches here so that they are more visible on the pants. 


Continue until you reach about 1.5" from the top. Tie it off on the wrong side with a knot.


Start with your next color and use your first line of stitching as a guide to where the needle goes in and out. I did the blue and then purple on the front side, then went back from the green with yellow, orange, and pink.


 This girl.

Trouble.


And since I know you are going to ask, that super cute blazer is from Target, I didn't make it. But I'd love to try making this pattern with a knit.


Now you can head over to check out the (Whoa, infinitely more talented than me, wtf?) super lovely Lladybird for something a little more grown up. Not that grown ups can't wear jeggings with rainbows stitched up the sides, they totally can. And should.


125

Thursday, January 5, 2012

A couple of Raglans on my Ragamuffin, and Other Knitsy Thoughts

Hey guys, just wanted to pop in and let you know that I'm guest posting today on Boy, Oh Boy, Oh Boy. Stacey is starting a sew-along thru the very awesome Sewing For Boys book, and this week she is having a bunch of guests showing off their projects from the book to get things pumped up.

I'm sharing 2 versions of the raglan tee pattern in the book, plus all my best tips for sewing with knits. (Which I hear Rae also happens to be talking about this whole week. Knits-apalooza!)


You should go check it out here. All of the cool kids are doing it. And you'll be able to see what hilarious thing this shirt says. You know you want to.


Ok, while we are at it with the knits, I might as well answer Rae's kniterview questions. No, I'm not just pretending that she asked me to guest post too :) She actually wants people to do this!


1. I honestly don't remember. This was the first knit project I made, an LBB Hoodie. I don't think I knew enough back then to even know that knits were different and I should possibly be afraid of them. So that took care of that.

2. See #1

3. Clothes for my boy! And I've now made one LBB Hoodie for my baby girl too. Hendrix's Halloween costumes I've made from knit the past two years as well. I'd like to try a top for myself come spring...


4. It's hard to compare. I'm into quilting pretty hard now (have you noticed?) so that's what I like to do with wovens. I'm obsessed. But I also absolutely love being able to make super-comfy practical things for my kids. Apples and oranges really.

5. Interlock is easiest. Jersey can be a tricky bastard but it's just so soft. I've only used ribbing once and I still need to get a better feel for it...

6. I've only used recycled tee-shirts and sweatshirts until just this week. (See above linked guest post for my other shirt made with store-bought knit.) Oh, and I did buy the ribbing as well. We have a few really nice Michael Miller knits at the local fabric store I work in, but I've also browsed this online store and lusted after their wide selection of knit prints. 

7. See #6

8. My main machine, a Brother pc-420.

9. Nope. I have one. It's a sewing resolution this year to actually figure out what to do with it.

10. I used to just lengthen the stitch slightly, but the Sewing For Boys book has a fantastic tip on this that I  will be utilizing from now on: zig-zag stitch, 1.0 width and 3.0 length. 

11. You know, I haven't. But I can see how that would be pretty helpful. My current walking foot needs replacing though.

12. oooooh, also need to try that. 

13. My absolute favorite thing to do with knits is to cut out my pattern pieces with freezer paper. In fact, I've started doing it with all patterns on any fabric, but it especially makes the cutting so much easier and more accurate with knits. I explain a little more with pictures here. 

14. Don't be afraid. It's really a must if you like sewing for your kids, so just cut into an old tshirt and go for it. This free tutorial is a good place to start. 


More about Rae's Kniterviews here. What about you guys? Do you embrace or fear the knits? 


Wednesday, April 20, 2011

3 Boy Shirts

So have you seen the little solid and striped tees Target has right now for $5? I bought a bunch and have been having a blast dressing them up, mostly with a stack of mine and Nick's old tees. Mucho-score-age. 


First up is the obligatory "big brother" shirt. We parents sure love to put things on our kid's clothes that they won't understand. And me, I like to abbreviate things to make them even harder to understand. I even thought about making it say "bro-ham" or "brosef" like Jack Black calls Will Ferrell in his little Anchorman cameo. But that would have just confused most everyone and made our parents and grandparents question our moral bearings and worldviews...Hendrix is just going to like it because it has "shark attacks" on it. 

The words are freezer paper stenciled, and the wave part is a graphic that I just painted real quick. Just lying, it was already on another shirt. Then I slapped on a couple sharks.


This shirt you might remember being modeled on game day. The thing is, sports team apparel for kids is WAY expensive. Much more than I would ever pay for an article of clothing that is going to get popsicle stains all over it, or maybe even puked on. I found a Reds shirt at a thrift store a long time ago and put the logo from it onto this shirt about 6 minutes before we walked out the door to head to the Reds game. (p.s. That day was their first loss of the season so far. We always seem to have that effect on them.) 


This last shirt didn't turn out exactly as planned. When Nick saw it he said it looked like something Randy Savage would wear. (?) Then he asked if I was a promotor of Chevron now. (Don't get him started on the system.) The technique is inspired by this shirt, which of course looks perfect and cute and easy to pull off...


But only the top green chevron part is curling up to achieve the desired effect. After some quick pondering, I figured out that this is because I should have sewn the other two chevron panels opposite side down. Knit t-shirt material always has a side that curls up on the edges you cut into... D-oh. 

Maybe it will still curl up the more times I wash it, who knows. It's still his favorite color and cute enough to play outside in. I'm just glad the poor kid got something made for him in the midst of all these dresses and pink things. Just two more days until we meet Elsie Morgan! Squeeeeee!!!!