Showing posts with label bucket hat. Show all posts

Wednesday, June 6, 2012

A Bucket Hat Story


Mommy decides to make another extended-brim bucket hat, this time for Elsie, 13 months. 


She loves the way baby girl looks with the simple white outside and the fun Amy Butler Lark print framing her face around the brim. Mommy could spread that cuteness on a cracker and eat it up.


Elsie gives Mommy one last knowing smile, waving that lonely top tooth at her as if to say, "I know you really want me to wear this when I'm outside...


 ... but who are you kidding?" 

 Elsie goes back to her preferred squinty-in-the-sun face. 


Ah well, at least it's big enough that it will probably fit for a couple years. Maybe it can get 10-15 minutes of wear over that time period. 


Monday, May 7, 2012

Changing Up the Bucket Hat


I'm so excited that I won this week's color challenge in Project Run & Play!! The competition was truly stellar this week, every look was fantastic. Who knew the people loved persimmon so much? 

It's incredibly encouraging to me that I have so many of my readers earnestly rooting for me in this. You guys are awesome, and I love to see you being so excited for me. Thank you! We are almost to the home stretch in this thing... so anxious to show you what I'm working on for the movie challenge!


Anyway, I will be making a tutorial for the super simple halter top that will be up Wednesday on the PR&P site. But I've had a lot of comments on the hat, so I just wanted to pop in and tell you how I changed up the Oliver & S Bucket Hat pattern to make this. 

The hat pattern is originally from the Little Things To Sew book (which you guys know I'm a big fan of!) but now you can download it FREE right here. It's perfect bucket hat making time- so do it!

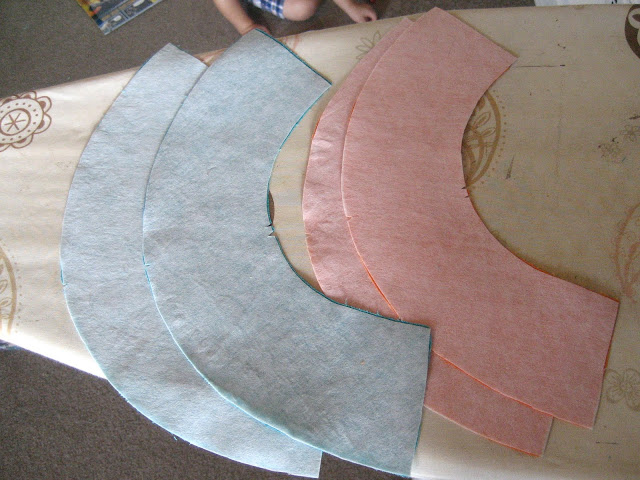
I made the small size, but you could make the same adjustments on any size. All I did was take the brim pattern piece and extended the outside curve by 1.5." So all the way around, 3" are added to the hat width. Do this by tracing or printing out the original pattern piece, then measure 1.5" out every couple of inches along that curve, marking with dots. Connect the dots and you have your new pattern to cut the brim pieces with. 

The two fabrics I used are just quilting weight cottons, so I interfaced every piece with fusible shapeflex by Pellon. Every brim piece I fused two layers onto, so the brim has 4 layers of interfacing total. I've found this gives the hat the best shape and feel out of all the times I've made it. I opted not to do the topstitching all the way up the brim, which also can add structure, so the shapeflex made up for that. I just didn't want it to look too fisherman-ish. 

I also constructed the hat a little differently than the instructions. I made the two sides of the hat separately, then put them right sides together and sewed around the brim leaving a small opening to turn and then topstitch. I have a picture tutorial here. This avoids hand stitching the cap onto the brim in the final steps of the pattern. Although, I do understand why it's written that way, because the two layers of the hat stay evenly stitched together a bit better that way. I just like to avoid hand stitching because I'm not the best at it. The hat still looks great on either side though. 


So there you go, a small variation on a great pattern that really gives it a cute vintage-beachy-look. 

Several of you also commented on the cardigan in this look. Mine was based off this pattern by Owly Baby. One day I'll have to share a tutorial with you on how I did it, but this week, I've really got to sew my tushy off... like NOW. Bye!


Tuesday, August 30, 2011

LTTSA: Bucket Hat Link Up, and a Pretty Fun Announcement


I really thought this kid would never want to wear his hat. But he LOVES this thing. He wants it whenever we are outside. He puts it on and says, "Let's go fishing now!" He's never been fishing before, but apparently he knows that's what bucket hats are for. That kid.

Just this week, I saw that Liesl Gibson released the hat pattern for free download. So if you've been watching from the sidelines because you don't have the book, you can now get the pattern here. Bucket hats for the world.


So now is the time to show off your awesome skills and cap off (pah! get it? I'm soooooo funny) our first month of the LTTSA. I think I have seen most of your hats already and I'm seriously impressed. I know I have seen some of you commenting on each other's hats too, which is very cool. But if you haven't taken a look around, but sure to visit everyone's post after you link up yours. Who knew you could get so creative with one simple hat pattern? 

AAAAAAAND, because you all have been so great and participatory and really exceeded my expectations already for how the sew-along would go, I've decided to make this month even more fun with a giveaway. You guys know I never do those, so I must really love my sew-alongers :)

For the September backpack project, everyone who participates and links up their pack at the end of the month will be entered to win an Oliver & S clothing pattern of your choice! Whoa, awesome, I know.

First backpack post next week, so if you are jumping in now, just leave me a comment and I'll add you to the list. See more info and grab the button on the sew-along page up there. 

Ok, let's party! On an imaginary fishing boat....

(I'll keep the party open for a week, in case there are any laggers.)


Wednesday, August 17, 2011

LTTSA: Bucket Hats, Part 3- Look, No Hand Stitching!


Ok, sorry if anyone has been waiting to see this method, I finally got myself together and here it is! It really went together even more swimmingly than I expected. I will always make this hat like this in the future. And I will preach the good news to all...


First, put together your two caps just like in the book. Then sew together the two sides of each brim, but don't sew the two brims together.


Instead, sew each brim to it's respective cap so that you end up with two separate hats like this. Use a 1/2 inch seam allowance still, finger press it down toward the brim, then topstitch the seam to the brim. You can see the topstitch well on my orange side.


Now turn one side wrong side out and fit it on top of the other side. Basically, just put them right sides together. Make sure you line up those side seams and notches on the outer brims.


Here is what the other side looks like.


Sew around the brim with a 1/2 inch seam allowance, but leave a three inch space for turning. When you leave a turning space in anything, it helps to sew off the edges like pictured here. This will make your excess tuck in very nicely once it's turned right side out. After you sew around, trim the seam allowance down to about 1/8 inch, except in this area.


Turn the whole thing through the opening. Finger press all the way around the edge of the brim so that the edge is turned all the way out and it's nice and flat. Use an iron to get your opening part tucked in and shaped right.


Top stitch the brim starting very close to the edge. This way, you don't even have to hand stitch your opening. (yay!) Keep topstitching every 1/4 inch or so up the brim. If you skip this part, the two layers will be too independent of each other. Plus it looks pretty.


Fully reversible, fully machine stitched. It's a little more wrinkly from the turning, but that will work itself out. 


I know a lot of you have made yours already, which is awesome! Isn't it great to look on the side bar over there and see them popping up every few days? Sewing along is even more fun than I thought. But if you haven't even started yet, don't worry. You have all the way until the end of the month before I'll do the final show-off post and everyone can link up their hats. In the meantime, maybe you can even whip up a few more this way. Hope it was helpful!


Wednesday, August 10, 2011

LTTSA: Bucket Hats Part 2

Has everyone got their fabrics picked out for the reversible bucket hat? You guys have some really good ideas. The comments section is a goldmine of information, so keep blowing those comments up. Cecile had the genius idea of using laminated cotton on one side to make it a rain hat, which would be so adorable. And Sarah told of the glories of using freezer paper for tracing, which I am definitely trying on our next project.

Alright, let's get to it.

But wait, let's not get to it just yet. I had a little convo with Amanda (who seems to be done already. Woot! Wait, I don't say that.) about how much we both hate hand stitching. Well, I mostly hate it because I tend to suck at it. Also I'm impatient and I want my project done yesterday. So as I was constructing my first hat, it occurred to me that it would be very easy to do this without any hand stitching AT ALL. Some of you may have already figured this out, I don't know. But I'm going to do my second hat that way and show you that as well. So I realize I'm asking impatient people who don't like hand stitching to wait a few more days... sorry.

Anyway, let's get to the book's way. The tricky curvy parts are the same either way, so pay attention if those curves are vexing you.

Here is the Fabric A side of my hat after I have already sewn the side panels together and begun to pin it to the top. Those notches are really helpful huh? 


(switched to lining fabric, but same idea.) Now once you have the notches pinned together, the spots in between won't be lining up right, which is why we make more notches all the way around now. The book seems to show just slits, but I think actually cutting the little triangles out helps it stretch a little better. 


Also helpful on curves: A ridiculous amount of pinning. Trust me it helps. You don't want to get puckers in your curvy seam.


Then when you sew this seam, do it with the side panels on top and the circle underneath. This way, you can continually straighten out the side panel fabric as you go and avoid those puckers. 


Now take a break and see what your kid might look like as a surgeon.


(Fast forward a few hours, dinner and bedtime, lighting on my pictures changes...) Here are both my little skullcaps finished. Don't skip the edge stitching there along the top, it looks and feels a lot better that way.


Now here are all my brim pieces sewn together and turned right side out. I mostly just wanted to take this picture because I feel like this part alone could be stuffed and turned into some kind of frisbee toy. Maybe?


I also didn't skip the extra top stitching. I think this makes it look much more professional and cute. I even used brown top thread and blue bobbin thread (which I'm usually too lazy to match, but I'm glad I did here.)


Attach it to the top using the same notching and crazy-pinning technique above. Ta-dah! Bucket hat.


Although, not a reversible one. I will get around to stitching the other side on, but I was definitely not feeling it last night.

If you are doing a blind stitch, I like this video. It's a little hard to see what he is doing, but the way he explained it seemed clear to me.


But fear not! I will have my other method, sans hand stitching, all photographed for you in the next few days. In the meantime, you can at least put together your two little skull caps, just don't go further than that if you want to avoid the blood and tears of hand stitching. Ok, it's not that bad, but you know what I mean.

By the way, the fusible interfacing worked out just fine for me.
How is it going for you guys? And other ideas? Is anyone adding a little pocket like the book suggests?


Wednesday, August 3, 2011

LTTSA: Bucket Hats, Part 1

(Apologies, I know I said I'd post this yesterday. But I got home from work and just had to mostly tickle my babies and then put them to bed and drink wine with my man. You understand.)


Ok, let's start making bucket hats! A lot of this post is going to be really mundane for some of you. But I figured since this is the first of many patterns we are using, I would show some detail about tracing and cutting for any beginners out there. All sewing levels welcome here.

And this is just how I like to do things. Feel free to share how you do things differently or better or just any general tips.


 You'll find the bucket hats on the bottom corner of pattern page 2, which is on the back of page 1. First you'll need to decide what size you are using by measuring your child's head or just going with the age ranges they give for each size on page 33. But if your child has a particulary small or large noggin, you might want to measure. I'm making 2 hats, one medium and one large.

Obviously, you can't cut out the patterns from this sheet. You would lose not only the other bucket hat sizes, but also all the other patterns that overlap. That's why patterns must be traced first.


Here are my pattern pieces all traced in pencil, in both sizes. A while back, someone gave me a huge package of blank newsprint sheets just for this and other crafty purposes, which was very nice. This worked fine, but the tracing paper that you can buy from the craft or art supply store in big pads actually works better because it's easier to see through. I might get a large pad to use for the rest of our projects. But definitely use what you got. You might want to weight down your paper with scissors or other items so it doesn't shift around too much as you trace. Just move your paper to trace each new piece in a spot that uses up the least space. 


When I cut them out, I made sure to keep the different sizes organized. I also labeled them with the project, the size, the pattern piece (a/b/c) and how many to cut from each fabric. I cut out each notch. When you cut out your pattern pieces, make sure to use different scissors than what you cut fabric with.


Since we are cutting two of each piece besides the top piece, double up your fabric. It's probably easier to always do right sides together, since that's how they will be sewn together. But it doesn't matter if you do it the other way as long as it's a mirror image. Pin the pattern piece right through both layers of fabric.


Here's the medium brim piece pinned to my fabric. You'll notice I didn't exactly follow the grain of the fabric here, which is what that arrow on the pattern is supposed to indicate. For this project, I really don't think that matters too much. I was just trying to use this scrap of fabric wisely. This project is great for using up larger scraps, so arrange your patterns how you need to. It also doesn't matter because of the small print I used here, but later I'll show you what I did on a larger directional print.


After I cut along the top curve of the brim, I opened that section up to use for the top piece, since you only need to cut one of those out for each layer.  Remember, always iron your fabric well before pinning and cutting out the pieces. You can also iron your paper so that it lays flat and makes things easier to cut.


Now, for my large hat I decided to use this Michael Miller print called Groovy Guitars. I folded up the edge to make enough space for two layers and laid out my brim. With this large print, I had to pay closer attention to how I placed it. I used the notches to center it on that light blue guitar neck.


So here are my large hat pieces all cut. Groovy guitars, and a couple of solids left over from Hendrix's quilt. The two shades of blue just happened to match the blue guitars perfectly, and I didn't have enough of either of them do it all one shade. But I think having the middle section of the hat in the lighter shade will add some interest.


My medium hat is the green Hugs and Kisses print from Loulouthi and a couple of orange solids. I love green and orange on little boys.


Now let's talk a little interfacing. The book calls for sew-in interfacing, but I have about 6 yards of fusible (iron-on) interfacing on hand, so that's what I'm using. Interfacing is just something you add to a layer of fabric to make it a little thicker or sturdier, in this case the brim.  I folded it over to make two layers and cut out interfacing for both of my brims. (You will need just two pieces for each hat.) Obviously, don't iron fusible interfacing at this stage because it will fuse to itself!


Here are my interfaced brim pieces. I cut the notches out of the interfacing after ironing it on completely so they would be lined up right. A word about notches- They are meant to help you line up the pieces so that everything comes together in the right place. I don't know if some people just draw them on, but I always cut them. This way, you can see them from both sides. They get lost in the seam allowance, and they are on curves, which you have to clip later anyway.


Wow, that seemed like a lot of information just for getting everything cut out! Honestly, the cutting is my least favorite part of any project. That's why I like to do it ahead of time, like while Hendrix is watching his afternoon video or something. That way, I can come back to the project later and just get straight to the part I like, the sewing.

My fabric choices for both of these are pretty bright and loud, but I figure I am going to pick those kinds of things for my son as long as he's young enough to let me. But I also think this hat would be really cool made from some upcycled khakis or plaid shirts or something. So what are you guys using?

Any more questions or tips? Has anyone made this before using the fusible interfacing? Is anyone using any unusual materials for theirs? Comment it up. See you next week for the fun sewing stuff!