Showing posts with label sew along. Show all posts

Tuesday, March 20, 2012

LTTSA: Making Bellows Pockets


Let me just say first off- If you are making the vest this month and still hee-hawing about whether to do the bellows or not, just do it! Yes, this took extra time, but to me it's totally what makes this vest explorer-ish. I love the way mine came out and they really aren't hard to do. I'm sure Hendrix will like wearing it when I convince him it's just like Diego's vest. "SAY BELLOWS! SAY IT LOUDER! EVERYBODY SCREAM!" Most stressful kid's show ever. 


So first, you press one long edge of the bellows to the wrong side by a 1/2 inch, then pin the other raw edge to the pocket, right sides together. Clip into the bellows piece on the curved parts and stretch it to fit, just like we did on the bucket hats so long ago.


Here's what the front of your pocket will look like after you sew that seam and press. I found it easiest to press the seam allowance towards the bellows.


Now turn the pocket back the the wrong side and hem the top as instructed. You'll notice the the first fold you made is still there, but the rest of the bellows piece is not folded into the hem. The diagrams in the book are actually really clear for all these steps, but real fabric pictures help a little too.


 Then you are going to topstitch the seam around the pocket and bellows. It's easiest to do it with the bellows on the top. Take it nice and slow around the curves so you can get the extra fabric out of the way without getting any puckers.

I didn't take a picture of this step, but then you are just going to pin and topstitch the other long side of the bellows (still folded under) to the vest where you transferred the marks from the pattern.


Lastly, add bar tacks (a tight zig zig stitch) on both sides of the hem so that the top lays flat and doesn't hang open. I haven't done it yet in this picture, just pointing out what the sides will look like. 


My front pockets are all bellowed up and just need flaps. I'm so happy to have learned a new type of pocket because I LOVE pockets. Who doesn't?


Link party for your explorer vests and other projects from Little Things will begin on the last day of the month and you will have a week from then to add yours. Remember, you could win the wonderful book, Growing Up Sew Liberated.


Also, I wanted to let you guys know I was interviewed this week over on Krista's awesome blog, Thar She Sews. It's all about the stuff you care about- fabric and sewing. Check it out right here.


Monday, March 12, 2012

LTTSA: Explorer Vest Part 1 and Important NEWS!


First off, you sew-alongers are waiting very patiently for a winner...

It's #8 Grandma G! I'm so happy she won because she has participated almost every month, if not all of them! I'll be emailing you about which fantastic Figgy's Pattern you would like.


Moving on to March's sew-along, I've actually got my fabrics cut out in the first half of the month- I'm not a loser! I'm using khaki corduroy leftover from these pants and Echino prints for the pockets. I think those really fit the whole explorer thing. I'm using that brown stripe for lining, just haven't cut those pieces yet. (Ok, so maybe I'm a little loser-y.) I plan on doing the bellow pockets because I want to learn how, so I'll throw up some pictures of the process for you next week.


Now, originally I had planned on also making the cape this month and then people could do either. They still can, but I will only be making the vest. Also, this will be the last month of the sew along :(

But it's not because I don't love sewing along with you guys! I actually have a really good excuse. I'm going to be competing in this season of Project Run & Play! Yes, it came as a BIG shock to me too :) I'll have to post more on my feelings about this whole business another time soon, but I wanted to make sure everyone knew this would be the last month of the sew along because this contest is going to take A LOT of sewing and blogging energy, so there is no way I'll be able to lead a little quilt-along too (even if I don't last very long!)  So if you have been putting off joining, do it now!!

This month's prize will be a gift just from me to show my gratitude for you guys being so enthusiastic about this with me. I'm getting the random winner a brand new copy of Growing Up Sew Liberated! It's a fantastic book and I think anyone who loves Little Things To Sew will really enjoy this one.


So are you guys making the vest this month? Who are you making is for and what are you using?


Wednesday, February 29, 2012

LTTSA: Play Town Link Up!


This was definitely the most fun I've had with a sew along project so far! It really surprised me how much I liked fussing over some of the details, which was well worth it. 


I'm really happy that I had to finish this today- Elsie's birthday present is ready almost 2 months early. So unlike me. I made a pretty elaborate gift for Hendrix's first, so I really wanted to do something special for hers too. I still plan on making some type of play mat to go with it, but I don't think that will be quite as much work.


I love the round window on this one. I used a blanket stitch on some windows, zig zag on others, and a few rounds of wonky straight stitches on others. (Both wonky and straight? Yes.) The brownstones have a very convenient scrap of text fabric for embellishment, as well as some other street scenes on the backs I didn't take a picture of. The wood grain is a Joel Dewberry Aviary home dec fabric and the other brownstone is Essex linen in black. 


The houses are Central Park by Kate Spain (the yellow), some seersucker from Sewn, and Alexander Henry Heath. Yes, this bird and car a bit off in proportions :)


So I should have explained earlier about the foam, but I'll share my pointers for anyone who is still working on their project. At Joann Fabrics, they sell upholstery foam in different thicknesses in sheets. In my local Joann, they are in the back by the batting and pillow forms. You need a 4" thick piece, then you can take it to the cutting counter and get them to cut it down to the size you need. The piece I got, shown above, is 1/3 of a yard, which I paid about $13 for with my 40% off coupon. As you can see, I had a lot of it left after cutting out my five buildings, so I probably could have got away with 1/4 yard. I just used one of our steak knives and it wasn't hard to cut. I traced the templates on both sides of the foam so I could always make sure I was cutting straight thru it. In my opinion, it was well worth splurging on the foam over using stuffing. The shape and feel of the houses are great with it. Plus, every other thing I used, I already had on hand, so $13 is pretty good for a birthday present right?

I completed hand stitching the bottoms this morning. You know this isn't my favorite part of any project, but the basting stitches she has you do on the bottom of all the walls really helped. I would have been a mess without those. And I think I'm finally getting the hang of blind stitching after having my mom tutor me about a dozen times. 


Time to share your projects- Remember this month's winner gets a pattern and clothing labels from Figgy's! You have until one week from now, and as always, you can link up a blog post or flickr photo of any project from Little Things To Sew. 


Saturday, February 25, 2012

LTTSA Play Town: All in the Details


So now that I've started on this project, I think I might be having the most fun yet. There are so many ways to add great details with trims, appliqués and fun stitching. And I love the fact that I've used only scraps. I'm going to get my foam this weekend, with a 50% off Joann's coupon in hand. You could opt to use Polyfil if you have some on hand, but the buildings would not stand up and keep a square shape as well. Have you seen Liv's little bike shop? Adorable.

What ideas have you had for shops and buildings? Any special trims you are putting to use? I can't wait to see everyone's creativity!

Don't forget, we will link up starting Wednesday, but you will have a full week from then to add your play towns or any other project from the book Little Things to Sew. (If you are new around here and want to know what I'm talking about, check out the sew-along tab at the top of my page.) You could win an awesome pattern from Figgy's!


Thursday, November 10, 2011

LTTSA: Planning the Puppet Theater


We're a third of the way thru November people! How did that happen? We officially have a pink Christmas tree and garland up in my place of work- yikes. Time to get moving on this super-cute gift for our kids, and I'm really glad we are doing it this month. 

I recently bought a couple of prints from Lizzie House's 1001 Peeps collection on a whim. As soon as I saw them in person I knew I had to use them for this puppet theater. 


Here's a rough little sketch of what I plan to do. I'm not changing it too much, just turning the house into an Arabian tower type thing. Drawing it out really helped me see where I wanted to use my fabrics.


The linen on the bottom here will be the main part of the building. I still need to buy some canvas. The book has a great suggestion to get a drop cloth from the hardware store, but I think I'm going to pick up some duck cloth from Joann's because it comes in a few different colors. That's actually what I used as the base of my table playhouse, so I might even get the same yellow color. The blue tower print will be my roof and door and the purple will be the windows. I'm going to trim the windows in that orange, which is not Lizzie House, but the Moroccan feel is perfect.


I'm using Lizzie's signature pearl bracelet print in a variety of colors for the curtains. That red is actually from Outfoxed- I love how all of her collections work so well together!


Lastly, I have a little of this print on the way. I plan on stuffing the little characters to make a few puppets, either on craft sticks or just finger puppets. (If you like 1001 Peeps, Above All Fabrics has it on sale right now.)


You'll need to get some sort of fusible web for the appliqué if you don't already. I like to use this Heat n Bond light because it comes on a big roll, but there are several good kinds, like Wonder Under or Steam-a-Seam. Just make sure it's fusible on two sides and sewable. Sometimes I like to just use spray adhesive for appliqué, especially when using thicker materials like felt, or really big pieces. It's just quick and easy. Some kind of fabric marker will be good to have for this project too.


The possibilities are endless for how you could adapt this project. You could make it a castle, a circus tent, a train, a pirate ship or Noah's ark, a treehouse... you guys probably have some brilliant ideas. And of course, making it exactly as it is in the book will be very adorable as well. I really love those flower boxes on the windows.


Hey, maybe we should do the giveaway from last month? I loved all your aprons and other projects. And I was encouraged to see that we had even one more entry than last month- we are not losing momentum at all!


Ok, the winner according to random.org is #14, Amanda of Ellieboo! I'll be emailing you soon about your pattern choices from Mama Stellato's shop. If you didn't win, be sure to browse the great patterns at really good prices.


Good news- we have another great sponsor for November! Owly Baby has some of the sweetest young kid patterns like this reversible wrap dress and the sidewalk jacket for winter. You'll soon be seeing my version of the Darling Cardigan pattern. It's pretty darn cool.


So how are you guys doing on the theater? Have you started dreaming? Have you got to the cutting and appliquéing already? Can't wait to hear your ideas. Also, if you know of any great puppet patterns or tutorials, share links here and I'll do a round up of puppet ideas on the next sew-along post. Happy sewing!


Tuesday, November 1, 2011

Bias-Trimmed Aprons. (Finally)

Yeesh. What a weekend. I'll have to tell you more about it some other time. For now, we've got to see some adorable kiddie aprons!

So, you'll remember last week I was having trouble deciding which bias tape to use on my yellow stripes. The choice was between a tone-on-tone green print, and another yellow stripe with more colors mixed in. Stripey to the max, if you will. I think the votes in the comments here were pretty evenly mixed, as they were over on my Flickr. But then Liesl Gibson herself voted for the green! (you know her, just the author of our beloved book and the bestest kid's patterns ever.) Of course I thought that was a pretty good deciding vote. But then, I wavered again. You see, a certain sew-alonger is the mother of designer and blogger Jessica Jones of How About Orange. I'm pretty sure that was the very first crafty blog I ever followed, and she's basically awesome. Well, she voted for the stripes and I was torn.

In the end, I went with the green. True story, though pretty anti-climactic. I just thought it was funny how many designer-y opinions were getting involved.


 But you don't have to worry about the stripe trim, I'm in the process of putting it on this crazy Ikea print. I really love it on this one too.


Show off your aprons....you have a week if you are lagging... drawing for a prize from Mama Stellato patterns! .... Be nice to everyone else... you know the drill.


You guys! I'm so excited about the puppet theater this month! It's going to be our most fully customizable project yet, and I can't wait to see what you come up with. Join us if you are new!


Saturday, September 10, 2011

LTTSA: Penguin Backpack- the Zipper

... dun dun dun!

Just kidding. This zipper is going to go in like butter. Let's do this thing.


We are going to start on page 55 where it says "Insert the zipper." (duh.) Putting together the front and back panels of the backpack is pretty straight forward, so we'll just push on through. The first time you read through the zipper part, it can be a little confusing, so hopefully my pictures can help you visualize it.


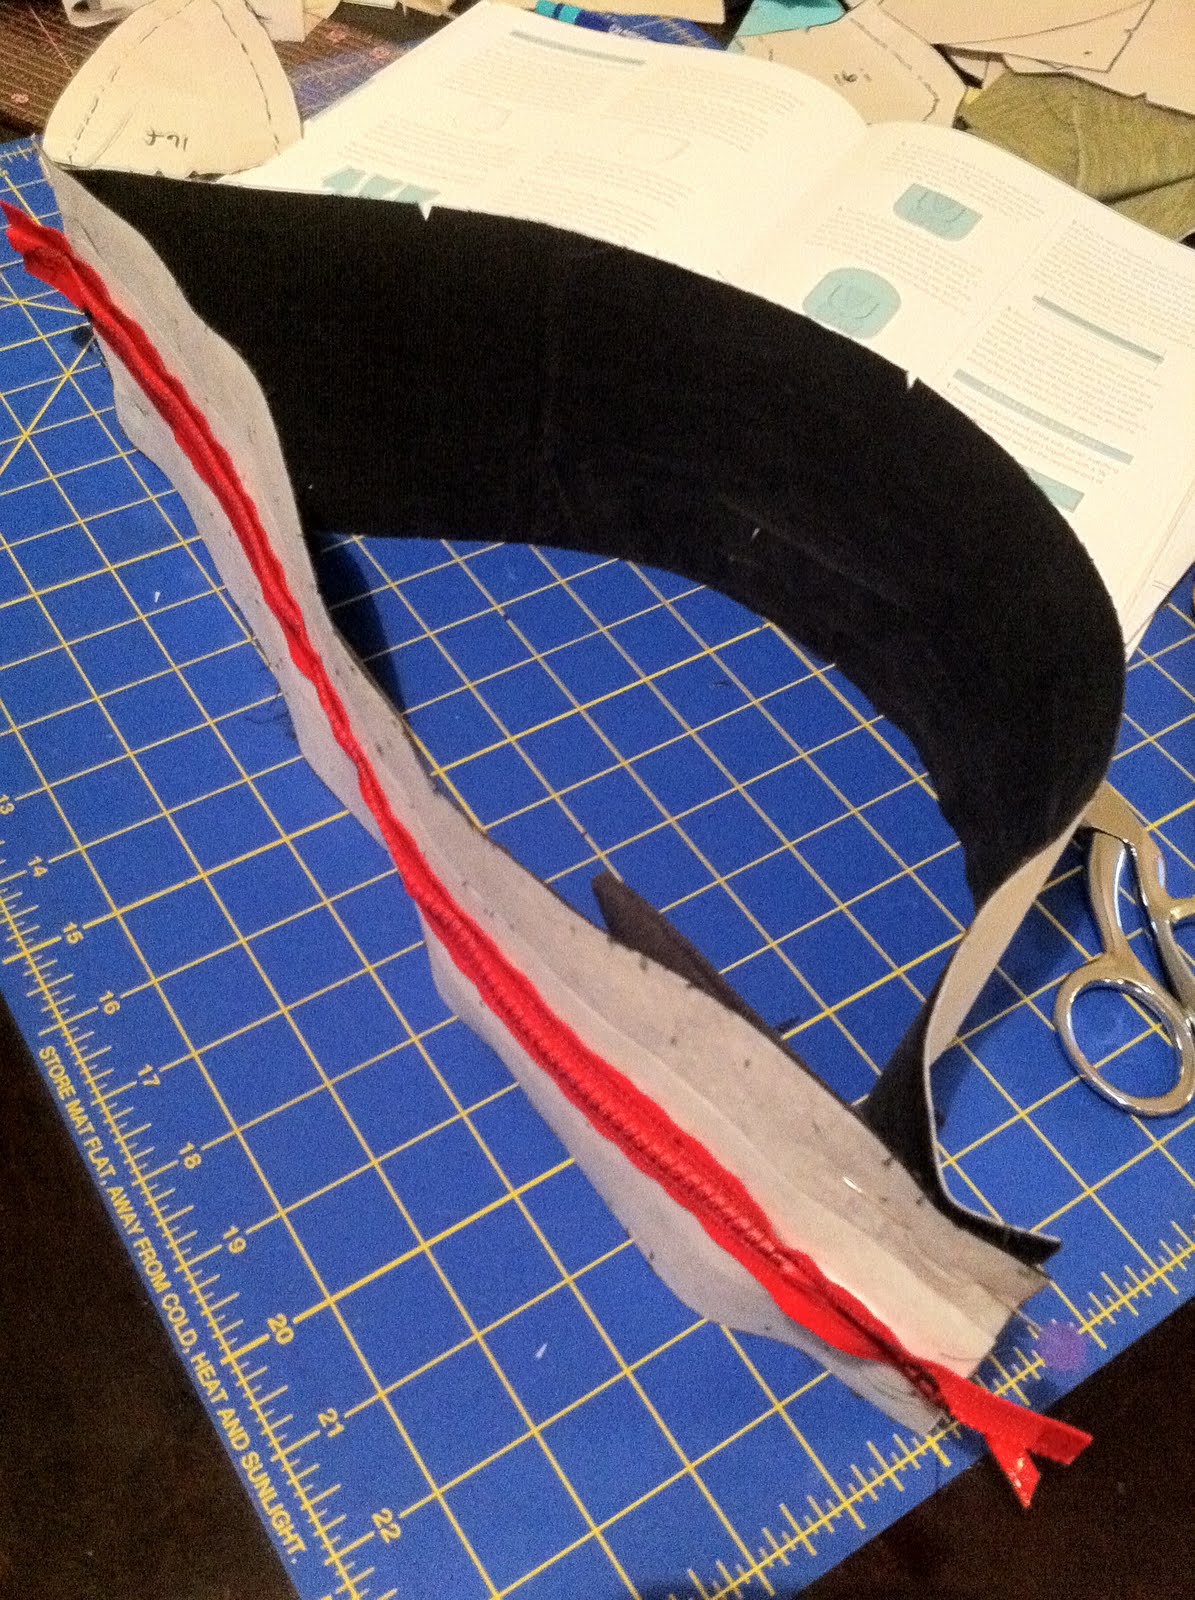
You need your two zipper panel pieces cut from the outer fabric and interfaced with that 1.5" strip. You can see mine are double interfaced. I'm using a thin charcoal gray corduroy, so I'm interfacing all of the pieces. And I chose a bright red sport zipper so that it's easy for little eyes and fingers to find.


Here's what the wrong side will look like after you stitch together the interfaced long sides and press seams open. This is just a basting stitch that we will be taking out later. So turn your machine up to the longest stitch length and don't backstitch the beginning and end. I also found it helpful to use contrasting white thread here because it was easier to see all the pieces when ripping it out later.


Now you are supposed to mark a line on the right side, 3/8" on either side of that seam. My fabric marker didn't show up on this very well, so I resourcefully grabbed a giant fat stick of sidewalk chalk. A bit cumbersome, but it worked and wiped off easily.


Now flip it back over and pin the zipper on, so that the top of the zipper is against the wrong side. We are just pinning it centered on that first seam, so that we can hand baste. This is not something that has to be pretty at all, you can see how huge and hasty my stitches are. But it would be nearly impossible to try to get the zipper and all the layers through the machine with pins. Don't try to skip this necessary step.            


Now rip out that first machine-basted stitch before you sew down the zipper. This helps things settle into position. 


Has everyone dug their zipper foot out of whatever chaotic drawer or bin it's been hiding in? Good. Put it on. Maybe you've never changed your foot before. That's ok, dig out your manual if you need to and figure it out. It's really not hard at all. As a self-taught sewer, I put this off as long as I possibly could in the beginning. But then I did it and realized it's actually worth doing, and it's easy. Same thing with changing your needle regularly. Anyway, we will have the zipper on the left side of the needle, so clamp down on the left side of the foot, as shown. Then you will just sew down the lines marked earlier on both sides.

Here's an extra tip- When you get a couple of inches away from the zipper as you sew toward it, stop and lower your needle. Then raise your presser foot up as far as you can and move the zipper back past it, then continue sewing. Then you never have to actually sew past the big part of the zipper. This is what I tried to show in the picture on the right, hope that makes sense. If you do this very carefully, you might even be able to go without the zipper foot. But I'd still recommend it.


You can see here that I ended up sewing another line inside of my first ones. This was because when I turned it over, there were places where the seam allowance did not get caught in the first stitch I made down the chalk line. It was no big deal to fix and now it's extra reinforced, but you might want to just sew a little inside of where your marked line is to make sure you catch that seam allowance the first time. Also, I obviously took out those big ugly basting stitches.


Now the only thing left involving the zipper is sewing it to the long outer side panel with the wings. I took a picture just to show that when you line up both short edges of these two pieces, they won't lie flat because the side panel is much longer. When you sew these seams, (you don't need a zipper foot now) be slow and careful so you don't run your needle into the zipper teeth. That would be bad. Just lift up the foot and move over the teeth, then continue. I actually backstitched before and after that long stitch over the zipper as well as at the beginning and end of the seams. 


Turn it right side out and admire your awesomeness! Zipper JUBILATION! Those wings placed there are pretty genius because they will make easy zipper pulls for toddlers. I'm so excited to finish this, it's pretty much going to be the cutest thing I've ever made.

Just waiting on those strap adjustors which I did have to order. (Boooooo Joann's)

So how's it going for you guys? Let me know if you have any questions about my zipper explanation. And please let us know if you conquer the zipper for the first time- It's exciting!


Wednesday, August 17, 2011

LTTSA: Bucket Hats, Part 3- Look, No Hand Stitching!


Ok, sorry if anyone has been waiting to see this method, I finally got myself together and here it is! It really went together even more swimmingly than I expected. I will always make this hat like this in the future. And I will preach the good news to all...


First, put together your two caps just like in the book. Then sew together the two sides of each brim, but don't sew the two brims together.


Instead, sew each brim to it's respective cap so that you end up with two separate hats like this. Use a 1/2 inch seam allowance still, finger press it down toward the brim, then topstitch the seam to the brim. You can see the topstitch well on my orange side.


Now turn one side wrong side out and fit it on top of the other side. Basically, just put them right sides together. Make sure you line up those side seams and notches on the outer brims.


Here is what the other side looks like.


Sew around the brim with a 1/2 inch seam allowance, but leave a three inch space for turning. When you leave a turning space in anything, it helps to sew off the edges like pictured here. This will make your excess tuck in very nicely once it's turned right side out. After you sew around, trim the seam allowance down to about 1/8 inch, except in this area.


Turn the whole thing through the opening. Finger press all the way around the edge of the brim so that the edge is turned all the way out and it's nice and flat. Use an iron to get your opening part tucked in and shaped right.


Top stitch the brim starting very close to the edge. This way, you don't even have to hand stitch your opening. (yay!) Keep topstitching every 1/4 inch or so up the brim. If you skip this part, the two layers will be too independent of each other. Plus it looks pretty.


Fully reversible, fully machine stitched. It's a little more wrinkly from the turning, but that will work itself out. 


I know a lot of you have made yours already, which is awesome! Isn't it great to look on the side bar over there and see them popping up every few days? Sewing along is even more fun than I thought. But if you haven't even started yet, don't worry. You have all the way until the end of the month before I'll do the final show-off post and everyone can link up their hats. In the meantime, maybe you can even whip up a few more this way. Hope it was helpful!