Wednesday, January 23, 2013

Merrily We Sew Along: Canvas Nesting Boxes

Have you heard of the book Improv Sewing by Nicole Blum and Debra Immergut? I love the idea behind it. There are a ton of projects (101!) in all categories of sewing that let you take creative control. It's a little less about following the instructions right down to the letter, and more about learning just how creative you can get with your sewing machine. Sounds fun right? And don't worry, if you are a person who prefers following the directions to the tee, all the info you need is there.

My friend and coworker Rachael is hosting a sew along through the book, casually covering one project per month. She's been gathering some really great prizes for the participants too.


So this month I was very happy to make these cute little nesting boxes from the book with her and Kelley. (P.S. Both of these women are all around crafty geniuses. You should follow them.)


I started with three pieces of plain canvas...one might even say blank canvas... which made me think of painting, so I went digging around the craft bin to see what colors of acrylics I had. I was very happy to find metallic silver! So gussy. So I painted the outside in the silver and added polka dots to the other sides using pencil erasers as my stamps. Now I really really want to try that on some pants for the kids or something. 

I did all the painting and let it dry before sewing of course. I was slightly worried it might be bad news to sew on all that paint, but it was fine. However, my bobbin shuttle was very sparkly when I cleaned it out afterward. 


After I finished I realized that they were completely reversible. I really dig it with the dots on the outside too. For stitching all the raw edges, I used gray 50 weight Aurifil thread and it matches the paint color perfectly. (Hey, isn't that one of our prize sponsors?)

The book has you stitch more brightly colored lines across the whole piece before you stitch the corners up for added structure. But I found that the dried paint made the canvas extra sturdy and I didn't need to. This let me keep the dots uninterrupted.


This was such a fun and satisfying little project! It uses such a small amount of fabric- all your need is about 1/3 yard cut of canvas. It would also be fun to try it with brighter colors of duck cloth and contrasting threads.

I'm mostly glad it reminded me that I should probably think of more excuses to paint on random things!


Are you inspired to stitch up your own canvas nesting boxes?? we would love for you to sew along with us (merrily, even).
merrily we sew along


... you should definitely check out the boxes made by the sew along co-hosts. They are all so different!


Make your own a set of canvas nesting boxes and share a picture in the merrily we sew along flickr group for a chance to win a super fabulous prize!!

speaking of prizes, episode three: canvas nesting baskets is sponsored by the very wonderful Aurifil Thread and Storey Publishing!


the winner of the merrily we sew along episode one challenge will receive a Folk Art Aurifil 12wt wool 12 spool large collection case, as well as a package of these five sewing books from Storey Publishing: Improv Sewing, One-Yard Wonders Fabric by Fabric, Mend It Better, Grow Your Handmade Busniess, and Sew Up a Home Makeover. how great is that??

so get improv-ing... i can't wait to see what you stitch up! just upload a picture of your canvas nesting boxes to the merrily we sew along flickr group by february 28 to be entered to win!!


Monday, January 21, 2013

Scrappy Trip Confession


Scrappy trip along


Yes, I'm doing this too. I almost feel guilty and weak about it, because at first I swore I wouldn't succumb to the craze.  Then one day, without putting in much thought, I just grabbed my entire stash of blue fat quarters and began cutting them up in order to join in the #scrappytripalong that started spontaneously on instagram. 

It's fast and fun and satisfying each and every time a block is finished. It's based on this great tutorial. However, it's not so fast if you decide to make 56 of them for a queen sized quilt.


I'm now halfway there, with 28 blocks done. The top picture is my first 16, but after that my Lizzy House Pearl Bracelets arrived and all the blue ones were immediately cut up, along with some blues from her Constellations line, which I got at Sewn Studio. I'm loving the blocks even more with all those mixed in now.

I'm hoping I get to make more progress next week, after I finish the new baby quilt I shared with you last week. Sometimes it's just fun to join in, no pressure, no prizes or deadlines. Lots of people are finishing up their quilts now- check out the Flickr group for lots more inspiration. Or search the #scrappytripalong tag on IG. (I'm alittlegressica)


I also wanted to let you know that if you're a newer quilter in the Cincinnati area, I'm teaching a class on this block on Saturday February 9th at Sewn Studio. Check out their site and call the shop for more info.


Friday, January 18, 2013

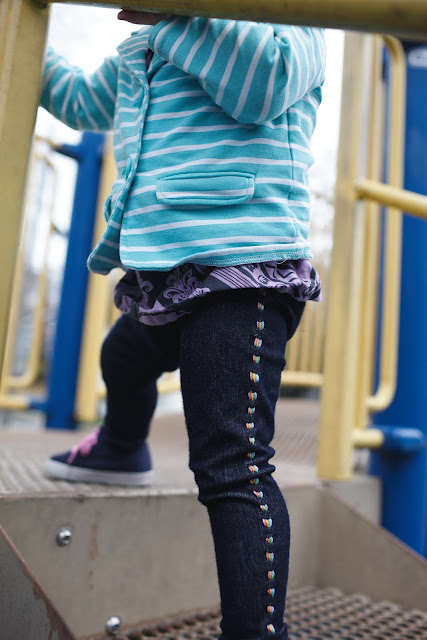
Rainbow Road Leggings


This post is part of the fantastic Stretch Yourself series hosted by Miriam of Mad Mim and Miranda of One Little Minute. (I feel like they should have called it "Mmmm... Knits." But that's actually not very catchy. This is why I've never hosted a series before. I actually suggested to a friend tonight that she call her series Fashion Unicorns. I was mostly serious.)

Today I'm talking about embellishing a basic. For the past few months I've been kind of fixated on hand embroidering designs onto knits. It's not something I ever would have taken the time to do when I first started making my kids' clothing, but now I visualize stitches on everything. And when it comes to stitching onto stretchy knits, it's not as problematic as you would think. All you have to do is be careful not to stretch too much as you stitch.


Leggings are kind of the ultimate knit basic for girls this time of year. I wish I had 3 dozen varieties of them for my daughter Elsie, all hanging in the closet on one of those automated tie racks. I made this pair using the Go To Leggings pattern, which was so great and has some wonderful options and tips for knits. I so enjoyed this pattern and will use it for years, I'm sure.

The hand stitching was really not as time intensive as you might think, and the small detail adds big appeal.


First let's talk about the supplies. You will need a hand stitching needle with a large eye, like pebble or tapestry needles. You can use regular embroidery floss or perle cotton. These are inexpensive and fairly easy to find. I've been growing my small collection of thread colors and now I usually have what I need on hand. My little rainbow consists of pink, orange, yellow, green, blue, and purple. 


Put your legging pieces together and hem the bottoms. Do not put the elastic waistband in yet. Press a nice crease into the sides of the legs. 


Thread your needle and knot the end of the thread. Starting where the crease meets the stitch line on the hem, bring your needle up through the wrong side. I began with green because that's in the middle of my rainbow.  


Go back into the fabric about 1/4' up and go in and out a couple more times before pulling the needle all the way through. This is called a running stitch and it goes pretty fast because you can do a few at a time like this. Just make sure you are only going through one layer of your pants!


Here is what it looks like after you pull the needle through. I use fairly large 1/4" stitches here so that they are more visible on the pants. 


Continue until you reach about 1.5" from the top. Tie it off on the wrong side with a knot.


Start with your next color and use your first line of stitching as a guide to where the needle goes in and out. I did the blue and then purple on the front side, then went back from the green with yellow, orange, and pink.


 This girl.

Trouble.


And since I know you are going to ask, that super cute blazer is from Target, I didn't make it. But I'd love to try making this pattern with a knit.


Now you can head over to check out the (Whoa, infinitely more talented than me, wtf?) super lovely Lladybird for something a little more grown up. Not that grown ups can't wear jeggings with rainbows stitched up the sides, they totally can. And should.


125

Wednesday, January 16, 2013

Something Sweet and New


One thing I want to do on the blog this year is show more of the process. Take things slower, make the time to show the unfinished and the small decisions along the way. I always like reading those kinds of posts when other people do them, but I guess I never think to take the time unless I have something shiny and finished to show. But the truth is, unfinished is much more true to my life and has much greater potential. 


So this what I've started this week. A new quilt for a very old friend who is having her first baby. I started with sweet pinks and aquas and golds, then added a couple black/white and gray prints for an unexpected edge. I used almost entirely scraps, but also cut into a couple of fq's from my new bundle of Lizzy House's Pearl Bracelets. They just make everything better. Everything.

I've been wanting to do a more traditional dresden design ever since making my Old World quilt a couple months ago. And it seems perfect for the vintage feel I want here. They are really fun to put together and relatively fast once you get all the blades cut. (You were right about that Maureen!)


The quilt will be about 45" square and have four large dresdens. I have 2 done and 2 more sitting in these very appealing stacks. They are screaming at me to finish them. Tomorrow I'll take one of the finished ones into work and pick out a background, a backing and binding. As one would expect, it's very convenient to work in a fabric shop for many reasons.

We have a couple new low-volume prints in that might be just the thing for the background. The colors would have to be just so to work with these, so we'll see if I end up defaulting to white. Maybe a very pale pink if I go the solid route? More of that floral Liberty print might be really nice for binding. Can't wait to show you the finished product!


Monday, January 14, 2013

2012- a (slightly tardy) Review

I learned a lot in 2012. 

Putting it together here is satisfying and a little nostalgic- is it possible to be nostalgic about things that are relatively recent? 


The nostalgic part comes when I think about competing in Project Run & Play in the spring. It was one of those things that was good for me in every unexpected way, but I'd never want to go through again. Winning was a very happy surprise, but definitely not the best one. I gained so much more just from having the excuse to push myself creatively and focus my mind that completely on the task. And I got the chance to learn how many cheerleaders I have. Really really good ones.

The bottom half of the mosaic above is all the looks I've made for Film Petit with Kristin (Who turned out to be another fantastic surprise resulting from my PR&P experience.) I love doing those movie-inspired looks each month. We have more fun with those than should be allowed. There are no plans to stop them any time soon.


I finished 9 quilts this year. Three went to charity, three were gifts, one was my own pattern for Sewn Studio, one was for display in a big quilt show, and one was just for ME. I want a lot more of this in 2013. More quilts in each of those categories please. 


And here are just some of the smaller items I made. I'm a little hooked on gifting quilted pillows at the moment. I need to make more for my own couch this year.

You'll notice the sewing-my-own-clothes category is still appallingly absent. 2013 is the year. (Man, I'm really trying hard to be more selfish, huh?)


There were a lot of other clothing items I made for my kids this year that aren't shown here. After PR&P I was suddenly "known" in the tiny world of kid clothes bloggers and I did a gajillion guest posts and blog events. It was fun, but sometimes stressful. As I think about what I want this year to look like, well, I don't want that. I'm not trying to complain or sound ungrateful to anyone who had me participate in their awesome events. I just don't feel the need to say yes all the time anymore. I'm not a person that likes to be overly busy. Some people do really well at that kind of thing, but I don't at all. I need to leave a lot of extra room in life. So that's what I'm gonna do this year. You will still see a couple of those events coming up, and I don't regret doing those. I'm just gonna stop now. I'm just gonna sew what I want.

So I guess if I were to do that hip thing where you choose one word to characterize your focus for the year, mine would be... SELFISH.

....

....

....

Wouldn't it be awesome if I didn't say that I'm kidding? I'm half kidding. The actual word would be simplify. I want to get rid of the things that are just taking up space, in my home and in my mind. And, you know, make room to be more selfish ;)


Friday, January 11, 2013

Flashback


Today I'm at Sew Much Ado sharing some snippets and stories from my sewing past. Have you seen this series yet? It's been really fun to read thru everyone's posts and learn something a little more sentimental about all your favorite bloggers. Good stuff.


And for those in the Cincinnati area, I wanted to let you know that I'm teaching a 2-part class at Sewn Studio on January 17 and 24 on how to make the Oliver & S After School pants pattern. It's a great basic for boys and girls, and you'll learn some new skills. Call 513-321-0600 to sign up!


Tuesday, January 8, 2013

The Christmas Gifts- Quick and Dirty

Not that the gifts I made were particularly quick and/or dirty. Hopefully, none were dirty. But I  figured I'd run them all down in one post today so we can all just move on with our lives already. Christmas, you are SO OVER right now.

So early on in December I made the decision that I wasn't going to stress myself out trying to sew everyone an amazing gift. Definitely no full quilts for anyone this year. (Last year there were two. Rookie mistake.) I also decided to sell the Charlie Brown ornaments in my Etsy shop. They had become so popular that it just seemed really stupid not to do it to earn some extra Christmas cash. I did earn some good cash, but I also didn't have much time to sew the gifts I did want to sew for people, therefore we spent more on Christmas. Catch 22. But it was a lovely Christmas, and now all that Etsy money will be used for our trip to Vegas next month to see my younger brosef get hitched. Exciting! (P.S. The shop is back open, if anyone wants a head start on next year.)


This one was actually a birthday gift for my mom. She turned 60 last week, and I turned 30! We had a really nice family celebration and she loved this pillow. Now I can't stop dreaming of a whole church dash quilt.


This doll quilt was for our best friends' daughter, Lily. (You may remember some of her modeling from PR&P.) Lately when she comes over to play, she is always carrying around the Grinch placemat as her "camping mat." She dances with it, uses it as a cape, a stage, a magic carpet. So I knew she needed her own. I used all scraps plus a fat quarter that came from Delia on the back. (Thanks Delia!)


This one is for their son Ryan. It's actually a 16" pillow cover, but I hadn't gotten the form yet when I took pictures. He LOVES Sonic. Which is kind of hilarious for a 5 year old in 2013. I love the way the felt appliqué looks on the Julia Rothman Type print I got at Sewn. 


I made four of these boxed-bottom zip pouches for Hendrix's teachers, but all I got was this late night IG pic of a couple of them. I really wanted to keep the triangle one for me. 


Lastly, an exciting gift for me! My mom got me a FQB of Lizzy House's Pearl Bracelets for my birthday. This is definitely my favorite print ever and I'm so excited to have every color. I've already used up 6-7 of them. We found them still in stock at Fresh Modern Fabric, although I think they only have the half yard bundles now... which I might go back for soon!