Saturday, January 30, 2010

Baby Gift: Fabric Blocks

I made these yesterday for friends whose adorable baby boy was born last month.


Please don't ask me his name, that's private...


They are easy to put together, just a lot of squares to cut. It's basically this, plus the letter appliques. 


And I put jingle bells inside. 


"Hey, when are you going to make me something?"

Thursday, January 28, 2010

OBSESSED WITH: Faux Bois


French for fake wood, (that's just a guess, I'm just pretending to know French to impress you,) the trend has been around for a while, but I love it more and more...


1. Wristlet from JLStephens Couture
2. Pillow on Apartment Therapy
3. Bookshelf makeover on Imacookoo
4. Memo board from Ekoh Design
5. Gift Box on CraftStylish

Want more? There is an entire blog devoted to it!

Tuesday, January 26, 2010

Sweater Sleeve Accent Pillow How-To

I was working on sprucing up the guest room/ craft room last night, (remember this mess?) and I made a few pillows. I really wanted to do one of those pretty sweater pillows, like this one, but both of the old sweaters I wanted to use already had the bodies chopped off and made into other things. So I made do with the sleeves, and I love the way it turned out!


It's very quick and easy, here's what I did:

You will need 2 contrasting sweaters- at least the sleeves, stuffing (I ripped open an old pillow for mine), and a button or some other type of embellishment.


First I took my black sweater (already just a top half) and cut the  sleeves away from the collar. I tried to cut as close as I could to the collar. Then I opened them up by cutting open the seams on the bottoms- you know, the one that goes from the armpit down. Then I just stacked the two pieces I had left and cut the largest rectangle I could get out of the them- looks like it ended up being about 18" by 9"


Next I cut the sleeves from my white sweater. It is best to use sleeves that already have cuffs for this, but you could also just cuff them yourself.


Unroll both the cuffs and stuff one side into the other. Make sure you shove it deep enough so that when the cuff of the outer sleeve is rolled back up, it looks like it's right in the center and everything is even.


Now sew a seam thru it all right behind the fold of the outside cuff. You will be sewing thru four layers of thick sweater, so if your machine is finicky, you might want to hand sew it. Turn your cuff back over to hide the seam.


Now make a sandwich with your two outside pieces right sides together and the other sleeve piece in the middle. Pin and sew around the outside with a 1/4" seam allowance. Be sure to leave a few inches open on one of the long sides, and backstitch on either side of it.


Now is a good time to cut off the extra bit of sleeves hanging out.

My camera battery died here, but you know the rest. Turn thru the opening you left, stuff, and hand sew shut. I like to use a ladder stitch, which I learned how to do here.


Finally, add a cool button or other pretty embellishment to the middle of your cuff. I used this great button with an anchor on it that came off of an old navy pea coat (not Old Navy, but the actual Navy). I think it's perfect for the black and white pillow.


Best part- $0

Sunday, January 24, 2010

Chocolate Covered Clementines

I'm not one to think of new concoctions on the fly in the kitchen, but today...


...mmmmm. Brilliant.

Saturday, January 23, 2010

Duvet to Curtain How-to

Apparently, I haven't posted for almost 2 weeks- whoops. What a slacker.

I'm going to attempt to do a semi-instructional here, so hopefully you can understand what is happening in these bad pictures.

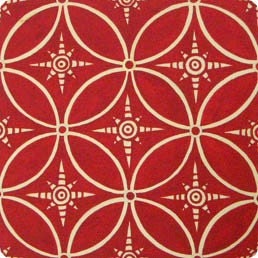
We've lived in our apartment for over a year now. For most of that year, we used a big red duvet cover from Ikea nailed into the wall to keep the light out from the window behind our bed. Pretty classy.

Then I finally thought, "Hey, I could probably make that duvet cover into 2 panels and we could actually have curtains on both our bedroom windows!"

I realize this would be very easy for any sewer to figure out, but here's how I did it:


This cover is queen sized I think. It would probably work better with a king, but for our windows, this was just barely wide enough. Since I'm so exacting, I measured by folding it in half and holding it up to the window just to make sure. Then I ironed a crease down it length-wise so I would know where to cut.


When cutting down the crease, I would NOT recommend spreading it out over your lap like I did. Overcome your laziness to clear a spot on the floor large enough to lay it flat and then cut. As you can see, the other way is just plain awkward.


Now turn the panels inside out.


Line up the 2 layers of the cover on the side you just cut and pin down the length. You might be tempted to skip this, but since you are sewing down such a long length, the layers could get misaligned easily. Or maybe I'm just an amateur. 


Sew from the bottom of the panel to the top. Leave about an inch and a half open at the top and backstitch to secure. (You might leave more or less space then this, depending on what you are hanging the curtain on. Or if you use those curtain tab things, you don't need to leave any space.)


Turn the whole thing right side out through the opening at the bottom where the duvet went on.


Now you could ladder stitch that bottom opening closed or something, but I just ironed it under. No one will examine the bottom of the curtains anyhoo. 


Back at the small opening you left at the top, stitch the little seam allowance under so it doesn't peek out on the curtain rod.


On the other side of the top, make another little opening with your seam ripper and stitch the top of that one under as well. Repeat on the other panel and you are done!


Red in the bedroom is saucy, no?


I almost made our bed for this picture, but who wants to live a lie?

I think they will look better with some sort of tie. But putting up curtains is always so satisfying to me. It's the easiest way to make a room look more complete. 

Monday, January 11, 2010

Free Paper Playthings

I'm finding papercraft everywhere these days, particularly toys.

HG is still a little young to appreciate such delicate fun- he would enjoy eating these toys though. Luckily, many of these are just as fun for grown-ups. Just print and fold.

I found the Toymaker a while back. She has beautiful 3d animals, story characters, boxes, and lots of holiday fun, like this little Valentine delivery elephant.


But my ultimate favorite is cubeecraft which has tons of movie, tv, and other pop culture characters, cubified. You can make this Fezzik from the Princess Bride- I mean, come on!


And of course, another little girly-girl treat that makes me hope HG gets a little sis someday. Fantastic Toys Etsy shop has adorable pdf characters, nesting dolls, and even entire multi-room dollhouses. They aren't free, but very reasonable. But you can get some great free stuff from their blog, here. 


Find beautiful print-out pinwheels here.

This site has many more woodland and mythical creatures in the cube style.

Really zany ren and stimpy-ish characters here,

and musical figures and more at toy a day. (My favorite there is Ziggy Stardust!)

Have Fun!

Thursday, January 7, 2010

I'm the Veener!

I actually won a giveaway! I never normally enter those giveaways on craft sites, partly because most of the time it's nothing I'm interested in winning, and partly because there are always like 300 entries and what's the use anyway...

But this was something I really wanted to win- a free online art workshop with Alisa Burke! Her style is so unique and fun- I'm really excited about doing the class. I've decided to try the Recycling Remix, which is basically about turning trash into art with supplies around your house. I will definitely be showing you what I learn and make.


In unrelated news, I bought a bit of new fabric yesterday. Well, it's more like loads of new fabric. But it's ok, because I had a gift card to The Needle Shop. Some wonderful friends got it for my birthday this year- all because my overachieving husband threw me a surprise birthday party and told everyone he invited to get me fabric/ gift cards for fabric. He is pretty good.

Anyway, I'll have to tell you more about that later, but here are my new beauties:


Kokka Echino Etsuko Furuya (japan)


Antler Damask by Joel Dewberry


Dolce Buds by Tanya Whelan


Suzuki by Alexander Henry


Lotus by Amy Butler


Del Hi Paisley by Valori Wells


Tablecloth by Anna Marie Horner


I CAN'T WAIT TO GET THEM!

Wednesday, January 6, 2010

Uber-cool coasters

My little bro made me something! Well, him and his awesome girlfriend. One might assume that she probably did all the craftiness, but I think he worked really hard, because he was soooo excited to give them to us :)

Anyway, they MADE little birdie stamps out of rubber erasers. How resourceful! This is the wonderful outcome:


(You can see from the lovely rings how well we take care of this end table- we really needed these!)


Brilliant! I'm guessing they were inspired by my love of all things avian right now and my husband's new arm tattoo. (Which my grandmother so tactfully referred to as an ugly blob when we were in FL. Hilarious.) My brother and his girl are so smart!

Sunday, January 3, 2010

Wild Play Mat


Last homemade Christmas gift post, I promise... until next year.

Our best friends' son is 2 and loves playing with little animals and dinosaurs. So I made him this play mat for all his creatures.


It has a cave and a volcano with lava that spontaneously attacks zebras.


And it packs up all the animals with just a pull of the ribbon for easy cleanup.


And I put his name on it for fun.


It is basically a hybrid of this one's landscape and the construction of this one.

I'm really liking all the stuff I've been doing with felt lately. It's really fun to cut and sew and no hemming required!

I'm hoping to make this very cute felt Mr. Potato Head soon.

Ok, now back to watching Burn After Reading with Nick. My brother got it for us for Christmas, which was very smart of him. We also got Once and the second season of Flight of the Conchords. Lots of good viewing this new year :)

Oh, and my resolution is to get back into reading books. I used to read all the time before HG was born, sometimes one or two a week. I burned through Water For Elephants this past week during our vacation and enjoyed myself so much that I was literally sad when it was over- even though the ending was really good. If you haven't read it, you should. And if you have read it, how perfect would Daniel Day-Lewis be as August for the movie?!?!