Tuesday, December 3, 2013

Gingercake's On the Go Organizer (Giveaway)


I hope your Thanksgiving was as great as mine. Last week was full of carefree family time and high-calorie meals. But when I woke up back at home Monday morning, I realized it was December 2nd, and I was completely unprepared for it. Damn you, late Thanksgiving! I'm not usually a person who lives my days in checklist form, but now it's time to get serious. 


At least now I have one gift checked off, thanks to Virginia of Gingercake (and a second cut out!) This is her On the Go Organizer, which might now become my go-to quick gift this year. It was so fun to pick out coordinating fabrics from my scrap pile and come up with a really polished finished product, thanks to a thorough and enjoyable pattern. I found this old piece from AMH's Innocent Crush line which is probably one of my favorite prints ever. I had just enough for the outside of my organizer.


The inside pocket is RK's Essex linen in black, same as the contrast on the outside. The lining and pockets are more little scraps. I love the way the pattern has you zig-zag stitch the pockets on. So much less bulky!


This will be a teacher gift that I'll probably fill with a couple of goodies like this. There are so many different uses for an organizer like this, and I think I'll eventually need my own since I might be the most unorganized person I know. 

It's nice and sturdy with layers of interfacing and batting in the middle, and I had to use my walking foot when it came time to put it all together. But even then, I broke my needle into three pieces while topstitching and I'm pretty unhappy with my stitch consistency. This is not because the pattern uses too many layers though... I think I'm finally realizing that it's time to upgrade my machine. I think saving up money for a Juki needs to be my big goal in the new year. It's exciting to think about purchasing my own machine, because I didn't get to pick out the two I've owned so far. They've been great to me, but I do A LOT of sewing and quilting. I need a real workhorse!


Anyway, another thing I really love about this pattern is the cute button closure. I didn't have any elastic cording, so I just used this aqua fold over elastic, which worked great. I think a long piece of leather cording wrapped around the button a few times would also be really cute.

Want to win your own copy of Gingercake's Organizer PDF pattern? Just leave a comment and your email. I'll pick a winner Friday, December 6. Also be sure to check out Gail's beautiful organizers, and look around the Gingercake pattern shop for more wonderful gift ideas.


Thursday, November 21, 2013

Film Petit: Zoolander


2001. Freshman year of college for me, and the peak of that period in our rich American cinematic history when funny things that should have been only as long as an SNL sketch got made into full length features. It was the the hey-day of my generation's stupid comedy. Jim Carrey was starting to do horror movies and trying to win awards, meanwhile Will Ferrell was in everything I called funny.

My roommate and I (hi Kira!!) probably watched Zoolander twice a week that year, at least as background noise to homework. And yeah, it was on VHS. (Damn, I'm old. I don't even know who the new Will Ferrell is right now, and I don't care.)


If you weren't a college freshman in this ridiculous time and you didn't have a fine appreciation for the types of movies I'm talking about, then proceed with caution. This isn't one of those FP's where we stand convicted that everyone's life would be made richer by viewing the movie we are paying homage to. If you see it for the first time now, you may think it's the dumbest thing you've ever seen. Or you may love it. But there are no guarantees. So let's proceed with the one-liners. 


Derek Zoolander is played by Ben Stiller as a "really really ridiculously good-looking" male model at the peak of his career. These ain't no Slashies. He's expecting to win his fourth male model of the year award, but he's upset by rookie model Hansel, played by Owen Wilson, so hot right now. After that and the devastation of losing his three male model roommates in a tragic gasoline fight accident, he decides to retire from modeling. Until designer Mugatu (Will Ferrell) finally wants to hire Derek to be the face of his new "homeless fashion" collection. But it's all a plot to brainwash Derek to kill the Prime Minister of Malaysia (the claymation dude) because he's outlawed child labor. "My name is little Cleetus!"

Oh, and there's a Derek/ Hansel walk-off, judged by David Bowie. "Listen to your friend Billy Zane."


The scene I reference in the graveyard is actually the funeral for Derek's three gas-fighting, Wham-listening, orange-mocha-frappucino-enjoying friends. Derek is giving the Eugoogoly, when he is upstaged by Hansel's entourage entering. So hott right now. He's wearing this ridiculous shirt and I just knew I had to make one for Elsie. 


I used the Bimma Sweater pattern by Lou Bee Clothing. I loved it! This is such a cute and original style. You can it with a big cowl attached, a hood, or a smaller shawl collar. I used the shawl option in a size 3 for this, but I can't wait to try the other styles too. I found this weird fuzzy yarn at Joann and just hand stitched it sloppily onto the shirt. I love the way it just hangs haphazardly on the sides. Elsie was mostly jumping off gravestones, but she occasionally found time to work her Hansel shades for the camera too. 


Which reminds me, am I a horrible person for taking my kids to the graveyard for pictures? And is it weird that they enjoyed this setting far more than any other photo shoot ever? They were running around hunting ghosts the whole time. Oy. 


Although he's not a big part of the funeral scene, I really wanted to include Jerry Stiller's character Maury Ballstein. He owns Derek's modeling agency, Ball's Models and is working in cahoots with Mugatu. And he's got a prostate the size of a honeydew apparently, but I didn't use that for Hendrix's acting notes.


Maury is always wearing some sort of crazy tracksuit, even if it's a gold one to a big awards ceremony. Alas, Joann had no gold velour! Not even an ugly paisley print. But I was set on velour. 


So with brown and teal velour, it turned into something off the set of Freaks and Geeks, but the styling is all Maury. By the way, velour is not the most fun I've ever had on my sewing machine. Use a lot of pins, iron on a low setting, and turn your presser foot pressure down really low. Those are just some tips, because I know Hendrix is gonna be bringing velour back on the sewing blogger scene. He loves this outfit. He said he couldn't wait to wear it to school to show his friends. 

"It's a casserole Sheila! IT'LL KEEP!"


The pants are size 6 Oliver & S Art Museum trousers. Did Liesl ever envision them in velour with piping down the sides? I don't know, but they really are a great basic pant shape for this kind of stuff. Of course I left off all pockets. Welts in velour? Ouch. 


The shirt is size 6-7 raglan tee from the book Sewing for Boys, with added front kangaroo pocket, waist and sleeve bands,  and "collar." I put that in quotes because it ended up being a disaster that could barely fit over Hendrix's head. I was sewing late at night and didn't want to figure out how to do the placket this top needed. So I just stuck the collar right on the neckline. I'll take it off later and just put a ribbed neckband on so he can  actually wear it often. Let this be a lesson: some of what we do here on Film Petit is poorly sewn and just for effect. Or maybe I should day some of what I do on Film Petit.  

My favorite thing is that early 80's knit piping on the shoulders. Knit piping is hard to find, but I actually got this stuff when I visited Kristin in Portland this summer. 


It's been a while since the last Film Petit, and I forgot how crazy fun it is! Thanks to Kristin for kicking my ass back into gear. Her kids reenacted the walk-off scene between Derek and Hansel and they are working it. Hilarious. Ambi-turning and everything.

And this time we had SO much fun working with Rae as our guest! Of course, everything she does is stellar, so seeing her take the idea of FP and run with it was such an honor. Her son Elliot knocked it out of the park with award show Hansel. THAT COAT!!! Check it out here.


Now that we are back in the habit, we have a couple more Film Petit plans in the work. To see all my older FP posts, go here, and see all of Kristin's here.

Thanks for being such great Film Petit fans! You guys make it so fun for us when you get excited about these posts :)


Wednesday, November 20, 2013

Simple Sewing Blog Tour and Giveaway: Lunch Sack


I love my new lunch sack! I made it using a pattern from the brand new book Simple Sewing by Katie Lewis of the Red Kitchen. It's a basic boxed bag with an open top that could really be used for so many things besides lunch. But I actually needed mine to be an extra cute lunch bag for me to take to work. Because when you work in a cute fabric store, your lunch sack should be adorable and home sewn, right? 


The hand-embroidered banana applique has a little story. I usually forget to bring a lunch to work, but I'm trying to get better at remembering. (Hopefully having something cuter than a plastic bag will help.) So I often end up getting a snack from the great local coffee shop we have next door. Whenever a coworker is the one making a snack run, I always say I just want a banana. And they make fun of me for it. As they probably should. Believe me, I'm no healthy eater. Just putting on airs at work I guess. Also, I'm cheap. 


Besides the embellishment, I made a couple other small additions to the bag. I lined it in laminated cotton. I've had this print laying around for over a year with the intention to recover our cheap kitchen stools with it, but that's never gonna happen. Plus Elsie peed all over one of the stools the other day and it went in the trash! Anyway, it will be nice to have a wipe-able inside on my lunch sack. I also added a layer of Pellon Insul-brite on the inside. I mostly eat dinner leftovers for lunch (along with the bananas) so the insulation will be handy.

The laminated lining gave me another idea- this would make a perfect thread and scrap trash bucket in my sewing room! I could make another one to throw all that stuff in and then it will glide right out because of the lamination. It would probably be better than throwing it all over the floor every day.


This book is truly perfect for beginners. Every single project has a picture for every single step, which is a huge help when you are just starting to sew. And the projects included are simple but so useful and cover a wide range. Baby stuff, kid stuff, accessories, decor, etc. It would be great to buy as a gift for someone you know that wants to get started and needs some guidance. 


So would you like a chance to win your own? Just enter the giveaway below! Also make sure to check out Andrea's cute hand warmers from the book on The Train To Crazy. Perfect little Christmas gift project.


a Rafflecopter giveaway

Tuesday, October 29, 2013

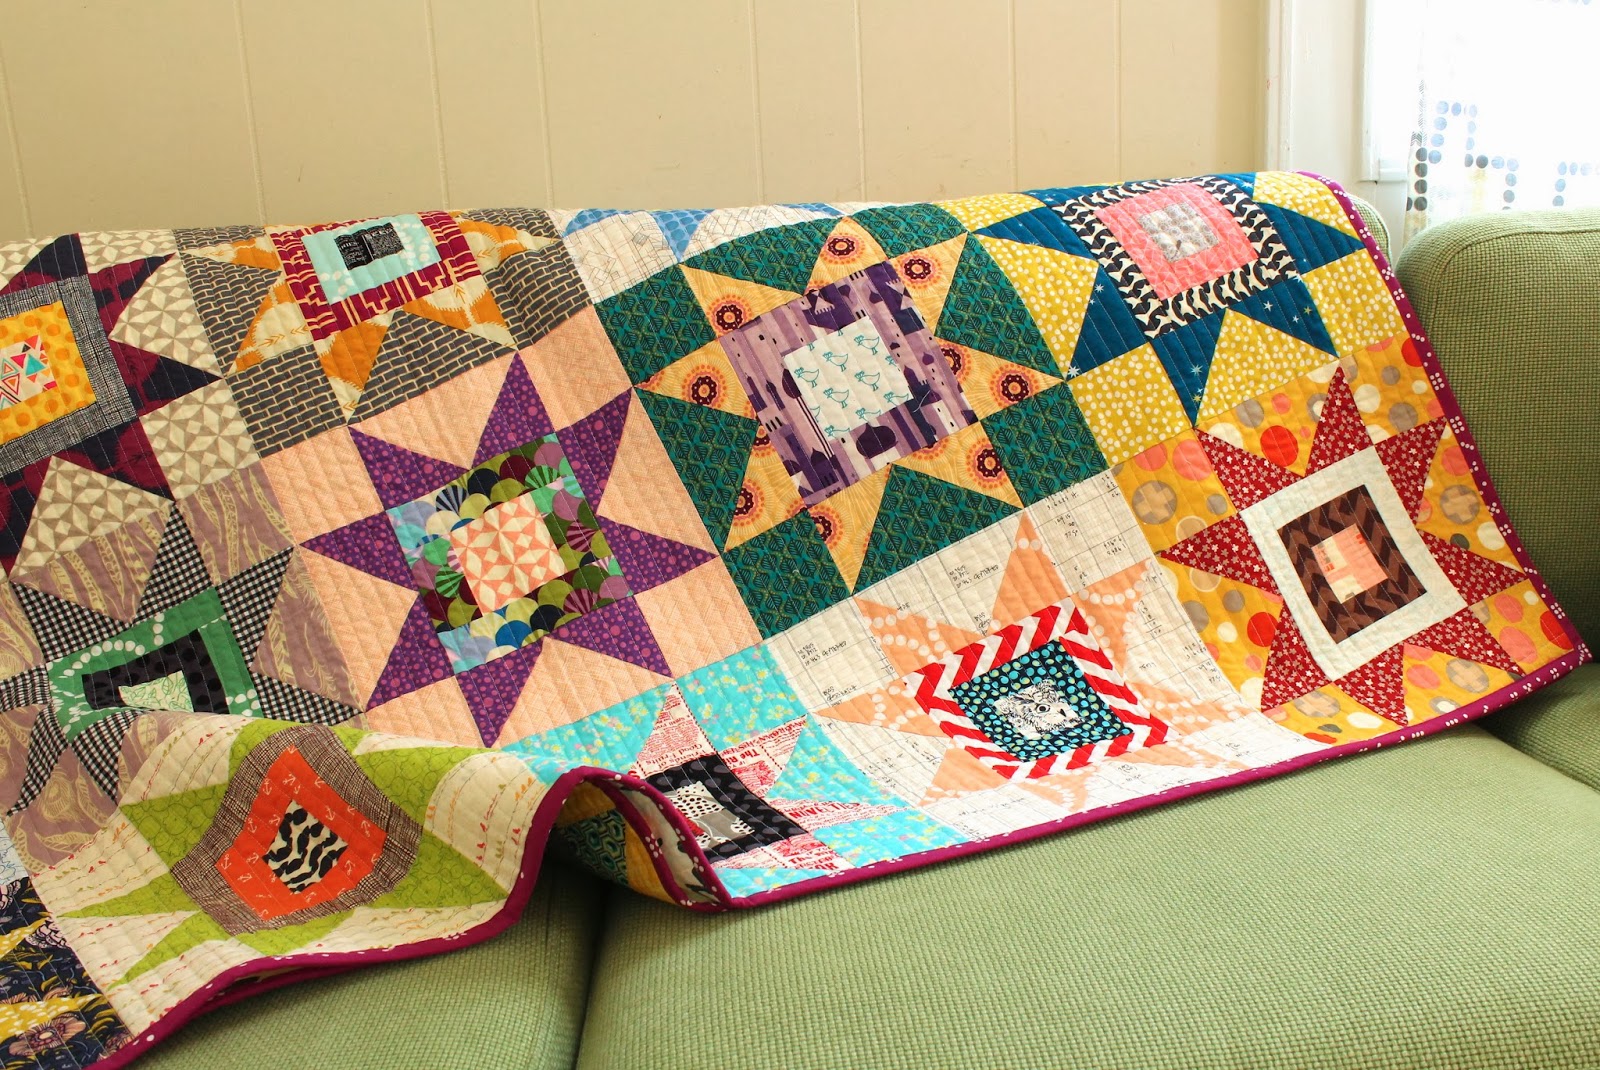
Blogger's Quilt Festival: Scrappy Stars for Ruth


I started this project back in May (or maybe June?) I knew it would be a slow-burner that I took my time with. I really like having a project like that always going on in little chunks between the other things I finish more quickly. It's soothing and satisfying and eats thru the ever-growing bags of scraps. 

This one is just for Ruth. Ruth was one of my very best friends from 7th-12th grade. She is one of those people who everyone loves, and I was lucky enough to hang out with her constantly during my formative years. She was a big fan of the scrappy + & x quilt I made last year so she asked me to make her a crazy colorful quilt like that. For her? Of course. 


The block design is from Elizabeth Hartman's first book, Practical Guide to Patchwork. I just treated each block as it's own color story and pulled fabrics from my scraps, trying to use a variety of values for the backgrounds and star points.


 I also put my flying geese for each block together using the no-waste method instead of the traditional way.  I was always especially excited when I got the directional prints to all point the right way using that method. Like those lions. Geese victory!


The backing fabric is not the most original choice these days, but it's just too perfect for a scrappy quilt like this. The large script print is from Ikea and looks so striking on the back. The quilting is just dense straight lines made with my walking foot, about 1/2" apart. The feeling and look of that quilting is always worth the extra time to me. I took these pictures before washing the quilt, but man-oh-man was the crinkle awesome after I washed it. 


The binding is Domino Dot in Jewel by Violet Craft.  I love the way that color tied things together. And dots always look nice in binding form, I think.


I would have been finished with this quilt a little sooner had I not made really stupid mistakes with the backing. With the wide Ikea selvedges left on, the backing was exactly as wide as the top. So I went ahead and pin basted it without adding any wiggle room. Not a wise choice when you are planning to do this much quilting. So when I had the middle half of the quilting done and it became apparent that there was no way around that lazy decision, I had to take the pins out of the sides, trim off the selvedges and add on those long strips of dark gray. Re-baste. Finish quilting. Then, after all that, the bottom edge had shifted so that the backing didn't cover a little bit of the corned there. So aggravating! Such a rookie mistake to not making the backing a few inches bigger on each side. But I fixed it with a tiny sliver of quilt-as-you-go (pictured above), which didn't end up being very noticeable in the end.


The quilt is a large throw, about 60" x 72". Ruth should be picking it up from her post office box any time now and I can't wait for her to get it!

I'm entering this one in the scrappy category at the Blogger's Quilt Festival. I'd love to be nominated as a finalist because this is probably my new favorite of any quilt I've ever made. Even so, I was still happy to send it off to such a good friend who will really appreciate it. And it helps to know I will probably begin scheming up a new super-scrappy project to replace this one any day now. I can't resist the lure of my scraps.


Wednesday, October 16, 2013

A Lush Pillow Gift

Lush Uptown pillow cover

A few weeks ago I made this quilted pillow cover for my good friend Julie's birthday. She's actually my boss at Sewn and she's pretty awesome and she's the sort of person who probably hates that I'm even mentioning such things, but I'm doing it anyway. I always like to make her something for her birthday because she doesn't get to sew for herself very much. She is usually too busy teaching the whole city of Cincinnati to sew. Last year I made her this pouch to celebrate our shared love of Arrested Development, and the year before I made her a pretty sewing machine cover


Lush Uptown pillow cover

The piecing here is simple, just a great print with a couple borders. The deer and the woodgrain are from the line Lush Uptown by Erin Michaels, which I ordered from Pink Castle Fabrics. (I always feel like I need to use fabrics that Julie couldn't just pull off the shelves at Sewn herself to make something with. Foreign ingredients I guess.) The first border is just a Bella solid that I thought made the prints pop, but I don't remember the name of it.

The quilting is my current favorite as you've seen here and here- spiral quilting! Especially easy and satisfying on something only 20" square. I kind of just randomly chose the middle of the tree to begin the spiral, and it wasn't until I got done that I realized it was a good thing I didn't start on the deer. Julie's not really a big hunter.


Lush Uptown pillow cover
THE BACK. 


Lush Uptown pillow cover

I was scurrying to take a few pictures on my phone before rushing out to her birthday lunch and I didn't even have the time to put it on a pillow form. But the good news is that it looks great as a pillow and she liked it a lot.


Julie, I think it's safe to say you are the only person who has ever gotten handmade birthday gifts from me three years in a row. Including my kids. I don't know what that means... 


Saturday, October 12, 2013

Divided Tote, Divided Socks


I bought Anna's Divided Basket pattern as soon as it was released, I think in February? I immediately printed the pattern pieces and started thinking of fabrics. Then I sewed it up in August. Yup, sounds about right. I didn't really have a purpose for making it, except that the CincinnatiMQG was having a fabric basket challenge thingy that month. Now it has become a holder of kid socks. Mismatched, can never find them where they are supposed to be, kid socks. How lucky am I that I have two kids who wear socks, and this thing is divided into two compartments?? Probably the best reason ever to round it out at two offspring. 


The main fabric is (again) Menagerie by Sarah Watson for Art Gallery. I actually made this project before making the Art Museum vest in the same fabric. And just last week I made a little bag for a CMQG swap with the leftovers. There are still some precious scraps that will be used to the last threads as well. It's just one of those fabrics you can't let sit on the shelf. 


I also used some Joel Dewberry woodgrain for the outside pocket, trimmed with peach Lizzy House Pearl Bracelets. My PB supply is dwindling, probably because I use them in everything. Must fix that problem.


The lining is from Saltwater by Tula Pink. I think I got all three of these main prints at Cool Cottons during my trip to visit Kristin this summer. Didn't really mean for them all to go together to well, but they did. Love it when that happens!

This pattern is fantastic, just like we always expect from Noodlehead patterns. The way the divider in the lining is constructed seems to simple in a way, but it's nothing I would have figured out on my own. It was so fun to see it come together.


But my favorite part turned out to be the handles. I used this burlap-ish ribbon I got on a weekend trip to Columbus at a beautiful shop called On Paper. The store was mostly stationary and specialty gifts, but it also had this amazing little selection of the prettiest trims. For these handles, I just made piping out of the peach PB and sandwiched it between two layers of the cute ribbon. I love the way they look great on both sides and stand up so well. Details, details.

I'm sure I'll be making a couple more Divided Baskets in the near future, as many of my friends are suddenly preggins, and they make great baby gifts you can stuff full of infant accessories. You can get your copy of the pdf pattern instantly right here.


Tuesday, October 1, 2013

Rocky Mountain Puzzle for Do Good


This is my last quilt finish for the do good stitches charity bee, at least for a while. It's a little sad to not be making fun plans for my next one right now, but I know I can always join the bee again down the road if the time is right. I just needed to simplify some things and make a little more time for my responsibilities as the Cincinnati Modern Quilt Guild president. 

Anyway, I can honestly say that my 2 years with the Harmony circle was so enjoyable and I would recommend this bee to anyone wanting to learn new things and give back with their quilting. It's really a wonderful project, and you can find out more about joining right here


This quilt was completely inspired by Amy of Badskirt's version that I saw here on Flickr. I instantly had a quilt crush on it. It's all kinds of amazing. So I told my group of stitchers to make Rocky Mountain Puzzle blocks using this tutorial, but I changed the measurements to make 12" finished blocks instead of 8." To do that, make the center square and HST units 3.5" with a 2" border around that center square.  I said to use bright saturated rainbow colors, everything but purple. Not sure why I excluded poor purple, it's a color I love. But I'm glad it's left out in the end. You don't belong here purple! This quilt is so cliquey.  Plus they could use black fabrics, and had to use low volume prints for the background of the blocks. 


The most fun part of this bee is when you start to get the blocks trickling in in the mail and you can imagine how they will harmonize in the finished quilt. It's so cool to see a bunch of scrappy blocks come together like this and really work. These two above are a couple of the blocks that I made. Everyone did a really great job at picking something fun to put in that center square.


For quilting I did simple straight lines, following the diagonal direction created by the arrangement of HST's. It's fine enough, but I kind of wish I had done vertical straight lines, or maybe a crosshatch. If I'm being honest, I would do straight lines about 3/8" apart across every quilt I ever make if I had the time. That is one quilting decision I never regret. But in the end, this one just needed to be done quickly. This quilting does at least give is a really soft easy drape, which will be nice for this kid that gets it through Project Linus.


The back has three extra blocks and a nice aqua Art Gallery print from Sewn Studio. I like how the little triangles scattered in it give a nod to the triangle design on the front. For the binding I chose an orange on pink dot by Kaffe Fassett. I loooooove the way his dots feel. It took me forever to settle on the binding for some reason, and I'm a little surprised I landed here. I must be having a hot pink moment lately. 


The quilt is about 60" by 48" and I'm really happy to be done with it and giving it away! Thanks for all your help on this one Harmony Circle, I miss you guys already :)