Showing posts with label finished. Show all posts

Monday, August 12, 2013

New Picnic Quilt


I've had a stack of fat quarters picked out to become this picnic quilt for at least a year and half.  It's evolved a little since then, but with half of this summer left for picnicking, the stack finally became a useful quilt! In fact, we've been taking it out regularly for over a month, and even in these pictures it's fairly covered with dirt, smashed bugs, and PB&J stains. It's so nice to have a quilt just for taking out to get dirty. 


Hendrix was a great guardian as I took these pictures at the park the other day. (Two birds, one photo shoot.) The kids really love this quilt. It totally makes a picnic somehow feel more picnic-y. We didn't join a pool this summer, so the season has been marked with making constant rounds around the city's parks, accompanied by the new blanket. Really, Cincinnati has such great parks! We are lucky.


I think it's about 60" by 72". Can't be positive, because I'm too lazy to get up and measure. The fabric selections started with 6 of my very favorite prints from Amy Butler's Lark line. Love how saturated the colors are in that one. Then I added some B&W, the ever-present Lizzy House Pearl Bracelets, some Cloud 9 Cut Out & Keep, and a little Lu Summers Summersville. Plus solid white and other coordinating scraps. The squares were cut to 5" unfinished. I put it together fairly randomly, not really planning what would go where. I just paired light with dark together initially and tried to keep the black spread out. Chain piecing made this quilt top come together super fast, even at this large size. 


The quilting is just a quarter inch on either side of every seem, both vertical and horizontal. It's not my most perfect quilting job, but definitely good enough for an outside quilt. 


The binding is a light sketchy plaid from Angela Walter's first line for Art Gallery, which I picked up at Sewn while having a fun girl's sewing night there with my awesome boss and her daughters. It's so fun to finish a quilt while your actually with someone who knows how exciting that feeling is! I should arrange dates with encouraging sewing friends for every time I finish the binding on a quilt. Binding party anyone?


Tuesday, June 11, 2013

do. Good Stitches Flying V Quilt


I finished this quilt a few weeks ago and finally took pictures today. This is definitely my favorite DGS quilt yet! Do Good Stitches is a charity bee I've been in for nearly two years. Every few months, I get to be the designer of the quilt my circle of the bee makes. 

This one was inspired by my friend Andie's minimalist flying geese quilt, featured in her awesome book. 


Of course, mine couldn't be quite as minimalist as hers, or else my group wouldn't have had much sewing to do! Instead of the standard 2 12" blocks, I instructed everyone to send me a strip of 12 flying geese units all joined together going the same direction and on a white background. They each finish at 6" x 3". 

I told them to block the colors together instead of mixing them all up, and to use this block for color inspiration:
Japanese + & x


They matched those colors pretty perfectly right? It's my most favorite block from my scrappy Japanese +&x quilt.  


So once I had everyone's strips in the mail and made my own, (second from the right side is mine) I added more white fabric on either side of the geese and joined them together, staggering one unit off with each one, and alternating directions. Originally, I imagined them all going one direction and all facing to the side of the quilt, rather than going vertically. But once I laid everything out, this way just looked much better. Flexibility is my middle name. (Actually, it's Elaine... I know you were wondering.)


I did straight line quilting, vertically just like the geese, about 1/2" apart. With all that white space, I knew I wanted to do heavy quilting. I think the simple straight lines are just perfect here. Always my favorite. 

The binding is the dictionary text print from Moda's Mama Said Sew, ordered a while back from Pink Castle. Except that one little spot where I ran out and had to use some Flea Market Fancy. (See? Jessica Flexibility McFlexyFace!)


The backing is all this pretty Vintage Modern print (Bonnie & Camille for Moda) from Sewn Studio on clearance. I just love the color.

I didn't wash this quilt before taking pictures, which is the opposite of my norm. I just wanted the smooth look for pictures, but I'll definitely be giving it a good wash-n-crinkle before dropping it at Project Linus this week. It's a good thing, because I've already got most of the blocks in for my next do good quilt!


Monday, March 25, 2013

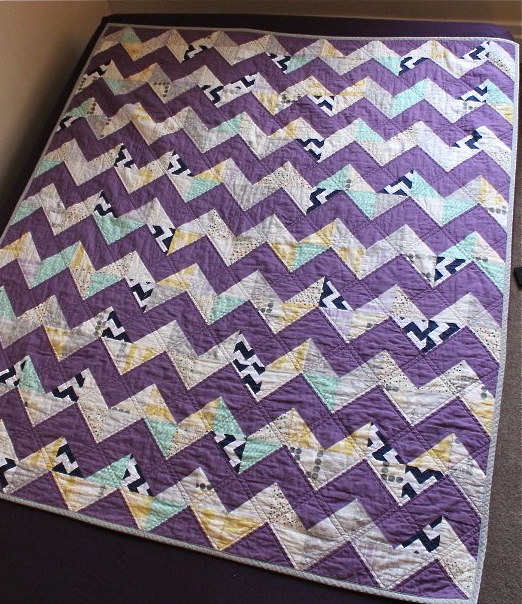
Purple Zig Zag Quilt


Since it's March 25 and it's snowing outside and I haven't really gotten dressed in three days, I thought it might be high time to share this quilt I finished back in August. August 2012, a time when the sun was shining and I had enough life in me to finish things.

I made it for our best friends' ten year anniversary and finished it just in time to give it to them without taking pictures. I was too excited to take pictures, as I usually am with sewn gifts. Anyway, they liked it. I think they still do. It looks pretty good as a throw blanket in their stylish place. Then I stole it back from them last week and took some pictures, because when you blog you think you have a good excuse to do weird things like that.


I really love the colors of this quilt. I first blogged about my fabric selections and using "triangles on a roll" here. You put a cut of paper over the 2 fabrics you want to make HST's from and then just sew where the lines tell you. Cut them apart and you've made a lot relatively quickly and really accurately. You just have a bunch of paper to rip off now. Still worth it for a quilt that is made of them entirely. We have a class at Sewn Studio that teaches this quilt, so we were all kind of learning how to use the product together.


After all the HST's were done I put them together randomly for the most part. I think it turned out great that way, plus trying to control where everything ended up would not have been enjoyable for me. The only thing that worried me at first was if that navy chevron was too much with the rest of my low-volume prints. But once the whole thing was together, I loved the effect that chevron print made. Totally would have been a bore without it.


The top only uses 8 quarter yards plus 2.5 of the background solid I think. So for the back I just put together all the quarter yards of those prints I had left. (Since I usually stash half yards.) The quilting is a simple double diagonal grid. This was the quilt that made me realize my walking foot sucked. It's not terrible quilting, but after I shelled out the $70 for a good walking foot after this, I quickly realized it wasn't great quilting either. Sometimes it's a relief to know it was your tools that sucked ass and not you. 


The binding is that Moda pre-made single fold bias from Sewn that I loooooove to use so much. Makes that end-of-the-quilt-I-just-really-want-to-be-done-with-this part go much faster. 


This little sprite in Santa jams thinks it's pretty cozy. Maybe it's time to start on one for her near-future big girl bed?


Wednesday, October 17, 2012

Do Good Stitches Stripes Quilt


Last Monday I finished up my second quilt with my circle of the Do Good Stitches charity quilting bee.  Back in May, I asked everyone in the group to send me two 16.5" blocks that had orange, yellow, green, and gray fabrics in mostly solids, arranged into any stripey design they could come up with. The variety of blocks they sent me is just amazing!


These are really my favorite kind of bee quilts, the ones that look like they were made by many different people with different styles, yet somehow it all works together. I'll admit, when I first started getting these blocks in the mail, I loved them, but wasn't sure how they would look together. I thought I should have been more specific about using brighter citrusy colors and maybe given more direction with the design. But after playing with the arrangement and getting the top together, it really looked amazing! I love how the different depths of the colors draw your eye to different parts of the quilt. I love the mix of straightforward strip blocks and crazier improv blocks. I think it will be great for a little boys bed. 


The back is a Robert Kaufman basic I got on super clearance, and the binding is pre-made Moda Bella bias binding, which I love using. Both are from Sewn Studio. 

For the quilting I did wavy vertical lines across the quilt in varying widths. I love how this style looks and feels, especially against all the straight angles on the quilt top. I used gray Aurifil thread. I'm convinced I will never quilt with another type of thread now that I've tried Aurifil. Thread snob here. 


It's almost all set to go to our local chapter of Project Linus, just need to stitch the bee label on the back first. I'm excited to dream up my next design for November's quilt. This and my first were both very boyish, but I'm thinking about trying something a bit "prettier", if you know what I mean... at the same time though, I know Project Linus always needs boy blankets, so I might just have to get creative with another boy design. We'll see, you know I can never resist making for boys.

Thanks again to the amazing girls in my group who made these blocks!


Thursday, September 20, 2012

Japanese x and + Scrappy Quilt- Done!


This is my favorite ever. I'm just gonna get that out of the way.

And what's with my downstairs neighbors putting up spiderwebs in the middle of September? Also gonna get that out of the way...


So this new-favorite-ever quilt is made up of 48 Japanese x and + blocks from Amy's great tutorial. I was also inspired a lot by Leila's gorgeous quilt. I started making them last December, just a few at a time, completely out of scraps leftover from other projects. Some of the scraps go back to when I first started sewing almost 5 years ago, long before I was quilting. I blogged about some of the blocks here and here. 


There are also scraps from every other quilt I've made, from every PR&P project, from stuff I used to sell on Etsy, and every other gift and toy I've made. It's pretty cool to watch my 3 year old Hendrix sit and point out all the fabrics he recognizes from things that are still used and played with around the house. I feel like it's a sewn journal of what I've done so far. 

It's also funny how you start to sentimentalize all the places your fabric comes from, even the online ones. Of course, a lot of this fabric came from Sewn Studio, which is pretty much the reason I started quilting and became any good at any kind of sewing. But the fabrics also come from great brick and mortar shops like Crimson Tate and Whipstitch, and my favorite online sources Fresh Modern Fabric, Hawthorne Threads, and Pink Castle. 


I'm very happy with the way my quilting turned out on this one. I've gone back to pin basting, after being a sprayer for a long time. I really do think it helped my straight line quilting turn out much better. Plus the quilt feels softer without the spray baste, and I'm glad to not buy any more cans of it. Yes, the process is a little longer, but I didn't really mind. Crawling around on the ground isn't the most fun either way.

I quilted 1/8" on either side of every seam that made up the +'s and x's. It took a long time, and lots of marking, but totally worth it. I also used Aurifil thread for the first time and I loved it. This was a whole lot of quilting and I only used 3/4 of the spool. I feel like I would have spent close to the same amount for several spools of Mettler. I may be and Auriful convert now as well.


The back is all pieces from my stash, and the border is Essex linen in leather, (thanks so much Rachael!) which is a kind of weird color on it's own, but looks great against these bold blocks. The binding is a Joel Dewberry Herringbone that was also in my stash. The only thing I bought for this quilt was the thread and batting.

I love how the design of the quilting forms those star shapes on the back. Also love how you can see the shapes of the blocks through the back when the light hits it. Perfect.


I usually start and finish quilts within a month or two, but I'm so glad I took the time to work on this throughout this year. It's the most beautiful thing I've ever made and it's all from leftovers. When I think about that, it really helps me not to splurge on the 187 great fabric lines that have come out recently. I just want to start on my next scrap quilt already!


It finished at 68" by 52" and it's getting lots of use on the couch already. What a great way to start fall. Thanks so much for indulging me by looking at 4 dozen pictures of it :)


Monday, June 18, 2012

do. Good Stitches Triangle Quilt- Finally Done


The charity-bee quilt guilt has lifted! I'm embarrassed to say that this quilt began in my circle of do Good Stitches back in November. November! There are lots of perfectly good and reasonable (psh) excuses for this, but I won't go into that. I will just rejoice that I finished this before all my blocks arrived for the next one. Then things would have really gotten out of hand.


For one thing, I did make things a little hard on myself because I was determined to turn this into a bed-sized quilt for an older boy. The original 12.5" blocks would not pull that off, so I sashed them all in a random log-cabiny way with various icy blue Bella solids. I really like the effect of this. Still not quite twin-sized though, so I had to add a border. 


It's about 90" x 75," making it cumbersome to quilt of course, but I kept it simple with my default diagonal lines. I usually like much denser lines, but these are 3 inches apart. The binding is a pixelated houndstooth by Michael Miller (I think.) And the back is a completely crazy-town bright lemon yellow.  Half the time I think it's really awesome, and the other half I think my eyes are melting off my face.

This is the block I asked the Harmony girls to make way back in 2011 (the shame!) It was not the simplest assignment, but they did great. I love the black and white prints on all that blue. It makes me think of the Backstreet Boys' fourth album... Shut up, you know exactly what I'm talking about.


I know this full shot is really sad, but it's the best I got after a bazillion attempts over 2 photo shoots. I'm convinced that it's impossible to accurately photograph the colors of this quilt. Also, I suck at it. 


Ready for Project Linus!

Thank you so much Harmony girls for your blocks and your patience! It's all labeled and ready to go to Project Linus this week. I'm so happy to be able to do something like this with quilting because I really feel like I'm honoring the memory of my Nanny. She wouldn't have waited 7 months to do it, but I can improve my turnaround time on the next one :)


Thursday, February 23, 2012

Sparkle Baby Quilt Done!


I LOVE this quilt. It might be my favorite yet. I made it for a family member, but it is going to be hard to give it up. But at the same time I'm really excited to give it to them. I finally got to use my swapped and hoarded Echino (well, just 4 out of 28 squares, but still) and I think the sparkle block is perfect for them. I really wanted them to stand out, so I only made three of the blocks and then framed them in this fantastic black yarn-dyed Essex linen from Fresh Modern Fabric. I need a LOT more of this stuff. 


It's a little hard to tell, but the quilting lines switch directions a lot and go all over the place. There are places where I was quilting in angles that were less than 45 degrees, which was not easy. But after washing it everything worked itself out.


I left the scooter square un-quilted because I'm going to add some hand stitching there with perle cotton. Can you believe I've never tried it before? I'm hoping it doesn't get too distracting from the design. If it does, I guess I can just cut it out. 


The back is Loulouthi hugs and kisses in gold (which is also the binding) as well as a Michael Miller word search print and another text print from Ikea, and a little more Echino. The quilt ended up about 40" by 45." Thanks for the fun QAL Jeni and Megan!


Wednesday, January 4, 2012

Bro Quilt


This was my big Christmas project this year. As in, consumed most of my December. Because I am crazy and a sucker for compliments, I didn't decide to make my younger brother a quilt until after Thanksgiving. That's when he saw this one and said he liked my quilts. What's that? You like my quilts? Then, yes you will have one. 


Luke is a real guy's guy. He climbs huge mountains and deadly glaciers. He'll camp in the middle of nowhere on any night of the year. He wears mostly things made out of high-tech insulated materials with names I can never remember. He moved to Las Vegas a few months ago just because he could. Besides all of that, he is just an amazing brother and brother-in-law and uncle to us. 

So I envisioned this quilt that kind of looked like it was going places, just like my brother. I've been wanting to make a flying geese quilt with a different spin. It's also somewhat inspired by Tula Pink's Field Study pattern, which is perfect because I knew I wanted those Prince Charming raindrops to be showcased. All of the prints are from my stash, I just added the Bella Navy and Teal solids. The dark background is pretty hard to photograph, but I love the way the navy looks. It's strong and manly but not at all drab.


My favorite thing about it might be that back is corduroy! Super soft, grass green, fine-wale corduroy. I got the idea when a customer in the shop did the same for the back of her quilt. It came out great, but the next time I use corduroy I think I will pre-wash it. I don't usually prewash anything for quilts, but after I washed the finished quilt it seemed like the back shrunk just slightly more than the front. Not a big problem, just something I will keep in mind next time.


Here's a close up of the Michael Miller Old Script print, just because I love it. I also love the Cloud 9 Across the Pond Banks print with the little arrows. Arrows in the arrows- it's meta.


I think it came out to about 65" by 80," but I didn't measure after washing. Putting together fabrics and a design for a man quilt- a single, 24 year old man who lives in Vegas- was really a fun challenge. I would recommend making a man quilt to anyone. And Luke seemed to be very happy, so I'm happy.


{Sew} Modern Monday at Canoe Ridge Creations


Fresh Poppy Design