Showing posts with label project run and play. Show all posts

Wednesday, July 11, 2012

Simplest Summer Top Tutorial

This is my last tutorial from Project Run & Play. Figured I had better share it here before the time for making summer tops is over!


Happy Wednesday PR&P fans! Thank you so much again for everyone who voted this week, whether you voted for my look or not. We just all love it that you are here cheering us on and waiting to see what we make next. It's incredibly fun!

Today I am going to show you the simple formula for making this easy halter tie top. You really can't go wrong with this one, it's so quick and cute.


The top is just a tube made of two rectangles of fabric with elastic at the top and bottom and long ties added. You'll need about a half yard of fabric and 1/4" and 3/4" elastic. 


First you need to figure out what size to cut your rectangles. Find a t-shirt that is fitted well to your girly. Measure the shirt hem lying flat. In other words, the distance across just the front of the shirt, not all the way around. Add 2.5" to that for the length of your two pieces. Mine was 12" so I cut my fabric pieces to 14.5" long. 

Now measure the shirt from the very bottom to the armpit, where the sleeve meets the shirt. Add 3.5" to that number and you have the width of your rectangles. Mine was 9" so my width was 12.5." My two rectangles measured 14.5" x 12.5"

(NOTE: Since I used a light fabric, I lined it by cutting two more rectangles of white in the same sizes. I kept those pieces on the wrong sides of the main fabric rectangles and proceeded the same way.)

With right sides together, sew both ends of these pieces together with 1/2" seam allowance. Now you should have a tube. Finish the seam allowances unless you are making a lining. In that case, make the same tube with the lining pieces, keep the lining wrong side out and slide it into the main tube so that the wrong sides are together. 


25
Make a casing along the bottom by folding 1/2" to the wrong side twice, sewing along the folded edge leaving a 2" opening and threading 1/4" elastic thru. Cut the elastic to whatever your child's waisq1t measurement is. Close up the opening once you have the elastic in and the ends sewn together.


Repeat on the top edge of the tube, but this time fold under 1/2" then 1." Put in 3/4" elastic the same way as you did on the bottom. On wider elastic casings like this, I also like to topstitch around the very top edge, which you can see in the picture. This gives it a very finished look, which is nice along the top of the shirt. On small children, the length of elastic is usually the same as waist size again, but measure your child around the chest to be sure. 


Time to add the ties. Cut 2 strips that are 2" wide and about 22" long. Fold and press them in half to the wrong side, open the fold back up and press the edges 1/2" in so they meet that middle crease. Fold the first crease again and sew all the way down right at the open edge so you end up with 1/2" wide straps. Sew them onto the inside top of the shirt, placing each 2" in from the side seams. Topstitch so they slant in a little, as shown above. 


See? Easy! You could probably whip up a handful in one afternoon and be set for summer.


I also have some info right here about how I altered a free downloadable pattern to make the sunhat in my look. 


Monday, June 11, 2012

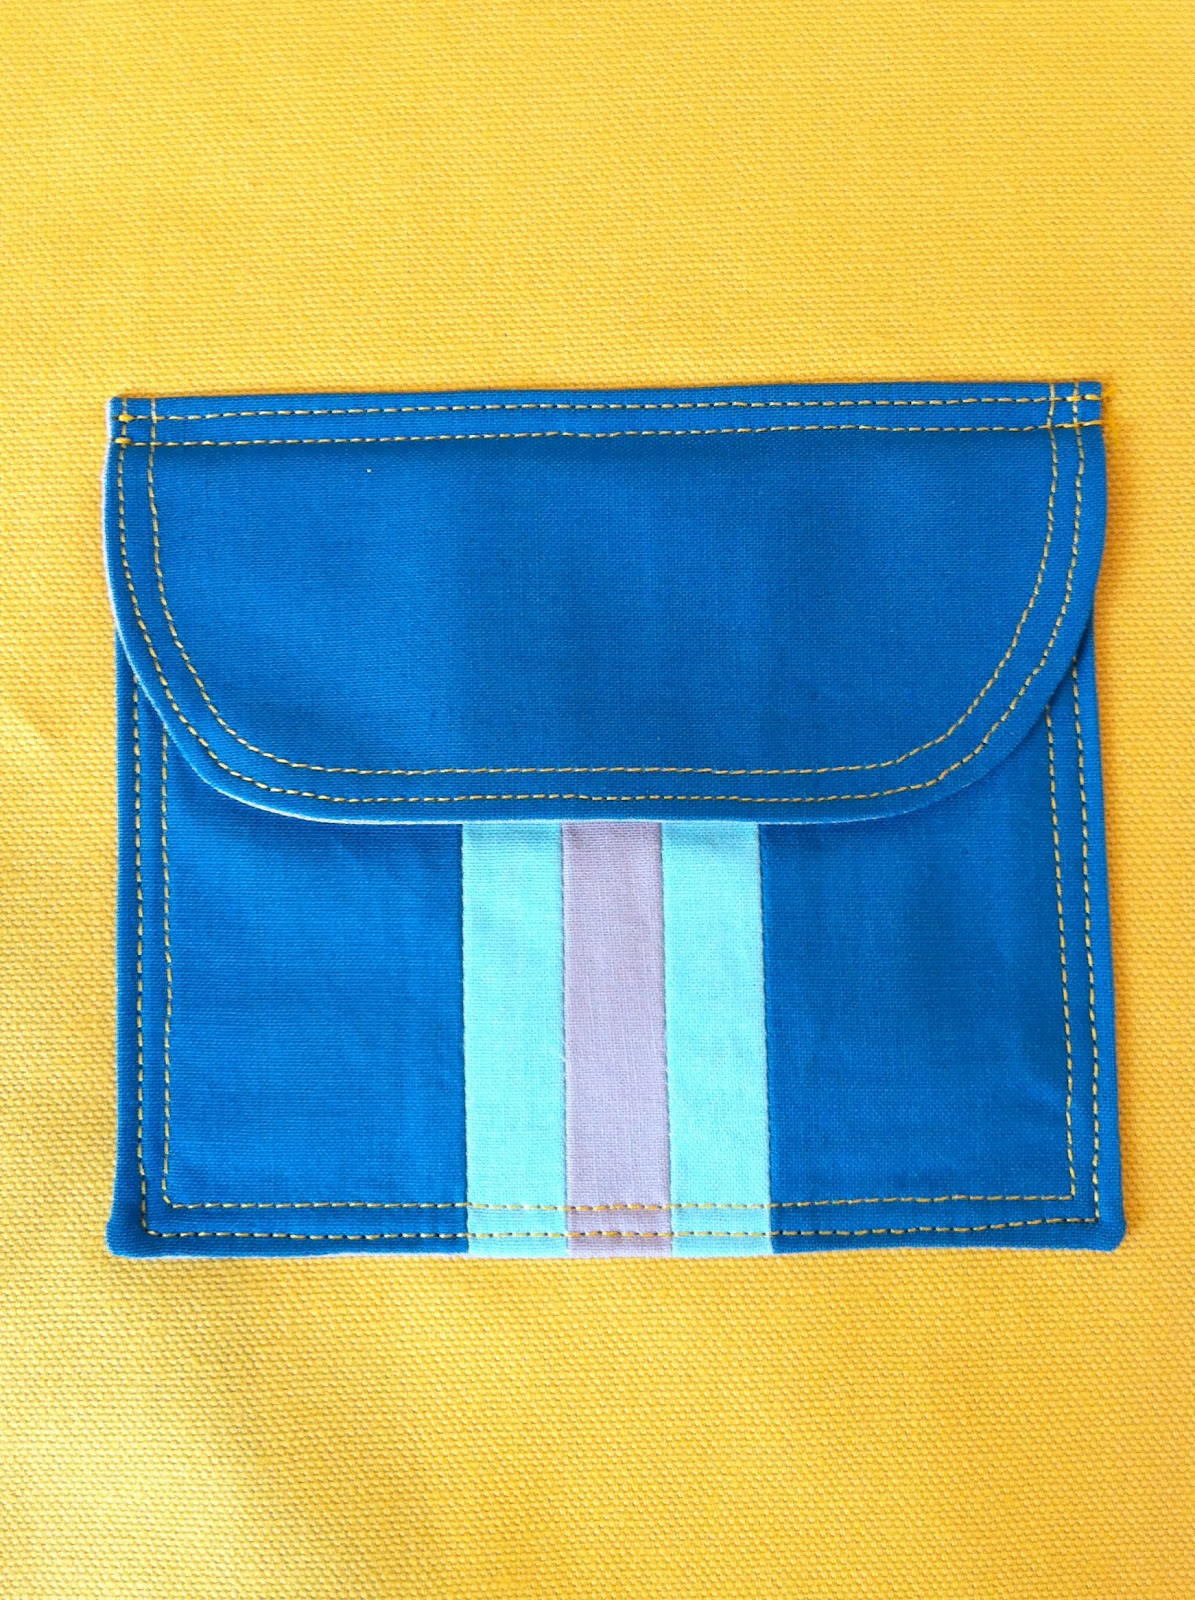
Perfect Striped Pockets With Flaps Tutorial

(This is another re-post of one of my Project Run & Play tutorials. See the entire "Howl at the Moon" look right here.) 


Hi, it's Jessica from A Little Gray, and WOW- I'm so happy to be back here to share a tutorial this week! I feel especially proud that a boy look won this challenge. I am more comfortable sewing for my boy Hendrix any day- this girly stuff is still pretty new to me!

Details are really important in boy clothing. Things like pocket flaps and contrasting topstitching go a long way on a pair of pants, and simple additions like bright stripes kick up the wow factor. So that's what I'm going to show you today.


You'll need a main fabric, two or three different colors for the stripes, and a lining fabric. I'll show you how to make one pocket, but of course the amount of fabric required depends on how many pockets you add. My "Howl at the Moon" pants had 4 pockets in this size, 2 on the back and 2 on the sides by the knees. 

First we'll make the striped patch pocket:

Cut each stripe to 1"x 5." Cut two pieces from your main fabric to 2.5"x 5." Cut one piece from the lining fabric to 6"x 5." Piece the striped front of the pocket together using a quarter inch seam allowance and press seams open. 


Pin the front of the pocket to the lining with right sides together. Stitch around the outside with a half inch seam allowance, leaving a couple of inches open on a shorter side for turning. At the beginning and end of this seam, stitch into the seam allowance right up to the raw edge, like a little tunnel for turning. This makes it much easier to get the seam allowance evenly tucked inside whatever you are turning. Clip the corners off, trim seam allowance to 1/8" except at the opening, turn right side out. Use a chop stick or turning tool to poke the corners and edges out while pressing.


Topstitch around the whole pocket 1/4" from the edge. Then pin in place onto the garment exactly where you want it. (I'm just using this scrap of yellow canvas for our example.) 


Topstitch around the sides and bottom 1/8" from the edge, leaving the top open and reinforcing at the beginning and end. 


Now we are ready to make the flap:

First make your flap pattern piece. I like to use freezer paper for my patterns, but use whatever paper you have on hand. Cut a rectangle to 6"x 3" and fold it in half so the short sides meet. Cut off the bottom corners so they curve gently.


Use your pattern to cut out one from the main fabric and one from the lining fabric. 


Pin right sides together and sew only around the curved edge with a half inch seam allowance. Leave the entire straight edge open. Trim seam allowance to 1/8," turn right side out through the top of the flap, and double topstitch the curve at 1/4" and 1/8." 


Now pin the flap onto the garment right sides facing, so that the straight open edge is just slightly above the top of the patch pocket. 


Sew it down 1/4" from the raw edge and then carefully trim the seam allowance down to 1/8."


Fold the flap down, press, and double topstitch at the top, and that raw edge will be enclosed underneath. If you'd like, you can add bar tacks at the top corners to keep the flaps from sticking up like I did on the original pants. 


Your professional looking pocket is done and ready for action!


Sunday, June 3, 2012

Chevron Circle Skirt Tutorial

This is a tutorial I did for the Project Run & Play blog in the first week of the competition. I have a couple more of these tutorials that I will probably be "bringing home" here in the near future. You can see the whole pieced chevron outfit right here. 


Good morning PR&P fans! Thanks so much to the hundreds of you who voted for all of us- it's so exciting for us as designers to see you getting excited about the competition. I'm very happy to be the winner this week and share with you how I made my pieced circle skirt. It was a lot of work and some of you were right to say that I must be a little crazy to have done it. But I decided it might still be interesting for you to see how it worked and maybe it will inspire someone else to do something a little insane.

For those of you who are looking for something a little more practical, I'm also going to share how I made an encased elastic waistband with a facing. It's a great way to do waistbands on any skirt or pants, and you can make it exaggerated like I did, or simply make it the width of your elastic.


Ok, let's get started! First I have to say that I was originally inspired by this quilt block. You'll also have to refer to Dana's fantastic original circle skirt to make your pattern.

It's important to keep consistent 1/4" seams on the piecing in the body, and I always like to press seams open. A cutting mat, rotary cutter, and 6" by 24" ruler are nearly essential.

This skirt is made of basically 16 panels of stripes, which I made in groups of two. For one inch finished stripes, cut your fabrics to 1.5" by 10." My skirt required 5 of these pieces in black and five in white on one panel, but yours may require more or less, depending on skirt size. In total, my skirt (about a size 3) required 1.75 yards of each color.


(Sorry for the funky colors here, but I didn't take a picture of this step originally.)
Use your cutting mat to lay out your stripes so that they extend 1" to the right past the one beneath them. Sew all ten together, keeping them staggered this way when you pin. Repeat this step with ten more stripes, but these will extend 1" to the left side as they go up, so you are left with two mirror images. Make sure you always start with the same color on the bottom.


Turn one of your panels so that the stripes point up and cut off the staggered edge. In this step, you are deciding on the angle of the chevrons throughout the skirt. Cut 6" to the left on that panel so that the other side where the stripes point down is also evened up. (Again, if you are making a larger skirt, you might need to cut wider here, so use your pattern piece to get a feel for how big you need to cut things.)

Now you are going to use that panel to cut the opposite one at the same angle. Flip the cut one onto the one that is still staggered so they are right sides together. Place them so the stripes and seams match up exactly on top of each other and cut to the same 6" width with your ruler. Take the panels apart again and they should look just like the picture above. 

Now match the centers right sides together again and sew. It helps to pin in every pressed open stripe seam so that all your points match. Take your time pinning. 


Now you have two stripe panels sewn together to make one chevron that points up. Take your circle skirt pattern piece and cut it exactly in half. The original is one fourth of the circle, but we need one eighth of the circle. Place it on your panel with the point of the chevron in the middle. You can see in the next picture that I tried to keep things even by placing the two lower corners right on corresponding seams. Now cut 1/4" on either side of the pattern piece for seam allowance.


Now it looks like this. It's important to cut the quarter inch on either side very accurately so that seam allowance is consistent. Do not cut along the top and bottom of the pattern piece, in fact you can put that aside now. 

Hold on to this original chevron panel because now you will use this to cut 7 more. As you are making those 7, keep the angle consistent by folding this one right sides together again and cutting at the same angle as the stripes in the middle seam allowance. 

The secret is to keep very consistent seam allowance as you piece stripes, and very consistent angles as you cut panels. 


Now there are 8 panels ready to be sewn into the circle skirt. You can see that there appears to be a gap, but don't worry. That will disappear in the seam allowance as you sew each panel together. Pin carefully again to match points and seams. 


(Warning: This method produces lots of scraps!)


Next make a lining to hide all those seams out of your original pattern. (Tape it back together so that it's one fourth of a circle again.) Center it over your chevron piece and use it as a pattern to cut off the excess in the middle and on the outside. 


Ta-Da! The hard part is over. 

Now let's put on the waistband. (Hopefully these pictures aren't confusing since solid white fabric doesn't have a wrong side and right side. I'll try to explain clearly.) 

First, figure out how big to cut your waistband piece. Measure the distance around the opening of your circle skirt (NOT the waist of your child) and add 1" to that. Cut your piece to that length and 6" width.  My skirt opening was 22," so I cut my piece 23"x 6." 


Fold one long edge to the WRONG side by 1/2" and press to give it a good crease. Open that fold back up. Now sew the short ends RIGHT sides together with a 1/2" seam allowance and press the seam open.


At this point I have basted the outside of the skirt to the lining at the waist opening with about a 1/4" seam. Take your waistband piece and pin the RIGHT side to the WRONG side of the skirt, on the raw edge that you did not press the fold into. In my picture, you can see the short seam in the back there so you know that's the wrong side of the waistband facing. Pin evenly all the way around and sew with a 1/2" seam. 


Turn the skirt inside out and press the waistband facing up. Even though this is the wrong side of the skirt body, you should be looking at the right side of the facing here, and that fold you originally made is on top. 


 Flip the skirt right side out again, and re-fold that first crease. Then bring that folded edge down on the outside of the skirt, just covering over your other line of stitching. Pin and edge stitch in place, leaving about 2" open at the back where the short seam is.


Here is what the right side of the skirt looks like, with the opening. 


Measure about 1.25" up from the line you just stitched and sew another line all the way around. This forms the actual casing for 1" wide elastic. But before you thread your elastic through the opening, topstitch one more time around the very top edge for a nice finish on that ruffle or "paper bag" waist. Insert the elastic that is the size of your child's waist, plus 1." Overlap the ends an inch and sew together, then close the opening. 


Hem the bottom however you wish, and you are done!


Phew. Who's excited for some sportswear?!


Saturday, May 26, 2012

I Work In a Pretty Place

You heard me talk a lot about Sewn Studio during the contest, but I don't think I've ever shown you much of it. (You'll have to excuse the sorry iPhone pictures, which don't really do it justice.) They were just so supportive of me, it reminded me how blessed I am to work with people who really get the whole sewing obsession.

 Isn't that a pretty apron Rachael made?


Reading lounge 


Solids corner- a personal favorite as far as corners go. 


All dots. (and my chevron pinwheel quilt, the kits for which have sold out thanks to a recent Pinterest bump. Sent to Canada even!)


Can o' laminates

All the Oliver & S patterns, neatly tempting me from one place.


And right now you can see all my PR&P creations on display in the window! It's really cool to see it there in my own neighborhood when I drive by the shop all the time. I should really add "have a window display of my work" to some sort of life list or something so that I can retro-actively cross it off :)


Have a great Memorial Day weekend everyone!


Monday, May 21, 2012

WOW!!!

This is a little bit unbelievable to me... Or a lot unbelievable. The big news is that I'm the WINNER of the 4th season of Project Run & Play! Can you believe it? Well, no, because it's a pretty low level of believability, which we've already been over :)


(Hendrix)


The last time I won something based on merit was in first grade. It was the fire prevention poster contest and I drew a picture of my middle school brother and his friend burning down the woods (really happened) and captioned it, "Don't play with matches." Straight and to the point. I got to pick out any bike I wanted from Kmart for my prize. It was pretty much the raddest.

But how often do you get an opportunity to win something like this as an adult? The whole competition has been crazy, stressful, and fun. But most of all, it's given me more confidence in what I can do than I've had since I was a kid. And that would have been true even if I didn't win it.

Even so, the VERY best thing about this experience has been the ginormous amounts of love and support I've felt from my friends (both in-the-flesh and intewebs) and family. It's crazy how much you guys wanted me to win this thing... I can think of a couple of you that were even more obsessed with checking the votes than me!

And my fellow designers were so talented and worked very hard, which is what made competing so much fun. I was always so excited to see what they had come up with each week. I know I could definitely learn a ton from Kiki, Chelise, and the Sew Together girls!


(Elsie)

When Liz and Elizabeth first asked me to be in this season, maybe back in February, I honestly thought they had emailed the wrong person by mistake. I had to read it like 13 times to figure out they were really talking about me. I still felt like a major rookie at making kid's clothing, especially girl stuff and I could think of at least 2 dozen other bloggers who would be better. Plus, my sewing focus had really been on quilting since last summer. I was completely intimidated, but my husband and mom really encouraged me to do it. I said yes of course, totally thinking I'd be one of the early outs but it might be fun to challenge myself creatively a little.

Before the competition got started, I considered backing out for various reasons, but someone always did something amazing and supportive to get rid of all my excuses. Nathan offered his superior camera skills and he and Edie let me use their beautiful daughter as a model. My boss offered to sponsor me with whatever materials I needed from the shop, which was a HUGE blessing. Rachael very graciously gave me a giant bag full of materials from her own stash, PLUS a gift card to another fabric store. My husband started taking the kids out of the house for me to have extra sewing time without ever complaining. Kristin offered to be a sounding board when I needed to vent or obsess about details. My parents were a huge help in numerous ways, and my friend Julie made it her mission in life to see me succeed. I really have all of you guys to thank for making this happen!


(Lily)

Ok, now I'm totally going to copy Danielle from last season and give you a list of fun tomfoolery from behind the scenes:


  • I never sketched out my designs, and I almost never stuck to my original plans for each challenge. I would always think of something completely different to do at the last minute.
  • After the first two challenges, I was sewing week to week and taking the photos on Thursday mornings, turning in my posts past due on Thursday nights.  
  • The most stressful part was always getting good photos in time. In the chevron skirt shoot, Lily was actually sick with chicken pox. Huh? Yes, those. 
  • I'm a pretty slow sewer for someone who isn't a beginner. Especially when I would let myself watch TV or drink wine while sewing :)
  • Both of my kids and my husband had their birthdays over the course of the contest. As you might guess, poor Elsie's first birthday party was not quite as spectacular as her brother's. 
  • I tried to keep up with feeding my kids decent food, but my own diet was horrible the whole time. Once I just had chocolate chips for dinner. I have some poundage to lose now!
  • Somehow the elastic casing on Hendrix's Drive jeans never got sewn up. Still hasn't...
  • I made a muslin or practice version of almost every garment. 
  • Hendrix HATED doing fittings for the clothes. I had to bribe him with a lot of candy, but then afterward I would forget to give it to him and he would go back to his new babysitter: the TV. 
  • I am extremely unorganized and didn't really take time to clean up my sewing space(s) between projects. This resulted in ridiculous amounts of time wasted just looking for things. Guess I should get started on that mess today...


If you will indulge me, I have one more thing to share with you. This is my grandmother, my "Nanny," Connie McTaggart. She passed away the Thursday morning before last from complications with breast cancer. I live in Ohio, away from all my family in Florida and the last time I saw her was in January, right after she had a mastectomy. She was doing so well, just so strong and we all thought for sure that she would be around a lot longer. 

She took kind of quick turn for the worse and my parents called that morning saying it didn't look good. I bought a plane ticket out of Cincinnati right away and left for the airport 30 minutes later. She died when I was on my way. I got on that plane with Elsie, me a complete mess and her with some kind of stomach bug. After taking me to the airport, Nick immediately took the Drive pictures of Hendrix and spent the afternoon editing them and uploading them for me. I was in FL mourning with my family, and he was making sure that I could go on in the competition, which was amazing. He then made the 17 hour drive down with Hendrix to join us on Sunday, and he sang at her funeral on Monday. 

All weekend I was thinking I would just drop out. I had nothing sewn, no time to do it, and it didn't seem to be all that important anymore. But at my grandparent's church on Sunday and at the funeral, a couple of different friends of hers came up to me and told me how much she had been bragging on me and my creative sewing. They said she was so proud of me. 

She was an amazingly crafty woman. She was a lot like some of us bloggers, always learning a new craft, moving onto the next project, cranking out beautiful things. In the past, she sold her creations to pay for her kid's college educations and things like that. But in the last few years, she only sewed for charity. She made quilt after quilt after quilt just to give away to people in need. She was always encouraging me to do more of that. She read my blog religiously and would sometimes comment or email me about it. She was rooting for me in the competition. 

So, after the four of us drove back up together, 20 hours (car trouble this time) on Tuesday, I got up on Wednesday morning and started my signature looks, with just one day to finish them. I was very tired, and very doubtful as to whether they were even going to turn out well or not. But I thought a lot about Nanny and the rest of my family rooting for me. She was a beautiful and inspirational person, with a quick tongue and the best giggle ever. I'm glad to know she was proud of me, and would be proud today.


...Geez Louise, did I make you guys cry or what? 


Well if you are new here, I hope the sappy doesn't scare you off and you'll stick around- I feel like I have a lot more ideas to share now! 

Thank you so much everyone for this amazing experience!


Friday, May 18, 2012

PR&P Week 6- Small Town Summer


Well hi. I have so many feelings right now that I don't even know how to begin this post... so I'll just quit the melodrama and explain that this is the very last week of Project Run and Play- the finale! I will say that I feel like I'm at the end of a mini pregnancy or something- In some ways it flew by, but mostly I feel like I just climbed a mountain for 6 weeks to get here. Now my baby's coming and I'm nervous as heck :)

I don't think I knew what my signature look was before competing in Project Run & Play. I kinda knew what I liked, and I definitely knew what I didn't like, but I never thought of myself as being a designer that had my very own defined style. Nothing like 6 intense weeks of eating, sleeping, and breathing children's clothing to help you figure that out...


 First and foremost, my style is wearable. It's real, easy, comfortable and practical clothing. Nothing fussy or over the top, just clothes for running and playing in.  Second, my designs are bold and stylish. I take a lot of inspiration from pop culture and the world of grown-up fashion. But it still looks like it belongs on a child. To me, it's a wonderful challenge to translate modern trends into something that is perfectly sweet and young. Using unexpected combinations of fabrics and design elements is probably my favorite part of designing.


Lastly, my style is crafty. I feel like that word can have negative connotations when it comes to fashion, but there is really no other way to put it. I like using details that take a lot of extra care and time. Whether it's piecing fabric together, painting on it, manipulating it in a new way, or carefully hand stitching on it, it's important to me that my craftsmanship really shows when you take a closer look.


So this week I created two looks which I think embody all those things. The first is a simple bright dress using bits of a great new fabric line called Summersville by Lu Summers. I used a layer cake from Sewn Studio. It has a patchwork yoke, which I pieced into a point in the front and a curve around the back, joined by red buttons at the shoulders. The teal bodice Moda Bella Horizon Blue from Sewn, and  is gathered under the yoke and then twirls out to a full circle skirt in beautiful textured linen. (The black Essex linen is some of my favorite fabric ever- backordered at Sewn, but should be in soon!) 


 I added appliqués of small town scenes from the prints in that same line all the way around the hem, and echoed the doodle-y feel of the designs in my red stitching around each one. You can follow the squiggly red line all the way around the sweet little town. 


Of course, I had to sew for my boy Hendrix as well this week, because that's kinda my thing too. I just love making boy clothes! I made him a comfy knit muscle tee in heather red and gray, with a pocket I hand stitched on in black perle cotton. The shorts are made from a super-hip vintage sheet that I was elated to find. (Got it at this awesome shop.) The triangle design and bold colors are just too perfect, and I'm pretty happy with how I matched up the large print at the seams to keep it looking continuous all the way around the shorts. 

It's funny how even after all this, I'm still much more comfortable making boy clothes. I guess it's because that's what got me started. But I also like the challenge of it because I feel like you have to be more creative to think of ways to make it special. 


I thought I should show you a brief reminder of my past looks, because you really can't get an idea of my style without all of them. Here are some more things I notice about what I've made:

  • I like to use black/white/grays paired with bright colors. 
  • I apparently have an affinity for my buttonhole foot. 
  • I've made one item in knits for every single look but the first. You just can't make the very comfiest kid clothes until you embrace the knits.
  • I like making separates and different types of garments. This week's dress is only the second I've made in the whole competition.
  • Most of these outfits could be translated into a stylish adult version. (Or were meant to be that in the first place.)
  • I'm not big on accessories. My goal was always to make clothes that speak for themselves. 
  • I freakin love that scorpion jacket. Favorite thing I've ever made ever. 
  • I like upcycling when it serves my purpose. I did it several times outside of the earth day challenge.
  • I do take a lot of inspiration from vintage styles, but not the ultra-sweet and florally kind of vintage. I like a mod feel, with graphic elements and bold colors that are a bit mid-century. 
  • I used my quilting skills a few times, but not in ways that look too "quilty," if you know what I mean.
  • I did not use one ever-loving ruffle. 
  • Did I mention how much I love that jacket?


I mentioned that I like to look at adult fashion for inspiration. Which is funny because I do not dress fashionable AT ALL. During the competition, I didn't really look at children's clothing sites, but I did read a lot of TLO. I've always read it religiously, but it was so fun to think of it more as a source for pieces to the fashion puzzle. You should read it- entertaining, educational, and hilarious.


That's all for now about me and my style, though I'm sure I'll more to tell you about behind the scenes shenanigans after this is all over. I can't tell you how encouraging so many of you have been to me. It's an incredible feeling and I'll always be grateful for how much you and this experience have helped me grow creatively. I'm SO relieved, but also a little sad the competitive making is over.

Enough talk, go VOTE! This is for all the marbles my friends!