Showing posts with label boy clothes. Show all posts

Monday, September 16, 2013

The Oliver & S Art Museum Set, Dressed Down


This 4 year old is too cool for school. And for smiling. He can throw some faces though. 

I made this little look for him from the brand new Oliver & S Art Museum vest and trousers pattern, which is fantastic! It would obviously be the perfect pattern to buy if you are looking to make a dressy boy outfit for church or a wedding or something, and it's even pretty cute on girls, as some O&S fans have already shown. But we don't really get dressed up too often, so I wanted to find a way to dress it down a little so Hendrix could even wear it to pre-k a lot this fall. 


For the trousers I chose a really nice medium-wash Robert Kaufman denim from Sewn Studio. Even with all the details on these pants, the denim really makes them a fall staple rather than special occasion pants. They have beautiful slant front pockets, back welt pockets, a faux fly, flat front, and even belt loops. (I left off the loops on mine though.) 

And after last fall, when all the fashionable slim fit pants I made him seemed to only last a month or two, I am all for relaxed fit pants. I love the fit on these and so does this very active boy. We're leaving the skinnies to the college kids this fall. I made the pants a size 5, but cut to a 6 length just in case. But after I saw how long they were on him, I cut most of the extra length off anyway. 


The vest is a size 6 and I love the way it fits over a Target tee. Perfectly light and comfy. I used a fabric I got on my trip to Portland to visit Kristin back in June from an adorable shop there called Cool Cottons. I could have done some serious damage there, but I showed great restraint. Still, this print called Menagerie by Sarah Watson for Art Gallery had to make the cut. It's just too good. And I think this fun neutral print makes the vest a little more casual as well.


The lining and back of the vest is just lightweight black batiste, but I added a little green contrast on the back belt and inside the pockets and with the buttons. The welt pockets were so fun to make. But, full disclosure, I did sew the inside of the vest pockets a little wrong. Nothing that effects things too much, just misread a part of the instructions and made some assumptions on my own. After talking to friends who were also making this pattern, I realized my errors. Then when I later started on the pants welt pockets, the instructions seemed clear as day and I didn't even know how I had screwed things up before! But really, they are the best welt pockets I've ever sewn, they look flawless on the outside and the pattern does a great job with that part. Maybe just read that whole part through once or twice before beginning.


I couldn't get a great picture of the pockets on the pants though because he only wanted to stick his booty waaaaaaay out for that part. This kid was acting like he was appearing in a Sir Mix-a-lot video, so I thought it best to spare you those pictures.  I had to tell him to climb the wall like Spiderman instead. A bit awkward, but there comes a time with 4 year old boys when beggars (bloggers) can't be choosers. 


Over it. But we'll just say this is his angsty model pose. The most important thing is that he loves the outfit and didn't want to take it off. Always a great sign! 


If you haven't seen them already, be sure to check out the AMAZING Art Museum garments from Cherie, Gail, and Kristin. It's one of those essential patterns if you have a boy you sew for, and a really cute unique pattern to keep around for girls. 


Thanks again to Liesl for letting us sew up these great patterns! I am really in love with this outfit and Elsie's new Playtime dress as well. 


Tuesday, May 14, 2013

Vintage May: My 80's Pop Art Boy


This post is part of the awesome Vintage May series with Skirt as Top and Craftiness is Not Optional. These ladies have put together a 2 week tour of the decades with some very talented seamstresses. Everything in this series is always so inspiring- you won't want to miss anything!


If you have spent much time around my blog, you know that the florally soft vintage look is not really my thing. Don't get me wrong, it's one of those styles that I love and appreciate on everyone else. I just don't usually go for it myself. I do make the occasional allowances, but it's not my MO.

So for some reason, when I began thinking about what I would make for Vintage May, I became fixated on Keith Haring.


Keith was a New York street artist in the 80's. He was kind of the first street artist to make that crossover into a household name, long before Banksy and Shepard Fairey. 


He just made the simplest of line drawings. But they were so recognizable and iconic that they grew into their own language. You've probably seen his radiant baby or dog symbols before. He was making these big social and political statements with street vandalism, but leaving it up to the people to decide what his symbols were saying. Unless it was one of those times he was actually spelling out the message for them.


If you are around my age, you probably remember his illustrations appearing on Sesame Street. I think that's where the positive nostalgia I have with him comes from. It's totally amazing to me how he went from criminal street vandal to this huge pop artist that was even accepted by parts of the high art community. He got his message out, whether it was a giant public sculpture project for a children's hospital or an Absolut Vodka ad. 

I chose this 'batman' icon for Hendrix's shirt just because it makes me happy. I have a positive response to it. That's what art is all about right? And Hendrix always says his favorite flying animal is a bat. I made a freezer paper stencil for the black part and then painted the yellow in by hand. (Which, by the way, was not the easiest way to do things. I should have made a stencil for the yellow first and then done a separate one for the black part. Lesson learned.) 


One of my favorite creative lessons from Keith is that he never planned out ahead of time what he would draw. Even on huge public works, he would just start drawing in his simple bold lines and see where it led him. I know it's not the same on every level, but sometimes my best sewing comes from the times I don't pre-plan, don't over-think things. He was just pure creation in that way. 

I couldn't resist taking these photos by an actual Shepard Fairey mural we have in our neighborhood. His style of street art couldn't be more different than Haring's, but I'd like to think they share the same drive as artists to have their message seen by as many people as possible. It's the new and the old, vintage and modern. 


The shorts are just Oliver & S Sketchbook Shorts that I made slightly more eighties-licious by shortening them a bit. I used a Kaffe Fassett woven stripe that feels to me just like a sheet set or curtains my older brothers might have have had in the 80's. The colors in the stripes are fantastic. 

I'm so glad Kristin and Jess asked me to join along in Vintage May. Otherwise, I might not have had an excuse to make Hendrix this righteous 80's outfit. (Although I am a very strong believer that there are many aspects of 80's fashion that should never be seen again.) 


By the way, I hear that the amazing Dana has something crazy good in store for Vintage May today as well. 


Thanks for reading folks. Remember, crack is wack.


Thursday, April 4, 2013

Green Pants and a Cardigan for the Boy


I didn't realize until looking at these pictures now that this whole outfit is just a variation on the Ferris Bueller look. I must have subconsciously needed to reproduce one of my fave Film Petits. It's the same two patterns- the Cool Cardigan from Blank Slate, and the Oliver & S After School Pants.


These are my favorite boy pants right now. Back in the fall, I made Hendrix several pairs that were skinny style. Cute as they are, they didn't last into the new year. Not only is this relaxed fit more practical for growing kids, it also has more give for wild boys who run, dance, jump, and climb 90% of their day. Harder to wear through those non-tight knees. And these aren't so relaxed that they look goofy. They are just cool pants. I also love that they have a pro-looking back yoke and back pockets but are still a full elastic waist.

The fabric is Robert Kaufman fine wale corduroy in kelly from Sewn Studio. And I used a scrap for the pocket linings, just for fun.


The cardigan was mostly made back in September I think, when I tested the pattern for Melissa. I loved it, but never added buttons and it sat in an unfinished pile all winter. What a waste! I made it from two old sweaters, the gray one already had those pockets, which I kept in front. You can see that I had to piece the navy together in some places for the neckband and waistband, but it worked. The buttons, which I finally stitched on last week,  are my favorite. I found them in the box of vintage goodies my mom gave me. I was disappointed there were only two because three really would have been perfect on this sweater. Still little-professor-chic though. 


I got it into my head to make these pants for St. Patrick's day, but I don't even think he wore them that day... or maybe I just didn't finish them in time, which sounds more likely. Good thing green cords are fantastic for any day.


Saturday, November 24, 2012

Color Blocked Kid Pants Tutorial

Just bringing home a tutorial I did for KCWC on Elsie Marley this fall. Enjoy!


Hey, I'm Jessica from A Little Gray, and I'm downright chuffed to be kicking off the pre-KCWC festivities. I love this event so much, but in the spring I didn't get to participate because I was competing in Project Run & Play. (Which is going on again right now, by the way. Lots of inspiration there.) But this time around, I am all in!

You should know that I love to sew boy clothes. I have a little girl too, but for some reason the boy sewing comes much more naturally to me. Color blocking has been a great trend for a while now, but it seems like girls have been having all the fun with blocked skirts and dresses. When I saw this new collection from Michael Kors, I knew my 3 year old needed to rock some color blocked pants.


This first pair is inspired directly by those Kors men's pants that are different colors on the front and back. Using Dana's fantastic kid pants pattern, I simply cut the front pattern piece from peacock blue corduroy and cut the back from navy. Not much to explain there, but it's something I never would have thought to do before. 

I also cut them a little skinnier (see below) and added back pockets with contrasting bright blue topstitching. I think back pockets are such a great way to make pants look much more polished and professional. I basically make mine like this tutorial. You can use an existing pair of pants to make a pocket pattern. 


I couldn't stop at just one pair of CB pants, (despite my husband's looks of great concern for my sanity) so I decided to try it with contrasting bottoms this time. They look pretty cool cuffed with some chucks.  The result is just like this pair, but pieced instead of painted. That's what I'm going to show you how to make today.


But first you can very easily make them fit slimmer if you prefer. I did this by marking a line on the bottom of each pattern piece, 1.25" in on the inseam side. Continue to draw the line up so that it's perpendicular to the other straight side of the pants. Then as you get closer to the crotch, ease the line into that curve. Make sure you measure the same amount in on both pieces, and your pants will line up without a hitch.


Now I've cut the new shape out of my pattern and I'm going to figure out where to cut again for color blocking. First, cut a piece of string to the length you want the main fabric of your pants to be before the contrast color starts. I wanted my contrast well below the knee and I cut my string to 11.5". However, my son is tall and I have to add a few inches onto the bottom of this pattern for him. So if your child fits the pattern as is, you might want to take 2-3" off of that length.

Use your string to start at the point of the crotch and measure down the inseam to mark the pattern at the end of the string. Of course, you want to keep it flush against that curve, which I wasn't able to photograph very well.


Use a ruler to draw a line at that mark all the way across the pattern, keeping it perpendicular to both sides. Cut the pattern on that line and repeat the same process with the string on the other piece. It's also helpful to write "front" and "back" on those bottom pieces now so you don't get them confused. 


Now cut all your pieces from the two fabrics, cutting two pieces on the reverse from each like normal. HOWEVER: be sure to add 3/8" for seam allowance to the bottom of the main pieces and top of the contrast pieces. In other words, on the edges where you cut the pattern apart. 


Sew all the contrast pieces onto the bottom of the corresponding main piece, using that consistent 3/8" seam allowance. Finish the seams and topstitch them down on the contrast side with matching thread.

Now you are ready to sew the pants together as usual. But when you sew the inseam, pin very carefully so that the contrast seams match up perfectly. Do the same when you sew the outside seams, hem as usual, and you are done!


If you like this look, you should also check out Blue-Eyed Freckle's tutorial for how to add a contrasting bottom to existing pants.


Thanks so much for having me Meg, I can't wait to see what pops up in the flickr group. Maybe I'll even get to see some color blocked pants? Happy KCWC sewing everyone!


Monday, August 6, 2012

Boy's Muscle Tee with Reverse Applique Tutorial

Today I'm posting a tutorial I did earlier this summer for Delia's Color Your Summer event. Enjoy!


So happy to be celebrating a colorful summer with you today! I'm a big fan of the men-wearing-purple trend right now. But it's still not something you will likely find in the boy's section at Target.

So when Delia invited me to play at CYS, I knew I wanted purple, and I knew it would be something for my boy!


This little muscle tee has become my go-to summer wardrobe staple to make for my 3 year old, Hendrix. They are so cute and hip, super wearable, fast to whip up, and the possibilities for embellishment are endless. 


So today I'm going to show you how to make the basic tee, and how to add a little hand-stitched reverse appliqué flair. I used to avoid hand stitching anything at all costs. But these days I'm addicted to embroidering on my kids clothes. It's really not as time consuming as I used to think, and it adds such a special look to knits. As you can see, my stitches are far from perfect, but that's the look we want here!

And yes, I did make my kid a "purple rain" shirt. It wasn't the original plan, but I really can't resist a weird pop culture reference on a three year old :)


Ok, here's what you need:
  • 1/2 yard of interlock knit (More for a kid bigger than 4t,  or you can always upcycle an old adult tee.)
  • 1/4 of contrasting rib knit
  • Thread that matches the interlock
  • Embroidery floss or perle cotton that contrasts the interlock
  • Chenille needle, or other embroidery needle with a large eye
  • 1/4 of Pellon Wash-n-Gone, or other stabilizer
  • Chalk or marking tool
  • Stretch machine needle


First make the pattern. I traced this shirt that I made for the PR&P finale because I know I like the way it fits. If you don't already have a muscle tee, you can just trace a regular tee and leave the sleeves off. Make sure to add about .5" all the way around for seam allowance, and a little less than that on the arm holes. I don't hem these shirts, but if you prefer to hem, add that to the pattern as well. I leave my hem raw and cut it to curve down a little in the middle for a cuter fit over little tummies. 

*KNIT TIP: I like to trace my patterns onto freezer paper when I am sewing with knits. Draw on the matte side, then iron the shiny side down onto your fabric and it sticks. This helps me cut the knit more accurately without pulling and stretching. 

Cut out your pattern piece and cut two of them from your main fabric. 

**KNIT COMMANDMENT: You must cut out the fabric so that the most stretch is going across  the body. Just think of the way your t-shirts stretch.


The front of the neckline needs to go lower than the back, so take just one of your cut pieces and draw a lower curve at the neck, taking off about 2 inches at the lowest point. Cut.


Now pin your two pieces together at the shoulders and the sides. (Right sides together, if your fabric has right sides.) Sew these seams with a 3/8" seam allowance and make sure to backstitch at the bottom of the side seams, since we are not hemming the shirt.

*KNIT TIP: I like to change my machine to a narrow zig-zag stitch with a width of 1.0 and length of 3.0. This way the seams have a little bit of give in the stretch fabric. (Learned this one from Figgy's!) On my machine, this also gives me a 3/8" seam allowance, which is perfect. 

*KNIT TIP: If you are having trouble with your machine "eating" the fabric at the edges, just start your seams in the middle of the fabric, then go back and finish the rest from that point. 

**KNIT COMMANDMENT: Use a stretch needle. If you don't, you'll likely see your needle holes start to tear after a couple washings. 


Press all seams toward the back of the shirt and topstitch the shoulder seams to reinforce.

At this point, I always try it on Hendrix to see if I need to cut a little more off the neck or armholes. I almost always need to cut the neck bigger than I think for his giant head.


Now it's time to cut the ribbing for finishing the arm and neck holes. Measure around the neck by using a string or thread to find the exact distance around. Subtract 1" from that number and that's how long your ribbing needs to be, times a width of 2". For example, my neck was 12.5" around so I cut it to 11.5" inches (with the stretch) by 2" wide. So the most stretch is going from left to right in this picture.


Sew the short ended together on all three pieces. (Don't get your neck and arm pieces confused!)


Now fold the circle you have so that the long raw edges are together and the seam allowance is sandwiched inside, so wrong sides together.


Start with the neck. You are going to match up those two raw edges of the ribbing with the raw edge of the neck on the right side of the shirt.

Begin by pinning the seam on the ribbing to one of the shoulder seams. Then find the exact opposite point on the ribbing and pin that to the opposite point on the neck hole (which is not necessarily the other shoulder seam, since the front of the neckline cuts lower.) Keep pinning in quadrants, stretching the ribbing slightly to match the shirt. The idea is to distribute the stretch evenly around the hole.

*KNIT TIP: Use lots of pins for this. LOTS! And just sew over them, much easier than trying to finagle them out while sewing in a tight circle.

Sew all the way around the hole, with the ribbing down against your needle plate, and the shirt fabric facing your presser foot. This way, you can make sure you don't get any puckers in the main fabric and also make sure you aren't stretching that fabric at all as you sew. Remember, it's the ribbing that is stretching slightly to match the neck hole, but if you pin well that will take care of itself.


Flip the neckband up and press. Now repeat the same process for each armhole. Hem it if you want, but otherwise, your shirt is sewn!


Time to make it your own with reverse appliqué. Decide on a simple shape or two that you want to use and draw the design lightly in place with chalk or a water-soluble marking tool.

Now cut a piece of Wash-n-Gone stabilizer and a piece of your contrast knit (the ribbing is fine for this) both large enough to cover the space of your design. Turn the shirt inside out and simply pin those down behind the design. The knit will be against the shirt, and the stabilizer on top of that.


Turn the shirt right side out again and use your perle cotton or floss (You only need three of the six strands in the floss) to stitch your design on. There is no magic skill to it, just use a running stitch or a sloppy-ish backstitch like I do. You can find a great tutorial on these stitches right here.


Very carefully pull apart the two layers of fabric in the middle of your shapes and cut out the middle of the top layer.


Finally, turn your shirt inside out again and cut the excess from around your stitches. Here you can see what the Wash-N-Gone looks like on the back, but after you wash it... it will be gone. Hence the name.


Oh so cute, and oh so PURPLE.


Thanks so much for having me today on Color Your Summer Delia!


Monday, June 11, 2012

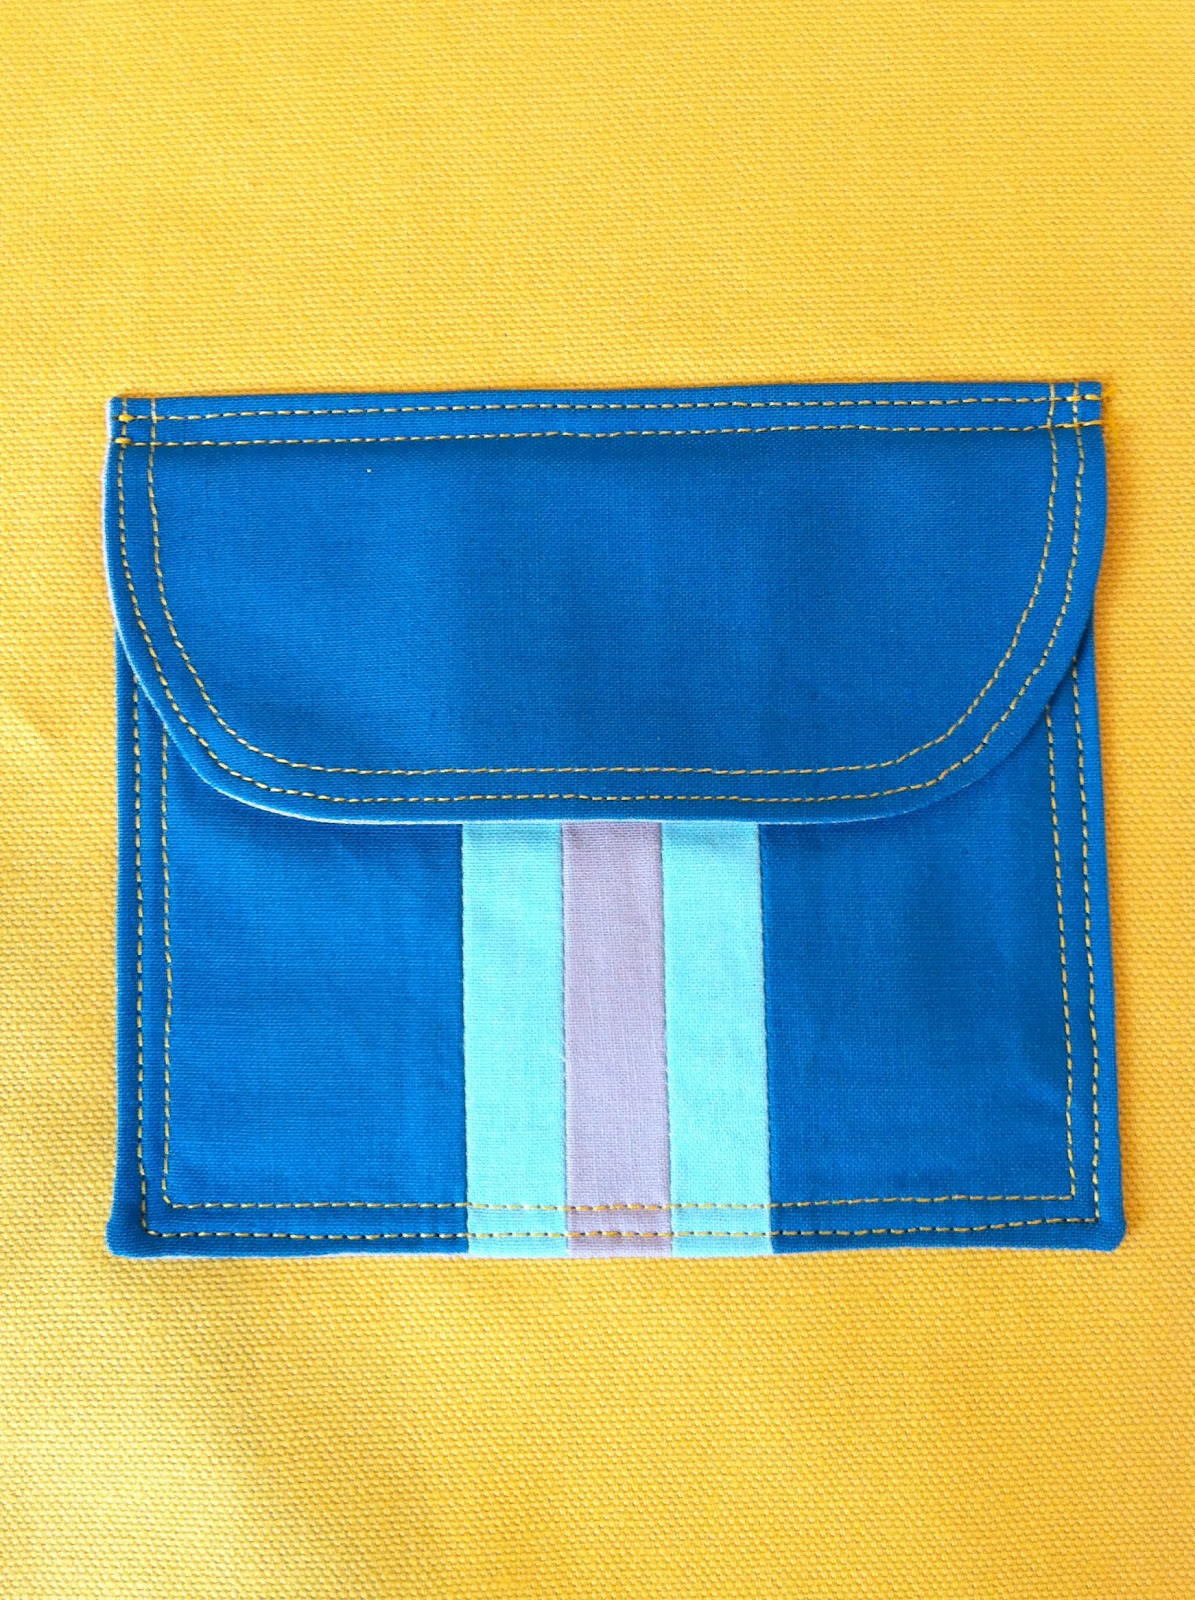
Perfect Striped Pockets With Flaps Tutorial

(This is another re-post of one of my Project Run & Play tutorials. See the entire "Howl at the Moon" look right here.) 


Hi, it's Jessica from A Little Gray, and WOW- I'm so happy to be back here to share a tutorial this week! I feel especially proud that a boy look won this challenge. I am more comfortable sewing for my boy Hendrix any day- this girly stuff is still pretty new to me!

Details are really important in boy clothing. Things like pocket flaps and contrasting topstitching go a long way on a pair of pants, and simple additions like bright stripes kick up the wow factor. So that's what I'm going to show you today.


You'll need a main fabric, two or three different colors for the stripes, and a lining fabric. I'll show you how to make one pocket, but of course the amount of fabric required depends on how many pockets you add. My "Howl at the Moon" pants had 4 pockets in this size, 2 on the back and 2 on the sides by the knees. 

First we'll make the striped patch pocket:

Cut each stripe to 1"x 5." Cut two pieces from your main fabric to 2.5"x 5." Cut one piece from the lining fabric to 6"x 5." Piece the striped front of the pocket together using a quarter inch seam allowance and press seams open. 


Pin the front of the pocket to the lining with right sides together. Stitch around the outside with a half inch seam allowance, leaving a couple of inches open on a shorter side for turning. At the beginning and end of this seam, stitch into the seam allowance right up to the raw edge, like a little tunnel for turning. This makes it much easier to get the seam allowance evenly tucked inside whatever you are turning. Clip the corners off, trim seam allowance to 1/8" except at the opening, turn right side out. Use a chop stick or turning tool to poke the corners and edges out while pressing.


Topstitch around the whole pocket 1/4" from the edge. Then pin in place onto the garment exactly where you want it. (I'm just using this scrap of yellow canvas for our example.) 


Topstitch around the sides and bottom 1/8" from the edge, leaving the top open and reinforcing at the beginning and end. 


Now we are ready to make the flap:

First make your flap pattern piece. I like to use freezer paper for my patterns, but use whatever paper you have on hand. Cut a rectangle to 6"x 3" and fold it in half so the short sides meet. Cut off the bottom corners so they curve gently.


Use your pattern to cut out one from the main fabric and one from the lining fabric. 


Pin right sides together and sew only around the curved edge with a half inch seam allowance. Leave the entire straight edge open. Trim seam allowance to 1/8," turn right side out through the top of the flap, and double topstitch the curve at 1/4" and 1/8." 


Now pin the flap onto the garment right sides facing, so that the straight open edge is just slightly above the top of the patch pocket. 


Sew it down 1/4" from the raw edge and then carefully trim the seam allowance down to 1/8."


Fold the flap down, press, and double topstitch at the top, and that raw edge will be enclosed underneath. If you'd like, you can add bar tacks at the top corners to keep the flaps from sticking up like I did on the original pants. 


Your professional looking pocket is done and ready for action!