Monday, October 15, 2012

Abominable Snowman Stocking Tutorial


Welcome to our first Holiday Craft Bash tutorial! This week is all about stockings, and as you can see, I've made a stocking honoring Bumble, the abominable snowman from Rudolph. Who doesn't love that old claymation tv special? It's just one of those nostalgic things that brings back great Christmas memories. 


And yes, we know it's only halfway thru October, but now you have plenty of time to create your own Bumble stocking. As you can see, this project involves a lot of machine appliqué, but I've scanned my drawings for you to download and easily use yourself. You will need to print Bumble's face template and the hands and star template. (Please let me know if those links aren't working for you and I'll see if I need to change something.)


Supplies:
- 1/2 yard fabric for the outside of the stocking. It's best to use a darker solid or near-solid. I used Essex yarn-dyed linen in black. 
- 1/2 yard lining fabric. 
- Small amount white felt and blue felt. I would advise getting a wool blend, not those little squares of craft felt. Stockings should last through the years!
- Gray scrap for the star
- Red scrap for the tongue
- Black perle cotton or embroidery floss. And red is optional for the star. 
- Stocking shape pattern. These are very easy to make by tracing an existing stocking and adding 1/2" for seam allowance all the way around. Just make sure the straight part of your stocking is at least 9" across unfinished to have room for this Bumble design. 


Cutting:
First let me talk about cutting your shapes out and securing them on the stocking. There are basically two ways you can do this. 

The first is to use two-sided fusible web. (If you have not used this before, sorry that's not part of this tutorial. But you can find lots of other tutorials on it, or just follow the package directions.) You can trace the templates onto the paper side of the fusible web, iron it onto your felt, and then cut them out and they are ready to fuse onto the stocking. Just make sure you trace the hand in two mirror images. On the other pieces, direction doesn't really matter. 

The second way is what I did, and that's use fabric spray adhesive or quilting spray baste. Whenever I have a project with several different pieces to appliqué, I prefer this method rather than messing with fusible web. Plus I always have spray around. I traced the shapes onto the matte side of freezer paper, ironed that onto the front of the felt and then cut out the pieces. Then they are ready to be glued on with spray. 

Also remember to cut out a circle about 6" in diameter from the blue felt for the background of Bumble's face. This is not included in the templates. 

Use your stocking pattern to cut out 2 from the main fabric, and 2 from the lining. Then cut a piece from your lining that is 2.5" x 9" for the hanging loop.


Iron both lining pieces down to the wrong side by 1/2" at the very top. Create a good crease and then unfold again.


Pin the two lining pieces right sides together, and sew around the sides and bottom, leaving only the top open. Use 1/2" seam allowance. After stitching, trim that seam allowance down to 1/4".


Now make the hanging loop. Take the 2.5" x 9" piece and fold it wrong sides together so that the long edges meet. Press. Open it up and fold both long edges in to meet that crease in the center you just made. Press. Fold it on the center crease again so that the long raw edges are inside and press again.


Stitch down the open side very close to the edge so you are left with a little strap to use for hanging. Set aside.


Now take the front piece of the stocking and arrange your cut shapes where you want them. remember that 1/2" will be lost all the way around to seam allowance. Once things are generally where you want them, take off the white parts and spray/fuse down the blue parts along with the star.


Machine stitch around the edges of each piece. Felt won't fray, so just use a straight stitch. I even used a straight stitch on my cotton scraps because I want them to fray a little, but use whatever appliqué stitch you'd like. The fingers are curvy, so go slowly!


Once all the blue pieces are stitched down, add the white pieces and the red tongue. (Just cut a small half oval shape for the tongue that fits under the lower teeth.) Stitch around these pieces staying as close to the edge as you can. Notice that I didn't try to go stitch to the edge of every tiny tooth, just stayed close. 


Don't forget to add the fur cuffs to each hand. You want these to hang off the edge of the stocking a little.


Almost there, now we are just going to add a little hand embroidery for the features. He wouldn't be Bumble without those crazy eyes and that turned up nose. I used a satin stitch for his eyes, and backstitch with French knots for his nose. Don't really know how to do those things? That's ok, I don't either, I just kinda wing it. But Wild Olive's stitch tutorials help me a lot.


I also added claws with backstitching and a red running stitch around the star. Don't be afraid of the hand stitching, it's really worth the time and it doesn't need to be perfect at all.


Now put the outside of the stocking together the same way we did the lining. Create a 1/2" crease at the top first, then sew right sides together and trim the seam allowances down. Be sure to clip into the curves this time, and then turn it right side out and press.


With the lining still inside out, stuff it down into the outer stocking, so that wrong sides are together. Refold both pieces so that the tops are creased to the wrong sides again. Line up the side seams and pin all the way around the top.


At the outside seam, stuff both ends of the loop piece down between the layers and pin.


Sew all the way around the top, very close to the edge with the lining facing your presser foot and the outer against your needle plate. Reinforce your stitching where the hanging loop is. 


Ta-dah! How fun is that stocking? All your friends will think you got it somewhere kitschy like Cracker Barrel, but be sure to tell them it's not so. 


If you do make this, or any other project you see over the next few weeks in our Holiday Craft Bash, be sure to add them to the flickr group. Anyone who adds pictures of stockings they made by next Monday will be entered to win this beautiful felt and perle cotton prize package from Sewn Studio.  


And there will be new prizes up for grabs each week for those who sew along on Flickr. Be sure to head over to Olivia Jane Handcrafted to preview three more beautiful stocking projects you will have to choose from!


Wednesday, October 10, 2012

KCWC Days 1&3


You may have been here last week when I talked a big game about getting a lot done for KCWC this year because my kids are in Florida for the whole week. As is turns out, there are so many more fun things to do besides sew when your kids are gone and you can do whatever you want. Who knew? Also, I have a job and playoff tickets and episodes of SYTYCD to catch up on. Priorities people. 

Even so, I've managed to make 2 items for Elsie in these first three days. For the rest of the week, I think I just need to continue down this path of following simple patterns I've made before. I also need to continue down the path of not caring if I miss a day. There is surely post-Reds-win beer to be had tonight, not more sewing. 


Pattern: O&S Class Picnic Blouse, size 18 mo

Fabric: AMH Loulouthi Framed in Shadow

Notes: A simple sew, just like the first time. Really had to squeeze in some fussiness when cutting this print though, and I love the effect. I promise the panel in the front is more centered than it looks here. 


Pattern: R is for Romper from the Sewing for Boys book, size 12 mo

Fabric: Old blue shirt and floral knit from Joann

Notes: I've used the Raglan pattern  from this book a lot, but it doesn't come in a size small enough for Elsie, so I modified this romper pattern to be a long sleeve tee. And I added the pocket, which is slightly crooked, but doesn't this side angle shot hide that well? I really love this funky knit I found in the clearance section. It's by April Johnston from PR a few seasons back. 


Wouldn't these look so much cuter on my little model? Despite all the grown-up basebally fun we are having, I miss my kids terribly. The couple in front of us at the game last night had the sweetest baby girl and I couldn't stop staring at her. It was all I could do to not ask them to let me hold her. That probably (definitely) would have been inappropriate, but I almost didn't care. Almost. 


Monday, October 8, 2012

Christmas Planning and Cindy's Pillow

Something really fun is coming next week! Meredith has invited Jacey, Debbie, and myself to participate in the Holiday Craft Bash with her and I'm getting so excited about all the projects we are going to share.


Each Monday thru Friday for the next few weeks, a different one of us will be sharing a Christmas project and how-to. I love the idea of this set-up because we all four have such different strengths and styles. Jacey is just brilliant at putting together colors and fabrics, Meredith does amazing embroidery and handwork, and Debbie does such modern appliqué and piecing. 

And me? Big surprise, I've decided to go with a movie theme for all my projects. I can hear your gasps. But who doesn't love Christmas movies? Here's my list of holiday flicks I'll be using in my creations- 

  • Home Alone
  • Christmas Vacation
  • A Christmas Story
  • Elf
  • Rudolph
Should be fun. And we are starting early so that Christmas doesn't sneak up on us before we have a chance to make some new decs. Happens to me EVERY YEAR. 

So you will get blasted with holiday inspiration thru the week, and then on Fridays we will have prizes for those of you who sew along with any of the projects. Really good fabrics and stuff from Sewn Studio, Stash Fabrics and more. All you have to do is add your work to the Holiday Craft Bash flickr group to be entered to win. 

Next Monday I'll be kicking off with my stocking project. Get. Excited. 


And before I spend the rest of the week sharing clothes for KCWC, I wanted to blog about this pillow I've been meaning to share forever. 


You may remember a while back I had some fun with a spammer and a comment contest. Pretty sure the spammer didn't actually see the comments, but I said that whoever wrote my favorite would get a custom pillow cover made by me. 

The very talented Cindy of Siestas and Sewing wrote my favorite comment and she asked for chilled out blues to match her home's beachy vibes. She also said her yellow kitchen was visible from the living room, so I threw the yellows in too. Totally sunny and beachy.


My couch pillows are a little smaller than Cindy's, so the pillow looks slouchy, but I think it filled out well for her. I used all scraps and fusible quilter's grid to get all those seams matching up exactly right. I love that stuff, because my seams would never look that good without it. Maybe I'll try to work it into one of my holiday tutorials for you?


Ok, I really have to get sewing on those clothes. I have no kids for the week, no husband for the night, no excuses! 


Tuesday, October 2, 2012

My Thoughtful Thoughts on Boy Sewing

Morning! Just popping in again to let you know that I have a guest post on the Project Run & Play site today that's all about the whys and hows of sewing for boys. It's something I love a lot, and I truly want every sewing mama of boys to feel the same way. You can read my rant right here.  (Rant with inspiring pictures, of course!)

Finale Looks


And in case you missed it, don't forget to check out my color blocked pants tutorial on Elsie Marley from yesterday. KCWC is coming quickly!


Color Blocked Kid Pants


Monday, October 1, 2012

KCWC: Guest Post and Planning


Today I'm guest posting at Elsie Marley with a simple tutorial on how to make Dana's kid pants pattern into color-blocked fashion statements. Find it right here.

I'm pretty excited to be a part of KCWC this year! If you don't know what that is, then you must be new here. And by "here" I don't mean ALG, I mean the whole sewing internet subculture thingy.

It's Kid's Clothing Week Challenge, and Meg from Elsie Marley puts it on every spring and fall. The idea is to spend at least an hour a day for a whole week sewing for your kids. Which is, in fact, a challenge. Even for someone like me who sews a little almost every day (maybe 5 out of 8, just to give a ratio that makes no sense and is not actually ratio), it's a marathon. There's also the photographing and blogging to attempt to keep up with. But you don't want to miss that part because there is SO much inspiration and such a feeling of community. It's pretty giant. But there is no blog required, just join the Flickr group. And don't forget to sign up for KCWC so there is a good count of the hoards of crazed sewing moms participating. Do that by leaving a comment on this post. Simple. Hurry though, because it starts next week!


In the spring during the last KCWC, I was competing in PR&P so I didn't get to join in. But last fall, I planned and cut almost all my garments the week before it actually began. That made the sewing part go much more successfully, and I'm hoping to get some serious cutting time in this week. I've already got my stack going and patterns assigned. I'm really trying to sew mostly for Elsie since Hendrix has been getting all the new handmades lately.

The one thing missing from the stack above is fabric for her new coat. I'm going with this pattern, which I've seen several cute versions of, but this one by straight grain clenched it for me.


Now I realize that is a really ambitious list for one week. I'm realistic that I won't get to all of it. But I'm also hopeful because I've had the stars aligned for me and my parents happen to be taking the kids to FL next week. Yes, both of the kids, all week. Besides KCWC-ing, I will also be working extra hours and going to the Reds playoffs games, (WOOOOHOO!) and possibly descending into a deep depression from missing my kids. Ok, probably not on that last one. I'll have to just sew my tushy off to distract myself.


Tuesday, September 25, 2012

Film Petit: Fantastic Mr. Fox


"If what I think is happening here is happening... it better not be." -Mrs. Fox

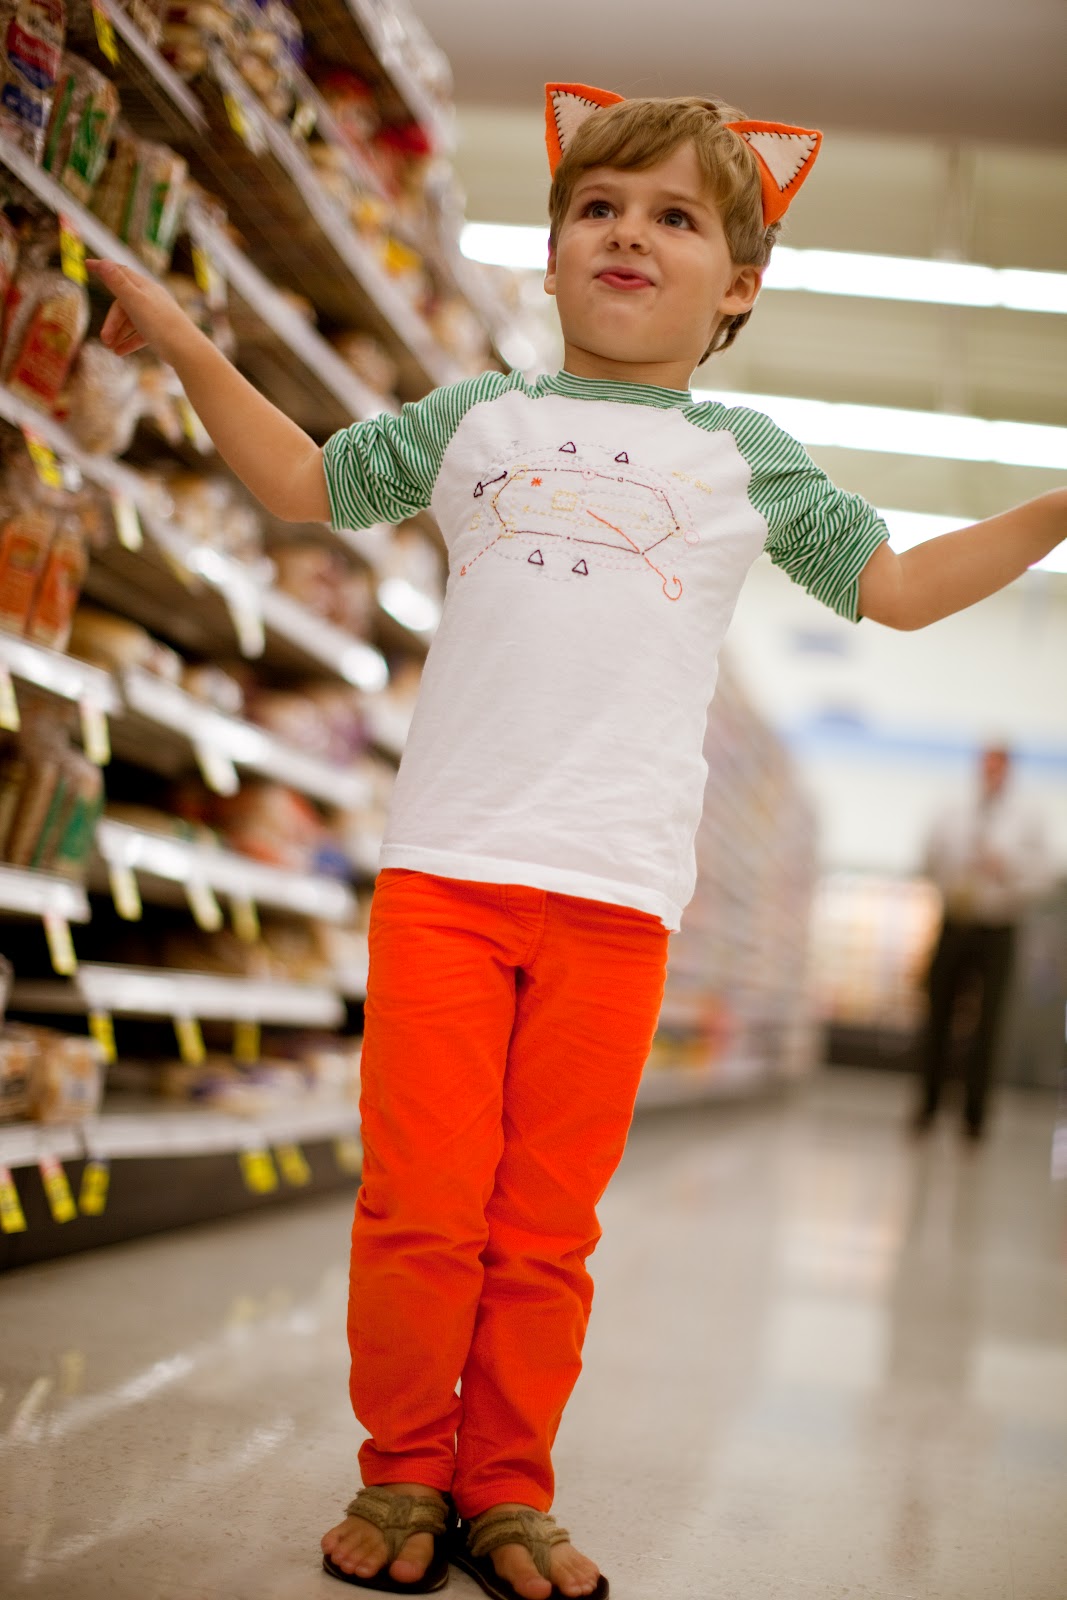
It's Film Petit day!!! Yes, we came back to another Wes Anderson film. We just couldn't stay away that long. But Fantastic Mr. Fox is the only animated film Wes has done and the only one that even Hendrix is a huge fan of. He was very excited about this month's look.

The movie is stop motion animated. That combined with Wes' attention to detail really makes it visually stunning. I love watching the DVD extras about the animation process and just how much he was involved in every single little decision. He even acted out each character's parts himself on video just for the animators to learn how each character moved and acted.


My look is a little less literal this time, but I associate it loosely with the character Ash. Ash is Mr. Fox's son. He's grumpy, he spits, he wakes up on the wrong side of the bed. He never seems to be able to get his father's attention in the ways he wants to. He is probably summed up best in a conversation with his mother in which she says he is just 'different,' as they all are in the Fox family. He responds with, "I don't want to be different. I want to be an athlete."


There are so many themes and lines and quirky Wes-isms that I love about this movie. The way the characters eat like wild animals even though they live and act like people, the way they say "cuss" in place of every actual cuss word, and all the capers stealing from the most hilarious trio of antagonists.


But my favorite scene is definitely the ending. SUCH a great ending. After being under siege by the three farmers, Boggis, Bunce and Bean, Mr. Fox finds a sewer entry into a great big supermarket after closing, filled with everything they could ever need. So of course, Mr. Fox makes a toast, and then they just dance. They dance to Let Her Dance by Bobby Fuller, which is just perfect. Every time we watch it at home, Hendrix immediately gets up at the end and shakes it all over the place. You can see he had no problem doing that in our actual supermarket. 


I guess I should tell you a little about the clothes. The pants are Peek-a-Boo Pattern Shop's new skinny jeans pattern, the very same I made for Elsie a couple weeks ago. I definitely love a good unisex pattern, and this one will get lots of use this fall. The fits is great and the pattern spares no detail, which really makes them look pro. But my favorite thing about these is the bright electric orange hue. It's fine wale corduroy from Sewn, and Hendrix pulls it off like a pro. I couldn't love these crazy pants any more. 


The shirt is the raglan pattern from the book Sewing For Boys, made with a couple up cycled tees. (And I put the seams on the inside.) I hand stitched the entire diagram from the movie that explains the rules of Whack Bat. It's a game that Wes made up just for the movie, kind of a baseball/cricket hybrid where the players hit a flaming pinecone. I realize that it's the kind of thing that no one will recognize, not even most people who have seen the movie. But you know that I like my kid wearing weird references no one gets... that's definitely the fun of Film Petit sewing.


Whack Bat Rules
"Basically, there's three grabbers, three taggers, five twig runners, and a player at Whackbat. Center tagger lights a pine cone and chucks it over the basket and the whack-batter tries to hit the cedar stick off the cross rock. Then the twig runners dash back and forth until the pine cone burns out and the umpire calls hotbox. Finally, you count up however many score-downs it adds up to and divide that by nine." 


"There's a lot of attitudes going on around here... don't let me get one." -Ash


Now you absolutely HAVE TO go see Kristin's amazing Mr. and Mrs. Fox outfits. She seriously kills me. Dead.

And we had so much fun planning and previewing all month with the super-talented Cherie. Her little foxy look is just stunningly creative and beautiful, it cannot be missed. Thanks so much for sewing with us Cherie!


Thursday, September 20, 2012

Japanese x and + Scrappy Quilt- Done!


This is my favorite ever. I'm just gonna get that out of the way.

And what's with my downstairs neighbors putting up spiderwebs in the middle of September? Also gonna get that out of the way...


So this new-favorite-ever quilt is made up of 48 Japanese x and + blocks from Amy's great tutorial. I was also inspired a lot by Leila's gorgeous quilt. I started making them last December, just a few at a time, completely out of scraps leftover from other projects. Some of the scraps go back to when I first started sewing almost 5 years ago, long before I was quilting. I blogged about some of the blocks here and here. 


There are also scraps from every other quilt I've made, from every PR&P project, from stuff I used to sell on Etsy, and every other gift and toy I've made. It's pretty cool to watch my 3 year old Hendrix sit and point out all the fabrics he recognizes from things that are still used and played with around the house. I feel like it's a sewn journal of what I've done so far. 

It's also funny how you start to sentimentalize all the places your fabric comes from, even the online ones. Of course, a lot of this fabric came from Sewn Studio, which is pretty much the reason I started quilting and became any good at any kind of sewing. But the fabrics also come from great brick and mortar shops like Crimson Tate and Whipstitch, and my favorite online sources Fresh Modern Fabric, Hawthorne Threads, and Pink Castle. 


I'm very happy with the way my quilting turned out on this one. I've gone back to pin basting, after being a sprayer for a long time. I really do think it helped my straight line quilting turn out much better. Plus the quilt feels softer without the spray baste, and I'm glad to not buy any more cans of it. Yes, the process is a little longer, but I didn't really mind. Crawling around on the ground isn't the most fun either way.

I quilted 1/8" on either side of every seam that made up the +'s and x's. It took a long time, and lots of marking, but totally worth it. I also used Aurifil thread for the first time and I loved it. This was a whole lot of quilting and I only used 3/4 of the spool. I feel like I would have spent close to the same amount for several spools of Mettler. I may be and Auriful convert now as well.


The back is all pieces from my stash, and the border is Essex linen in leather, (thanks so much Rachael!) which is a kind of weird color on it's own, but looks great against these bold blocks. The binding is a Joel Dewberry Herringbone that was also in my stash. The only thing I bought for this quilt was the thread and batting.

I love how the design of the quilting forms those star shapes on the back. Also love how you can see the shapes of the blocks through the back when the light hits it. Perfect.


I usually start and finish quilts within a month or two, but I'm so glad I took the time to work on this throughout this year. It's the most beautiful thing I've ever made and it's all from leftovers. When I think about that, it really helps me not to splurge on the 187 great fabric lines that have come out recently. I just want to start on my next scrap quilt already!


It finished at 68" by 52" and it's getting lots of use on the couch already. What a great way to start fall. Thanks so much for indulging me by looking at 4 dozen pictures of it :)