Monday, March 25, 2013

Purple Zig Zag Quilt


Since it's March 25 and it's snowing outside and I haven't really gotten dressed in three days, I thought it might be high time to share this quilt I finished back in August. August 2012, a time when the sun was shining and I had enough life in me to finish things.

I made it for our best friends' ten year anniversary and finished it just in time to give it to them without taking pictures. I was too excited to take pictures, as I usually am with sewn gifts. Anyway, they liked it. I think they still do. It looks pretty good as a throw blanket in their stylish place. Then I stole it back from them last week and took some pictures, because when you blog you think you have a good excuse to do weird things like that.
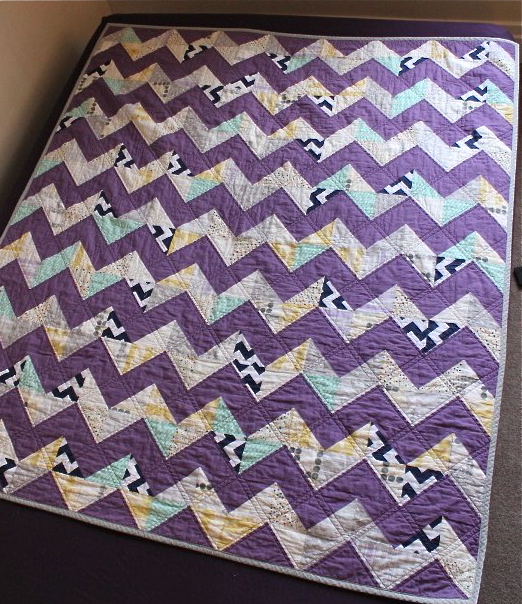


I really love the colors of this quilt. I first blogged about my fabric selections and using "triangles on a roll" here. You put a cut of paper over the 2 fabrics you want to make HST's from and then just sew where the lines tell you. Cut them apart and you've made a lot relatively quickly and really accurately. You just have a bunch of paper to rip off now. Still worth it for a quilt that is made of them entirely. We have a class at Sewn Studio that teaches this quilt, so we were all kind of learning how to use the product together.


After all the HST's were done I put them together randomly for the most part. I think it turned out great that way, plus trying to control where everything ended up would not have been enjoyable for me. The only thing that worried me at first was if that navy chevron was too much with the rest of my low-volume prints. But once the whole thing was together, I loved the effect that chevron print made. Totally would have been a bore without it.


The top only uses 8 quarter yards plus 2.5 of the background solid I think. So for the back I just put together all the quarter yards of those prints I had left. (Since I usually stash half yards.) The quilting is a simple double diagonal grid. This was the quilt that made me realize my walking foot sucked. It's not terrible quilting, but after I shelled out the $70 for a good walking foot after this, I quickly realized it wasn't great quilting either. Sometimes it's a relief to know it was your tools that sucked ass and not you. 


The binding is that Moda pre-made single fold bias from Sewn that I loooooove to use so much. Makes that end-of-the-quilt-I-just-really-want-to-be-done-with-this part go much faster. 


This little sprite in Santa jams thinks it's pretty cozy. Maybe it's time to start on one for her near-future big girl bed?


Thursday, March 14, 2013

Dresden Baby Quilt


I guess I didn't get all the dresden plates out of my system with my last finished quilt. I really wanted to make some traditional dresdens with the pointy blades, instead of rounded off like my modern dresdens quilt. This one is for a very good friend who just had her first baby. We grew up together, and even though we don't talk all that often now, she is just one of those people I will always think of as a close important friend. And when we do get to see each other, it's a very happy thing.  


I started by pulling soft girly colors out of my bag o' scraps. The picks edited themselves into a pastel primaries selection. Then I added the black sketch print and a couple other black or gray prints. That was all it needed to tie everything together with an edge. But a baby-appropriate edge. So it's pretty fun that I was able to get such a great color story just from my scraps. I only had to cut into a couple of my new pink Lizzy House Pearl Bracelets.


The quilting was pretty experimental. I had borrowed my mom's copy of Angela Walter's FMQ book and one night I was drinking wine and looking thru pictures in it. Then I decided, "hey I should just do some of that to my dresdens." So that's the extent of the planning that went into it. I tried swirly things in the center circles. I wish I had taken a close up of that light blue one, because it was the first and it really sucks. But the other three are pretty good.


This is an example of pretty good. Really, I should show more of the sucky stuff right? Then I just did meandering loops in the rest of the dresdens. Straight lines finished out the background, mostly because I knew I would screw things up if I tried another fmq pattern there. Still, it always feels good just to get slightly more comfortable with it. And the combination of quilting styles gave it a great crinkle.


I bound it in Bella Feather, same as the background, to keep the impact of the plates. My first choice would have been that black sketch, but I didn't have enough. I like the look of white binding a lot though.

The back is a Liberty Lifestyle print from Bloomsbury Gardens. The quilt finished at about 43" square.

Now I'm working my way through the WIP list and I hope to have more finishes to show for it soon!


Tuesday, March 5, 2013

Oliver & S Spring Patterns: The Pinwheel Tunic & Dress


Last week you got to see my reversible version of the new Oliver & S Roller Skate pattern.  This week the "Rolling Tour" is back with the last new spring pattern from Liesl and her team, the Pinwheel Tunic and Slip Dress.


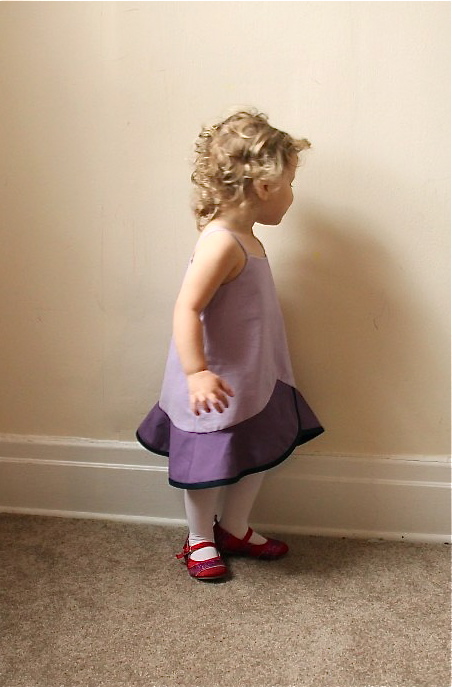
Like the Roller Skate, this pattern has several options that can be used to achieve lots of looks. But in my opinion, this one is more of the "special occasion" pattern because of the great flounce factor. It's completely different from anything out there today- a dress that is actually made of layers, a tunic worn over a slip dress. I wanted to make both pieces to be worn together, but also get two different garments that she could wear apart and look different from each other. So I went with a selection of four solid cottons from Sewn Studio. They are Moda Bella in green, caribbean, lilac, and aubergine. 


I LOVE the way the layered flounces look on Elsie in these colors. This will definitely be the perfect Easter Sunday dress this year. I made her the 18-24 month size. I've been starting to use size 2 on the O&S patterns so they last longer, but I knew this one would look off if it was too roomy on her. I'm glad I did that because the fit is perfect. 


Here is the purple slip dress without the tunic. This will be really sweet in summer with some sandals and a new bucket hat. I love the way the dress is constructed, with the straps sewn in between the main dress and the facings. I'd love to use the top of the pattern again and remix it with some different skirt styles.


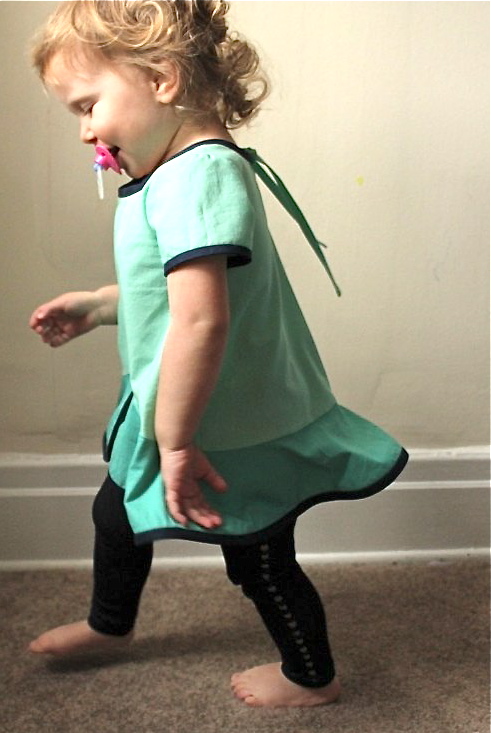
This post required photo shoots over the course of 2 days because there was no way my 22 month old was going to hang in there for all 3 looks at once. She is becoming SO hard to photograph. For the tunic portion, we had just returned from the doctor (to get staples out of her head, crazy girl. Don't worry, she's fine) and she was about to nap. Thus the pacifier and blankie- we do what we gotta do. 


I'm a huge fan of the tunic part worn with leggings. I think the simple short sleeves on top look so sweet and I love that it still fits over her head with just a tie in the back. We will get a lot of wear out of this. Come to think of it, I just knocked out St. Patrick's and Easter sewing for her!


And of course, the twirl factor is still there with the single flounce. She seems to be a big fan of the Pinwheel too! There is a lot of bias sewing on this dress, but it was great practice. I actually feel like my stitch in the ditch skills have never looked better. But I did use pre-made Moda single fold bias tape from Sewn Studio, which was a giant time-saver.  You buy it off the roll by the yard and since it's Moda it's infinitely softer and better to work with than the packaged pre-made stuff. I love having easy access to it at work and I use it whenever possible. But this pattern would be great with some homemade print bias tape, and Liesl has posted lots of bias help on the Oliver & S blog.


The pattern should be released any day now! It's been really fun to work on both of these great new styles, and as usual they did not disappoint my high expectations of Oliver & S. If you missed it, check out Kristin's adorable sleeveless tunic from yesterday, and look out for Cherie's sweet Pinwheel dress tomorrow.


Thursday, February 28, 2013

Oliver & S Spring Patterns: The Roller Skate Tunic


roller skate dress + tunic rolling tour

Welcome to the second stop on the "Rolling Tour" of the soon-to-be-released Oliver & S Roller Skate Dress and Tunic! Kristin started us off this morning, and Cherie will be the caboose this afternoon.


Elsie was not what you would call super excited about this rushed evening photoshoot. Not one bit. 


Mirth and excitement followed, no luck on the standing still though. M&M's can only do so much with the under 2 crowd. 


Somehow I was lucky enough to receive the brand new Oliver & S spring patterns a little bit earlier than release so I could have some fun with them. (Ahem, lucky enough= buddies with Kristin.) I love their patterns for the same reasons as everyone who sews with them- they are so cute and stylish, trustworthy, well-constructed, not too frilly, and you always learn something new using them. But also, as someone who works in a fabric and sewing shop, I don't know what I'd do without them. We carry them all, and when someone comes in looking for something to sew their little girl or boy, I can always find an Oliver & S pattern to recommend that fits the bill. And I can usually say to the customer that I've sewn whatever the particular pattern is myself as my own collection grows. They are setting the standard, and their two newest designs are just as fresh and precise as we've all come to expect. 


So this first new offering is called the Roller Skate dress & tunic pattern. I made the tunic length, without the optional yoke, so it's basically just two pattern pieces. It's designed to be fully lined, but I cut the lining to the same length, making it fully reversible. It's got an adorable built-in cap sleeve, and an elastic casing that gives it the cutest shape.


 Since the shape of the tunic or dress without the yoke is so straightforward and simple, it's the perfect  pattern for using a large, bold print. I have been dying to use this gorgeous tribal ikat-ish print we got in recently at Sewn Studio, and I'm so happy I got to here! It's called Boucherouite Blush from the Luxe in Bloom Collection by Sarah Watson for Art Gallery. This has got to be my favorite collection from Art Gallery ever. (I really can't wait for her next one, Indian Summer.) The coral pink on the reverse side is called Crystalline Reef, from the same collection. The softness that AG fabrics are known for is really great on this comfy top, and makes me wants to use them for garments a lot more.


 On the back it has a simple one button and loop closure. I used a pearl shank button from my vintage collection.


This pattern is so quick and satisfying. I'll definitely be trying the dress length, and probably another tunic with the cute v-notched yoke. I made a size 2 and discovered that you can squeeze one tunic out of two half yards- perfect.

Thanks so much to Liesl for letting us have fun with the new spring patterns! Kristin posted her super sweet dress version this morning, and Cherie has the tunic with yoke on the way this afternoon. It's our little "Rolling Tour." (GET IT?)  The pattern will be available for you to purchase online tomorrow, and at Sewn Studio (or your local shop) soon after that!


Next week I'll be back with my version of the versatile Pinwheel Pattern. Yay!


Wednesday, February 27, 2013

Film Petit #7: The Big Lebowski


 I can't quite remember the first time I watched the Big Lebowski. I know it was with Nick, but we've watched it so many times since then that I can't recall. It's a staple in this house... when the kids are in bed.


It's about the Dude, played by Jeff Bridges in his most memorable role ever. He's a slacker pothead in LA who spends his days bowling with Walter and Donny, John Goodman and Steve Buscemi, respectively. Suddenly his routine is interrupted when a group of porn thugs mistake him for a millionaire with the same name (ahem, Lebowski) and pee on his rug. It really tied the room together.

Anyway, the Dude is enlisted by the real millionaire Lebowski to get his wife back from some Nihilists trying to make some quick cash, and Walter helps him f*ck the whole thing up. Before long, there are many shady characters after them and Donny is dead. Excuse the colorful language, but if you are easily offended by that word, then don't watch this movie. It's in there 260 times. (I found this list of f word usage in movies very interesting.) But if you like hilariously genius cult classics by the likes of the Coen brothers, then you've probably already seen it. This 1998 movie is VERY cult. There are Lebowski Fests held all over the country every year. I honestly don't know why we haven't been yet.


For the shirt and shorts I used the Oliver & S Sketchbook pattern. They are both size 5, all I changed was the color blocking on the bowling shirt. The shirt is made from a yellow and a brown Moda Bella solid from Sewn Studio, and the shorts are made from a new Moda woven we recently got in at Sewn. These checked cottons are fantastic and I want to use them for everything. The pattern is on both sides of the fabric, woven in, but it's brushed on one side so it feels a little flannel-y. So comfy for the inside of kid clothes. 


"Medina Sod" was added with a freezer paper stencil and craft paint. I was tempted to change it to "The Dude Abides," but I love how obscure this reference is on the Dude's shirt. 


The "Art" is embroidered on with brown floss. I was going to try to embroider the pocket graphic as well, but that went very badly so I needed a new plan. I just cut a new pocket and drew the ball and pins on with a thin sharpy. Then I hand painted them in. 


The scene I tried to recreate with the Folgers can is Donny's funeral. Dude and Walter take his ashes out to the Pacific in a coffee can and Walter gives a touching tribute that is mostly just about Vietnam. 


Then he releases the ashes into the ocean, except they just blow all over Dude's face. It's gotta be one of the most classically hilarious funeral scenes ever.


I was lucky enough to take these pictures in Red Rock Canyon in Las Vegas this weekend, and despite  lacking an ocean, the rocks and shrubs work perfectly for this scene. (We were there for my brother's wedding- so fun.) I was actually trying to get him to rub the gray sand all over his face so it would look like the ashes, but he was way to into throwing handfuls of rocks into this little pond. I can't blame him for being distracted in this gorgeous canyon full of places to climb. But he did pretty well considering the day before was full of posed wedding photography. 


And of course we had to get a shot in the In-N-Out Burger. I totally get the appeal of this burger joint that's so popular out West. Have you tried it "animal style?" Yum.


This month we were SO lucky to have Sabra be our guest for Film Petit. We have been wanting to do Lebowski since the beginning, but knew we had to find a very specific person to pull it off and appreciate the ridiculousness of it all. She did not disappoint. She did the Dude AND Walter in the bowling alley and it's f**kin fantastic.


And since we thought the world needed at least 3 small versions of the Dude, Kristin also did one. Grocery-store-in-a-robe-Dude. I can't overemphasize how cute it is.


Like little kids dressed up like your favorite movies? You can see all my past Film Petit posts here.

Tuesday, February 19, 2013

Simple Sewing and Upcoming Classes


Sometimes the simplest little projects have the best payoff. 

I wanted to make a little something for my kids on Valentine's Day. (Something besides the personal ads shirt.) My husband and I have never been Valentine's day people, but since having kids it's become another fun excuse to make and do little special things for them. So when I only had a little time to get together a gift, I thought of this Ed Emberley Happy Drawing cut and sew panel I bought way back when the line was first released. (I don't know how easy it is to find any more.) It has several more animals on it, but these four were perfect to make puppet-sized. 


 I just love the look of these guys, especially the frog. Hendrix asked why the frog was so sad. I think it's a more a look of confused amphibian terror, but whatever. I sewed a backing on each piece and added a pocket in the bottom big enough for little hands. The giraffe is too thin, so he has a longer pocket for a dowel or spoon.


The backs are made from a couple really old Brandon Mably prints I bought when I first discovered online fabric shopping. I think they are so cool, but these last bits were languishing in my stash for a long time. I was so happy to use the last of them, love when that happens. 


And the greatest thing about new puppets is that the kids have new found appreciation for an older handmade gift- the Little Things to Sew puppet theater I made for Christmas 2011. Also love when that happens. It was interesting to see how they divvied up the puppets. I put all four in one bag and gave it to both of them, but they quickly decided the giraffe and dragon were for Hendrix and Elsie would have the frog and elephant. No fighting or anything. (Although, believe me that it not the norm.)


Do you like those stylish eyebrows Hendrix decided to give Elsie? That's what good brothers are for, I guess.


I also wanted to let you know about 2 classes I'm teaching in March at Sewn Studio! I'll be teaching the Swoon quilt block on Saturday, March 9, and a 2-parter After School Pants class (perfect for boys or girls) on March 14 & 21. Go here for more info on how to sign up!


Thursday, February 14, 2013

A Valentine's Sewing Compulsion


I'm sure I'm not the only one who sometimes gets that overwhelming urge to make something fairly ridiculous. This shirt was a must, a need.

Originally, I hadn't planned on making Hendrix any Valentine clothing, or maybe just doing some fun stenciling on tshirt. But then I remembered that I had a yard of this hilarious personal ads fabric that my friend Delia sent to me because she didn't know what to do with it. It was 2 days ago when I realized how perfectly destined it was to be a button down shirt for my 3 year old, and I kicked myself for not thinking of it sooner. But as short on time as I was, it still had to be done. 


I mean, is it borderline inappropriate? Maybe? I think it's in that sweet spot between hilarious and way too weird- the one I strive for :) There is nothing obscene on it, just some double entendres. And I figure there is no better time than before he learns to read, for clothing him in an outdated form of texty loneliness. (Do they even have these in papers anymore? Or is it just Craigslist now?)


The sewing is really rushed since I finished it around midnight last night. Threads hanging out, blue marks still all over it, the inside seams a bit of a mess. But I'm so happy I got it done in time for him to wear to school today. It would have been a waste after today!


The pattern is the Oliver & S Sketchbook Shirt in a size 5. He's also wearing his Oliver & S After School Pants from the Ferris Bueller Film Petit. He loves the shirt and totally thinks he such a big boy in it. That shirt is not for the faint of heart, but I enjoyed making it. It's just a lot of steps, some a little finicky, but the end result is just so great. And it's my practice for this month's Film Petit, which will need another Sketchbook shirt. (Oh no, did I totally just give away the movie?)


Smoldering. 


Happy Valentine's Day everyone!


(get more Arrested Development Valentines here. and awesome Wes Anderson ones here.)