Thursday, April 18, 2013

Film Petit #8: Back to the Future

Wait, stop. Press play:


  The Power of Love by Huey Lewis & The News on Grooveshark


Ok now you are ready for this, on your mental skateboard.


Like many people my age, I watched this movie a lot as a kid. I remember once when I was four years old, I was watching my two preteen brothers have a mostly friendly wrestle in the living room. This was not an unusual sight in my house, but for some reason I decided to feign indignation at these shenanigans. I marched right up to them and pointed one finger out in front of me, leaning my whole body into it like a blossoming little George McFly. "Hey you! Get your damn hands off of him!" I don't think I knew which brother should get their damn hands off of which, but I knew I was keeping the peace and standing up for justice and possibly saving people in photographs from being erased. Of course a discussion followed, and my mom wanted to know where I heard that word. When she heard my answer, I wasn't really in trouble any more. Then I told her she was my density.


 Ok, maybe the density part was a stretch, but I remember being a pretty cool four year old, so it's entirely possible. The rest of that story is completely true and one of my earliest memories. It seems likely that this movie taught me how to measure a movie's worth for the rest of my life. The gold standard.


So this is my little Doc Brown. I wanted to do Doc all along, but at first I was thinking of Hendrix. Obviously, Elsie is much more Docish. It shoulda been the obvious choice. 


Crazy hair, naturally, but check out the crazy eye:


Is an all-white summer jumpsuit that zips up the front the most practical Film Petit clothing I've ever made? No, probably the least. But it cracks me up, so I'll still find occasion to make her wear it. I started with the new Oliver & S Pinwheel tunic and then extended the top straight down into shorts instead of the a-line shape of the pattern. I installed the zipper in front, trimmed the neck and sleeves in bias from orange Lizzy House Jewels, and then sewed some thin elastic into the waist. I made the whole thing from an old men's button up in the closet and the rest of the supplies I had on hand, so at least my impracticality didn't cost anything.


The 88 is embroidered on the front pocket in black perle cotton from Sewn. Of course, this is the exact speed required for a DeLorean to time travel. (Everybody knows that.)


The radiation symbol was painted on the back with a freezer paper stencil. Without it, this would just be a pretty cute little romper. The fit needed a tad more length in the body, but that would be easy to fix and make her one out of pretty fabric. I love the ease of the zipper in front. 

I took these pictures in the middle of the square in our neighborhood in Cincinnati. There is no clock tower, but it's kinda got the quaint small town thing going on, and the 20th Century Theater in the background is very retro. I could totally picture an Enchantment Under the Sea dance being held there. 


My favorite scene in Back to the Future is at the dance when Marty gets on stage and starts playing metal for the high school kids in 1955, and they all just stare at him like he has three heads. I may have fallen slightly in love with Michael J. Fox.

"I guess you guys aren't ready for that yet. But your kids are gonna love it."


Now go see Kristin's very creative interpretation of the DeLorean! I love that she picked the time machine as a character. It looks very BTTF, but not like a kid dressed as a car. Well, just go see.

And we have had so much fun working with Dana from Made on this one! She brought her usual clean and stylish skills to Film Petit and her little Owen is the perfect Marty McFly. Thanks Dana!!


If you are new to Film Petit, here's how it works:


  • Roughly once a month, Kristin and I will post FP on the same day, along with one special guest. We all choose a movie together and sew clothing for our kids inspired by the characters or something else in that movie. They are not kids movies, they are just movies we love to love. 
  • We usually don't tell the movie until the post goes up, but we love for people to sew along and make stuff from their favorites too. You can post your photos in the flickr group.
  • You can see all my past Film Petit posts right here, and Kristin's here
  • Next time we are being joined by Delia! We love Delia!
  • We have the most fun ever. 


Tuesday, April 16, 2013

Bag for Shit and Stuff.


I feel like I should preface this post with some sort of "sorry if this word offends you..." type of thing, but I won't. If I was truly sorry about that, I wouldn't post this creation here. In reality, I think this word is one of my favorites and I make no apologies for that. (But I am sorry if you accidentally read this in front of your 7 year old and didn't really feel like explaining to them why this is funny for people who can yield such words responsibly. Don't worry, it will be good for both of you.)


The CinciMQG had a challenge this month to make something that was up cycled. I've had this set of hand embroidered linens from an antique show forever ago, and I've only used one piece. (But that one piece won me my sewing machine!)

So between me wanting to use those again, wanting a wide pouch for my sewing shit, and always hearing Rachael tell everyone to "go make shit," this bag practically made itself. For the main body, I used a texty Mama Said Sew print and of course Lizzy House Pearl Bracelets for the lining. I love how great these fabrics look with the vintage bit.


But I'm most pleased with how right-at-home the embroidery looks. Almost like it's always been there on that vintage shit.


Come back Thursday for a new Film Petit! It's gonna be the shit! (Sorry, I seem to have opened the floodgates.)


Thursday, April 11, 2013

What I've been working on


Now is one of those times when I have a project in just about every stage of production. Except the finished stage. But when I've been sewing these past couple weeks, it's been only to enjoy the process. I sew when I have time. Other times I read a book, or obsessively watch through the first four and a half seasons of Breaking Bad with my husband. No sewing for deadlines. (Although there are a couple deadline-related things that I really need to start on- ahem, Film Petit!)


Here is a peek at my current do good stitches bee quilt, as I was basting it yesterday. I went lazy and sprayed. I feel like I should have strong feelings one way or the other on the whole pin vs. spray debate, but I don't. I just do whichever I feel like. Excited about finishing this all-geese quilt though. Aren't the colors great? I'm usually not prone to use so much white background in a quilt, but sometimes that's just the best choice for this bee. And I hope all the white will be striking in the finished quilt.


I occasionally get the chance to plug away slowly at my oldest WIP, the Swoon. I started it at the beginning of last year. This is block #5, although probably only counts as 4 because I have one I really don't like. We'll see if I change my mind about it when all the blocks are done. I first blogged about this project here


Since I was feeling good about finishing a couple tops up, I cut a new one! This will be simple patchwork squares for a picnic blanket. I've had this particular fabric stack pulled and waiting for at least a year. Glad I still like it as much now as I did back then. 


These were last month's do good stitches blocks. I should really try to show you these more often, but I am always so rushed in making them that I never get pictures. This was a really fun tutorial to follow.


 And!!!! I finished my ginormous scrappy trip along top!! (First blogged here.) I basically pulled every single blue FQ off my shelf and started cutting and stitching. That was back in January. I stalled out for a while in February, but then got a new fire under my tush to finish all 56 blocks. I'm going to use a long arm quilter to finish for me for the first time ever, so I'm excited about that.

This is me showing it at our Cincinnati Modern Quilt Guild meeting last night, with Christine's help on the right. I recently became the president of our guild, and I am so thankful to have this group of creative friends. We have too much fun. Tonight, we are having a Modern Meet-Up event in downtown Cincinnati as Nicholson's Pub. If you are in the area, I'd love to meet you! More info on that here. 


Thursday, April 4, 2013

Green Pants and a Cardigan for the Boy


I didn't realize until looking at these pictures now that this whole outfit is just a variation on the Ferris Bueller look. I must have subconsciously needed to reproduce one of my fave Film Petits. It's the same two patterns- the Cool Cardigan from Blank Slate, and the Oliver & S After School Pants.


These are my favorite boy pants right now. Back in the fall, I made Hendrix several pairs that were skinny style. Cute as they are, they didn't last into the new year. Not only is this relaxed fit more practical for growing kids, it also has more give for wild boys who run, dance, jump, and climb 90% of their day. Harder to wear through those non-tight knees. And these aren't so relaxed that they look goofy. They are just cool pants. I also love that they have a pro-looking back yoke and back pockets but are still a full elastic waist.

The fabric is Robert Kaufman fine wale corduroy in kelly from Sewn Studio. And I used a scrap for the pocket linings, just for fun.


The cardigan was mostly made back in September I think, when I tested the pattern for Melissa. I loved it, but never added buttons and it sat in an unfinished pile all winter. What a waste! I made it from two old sweaters, the gray one already had those pockets, which I kept in front. You can see that I had to piece the navy together in some places for the neckband and waistband, but it worked. The buttons, which I finally stitched on last week,  are my favorite. I found them in the box of vintage goodies my mom gave me. I was disappointed there were only two because three really would have been perfect on this sweater. Still little-professor-chic though. 


I got it into my head to make these pants for St. Patrick's day, but I don't even think he wore them that day... or maybe I just didn't finish them in time, which sounds more likely. Good thing green cords are fantastic for any day.


Monday, March 25, 2013

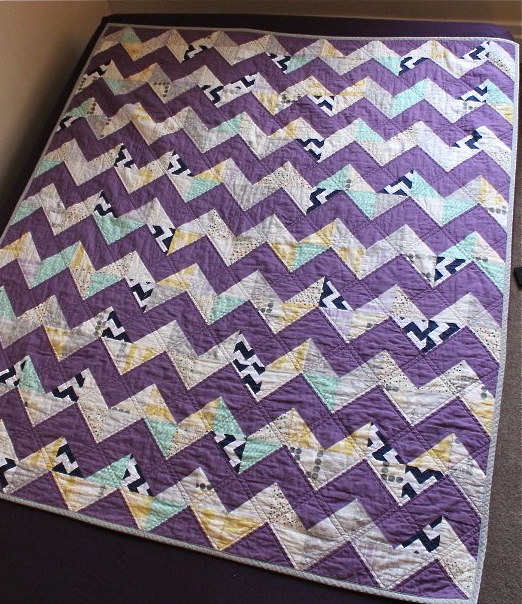
Purple Zig Zag Quilt


Since it's March 25 and it's snowing outside and I haven't really gotten dressed in three days, I thought it might be high time to share this quilt I finished back in August. August 2012, a time when the sun was shining and I had enough life in me to finish things.

I made it for our best friends' ten year anniversary and finished it just in time to give it to them without taking pictures. I was too excited to take pictures, as I usually am with sewn gifts. Anyway, they liked it. I think they still do. It looks pretty good as a throw blanket in their stylish place. Then I stole it back from them last week and took some pictures, because when you blog you think you have a good excuse to do weird things like that.


I really love the colors of this quilt. I first blogged about my fabric selections and using "triangles on a roll" here. You put a cut of paper over the 2 fabrics you want to make HST's from and then just sew where the lines tell you. Cut them apart and you've made a lot relatively quickly and really accurately. You just have a bunch of paper to rip off now. Still worth it for a quilt that is made of them entirely. We have a class at Sewn Studio that teaches this quilt, so we were all kind of learning how to use the product together.


After all the HST's were done I put them together randomly for the most part. I think it turned out great that way, plus trying to control where everything ended up would not have been enjoyable for me. The only thing that worried me at first was if that navy chevron was too much with the rest of my low-volume prints. But once the whole thing was together, I loved the effect that chevron print made. Totally would have been a bore without it.


The top only uses 8 quarter yards plus 2.5 of the background solid I think. So for the back I just put together all the quarter yards of those prints I had left. (Since I usually stash half yards.) The quilting is a simple double diagonal grid. This was the quilt that made me realize my walking foot sucked. It's not terrible quilting, but after I shelled out the $70 for a good walking foot after this, I quickly realized it wasn't great quilting either. Sometimes it's a relief to know it was your tools that sucked ass and not you. 


The binding is that Moda pre-made single fold bias from Sewn that I loooooove to use so much. Makes that end-of-the-quilt-I-just-really-want-to-be-done-with-this part go much faster. 


This little sprite in Santa jams thinks it's pretty cozy. Maybe it's time to start on one for her near-future big girl bed?


Thursday, March 14, 2013

Dresden Baby Quilt


I guess I didn't get all the dresden plates out of my system with my last finished quilt. I really wanted to make some traditional dresdens with the pointy blades, instead of rounded off like my modern dresdens quilt. This one is for a very good friend who just had her first baby. We grew up together, and even though we don't talk all that often now, she is just one of those people I will always think of as a close important friend. And when we do get to see each other, it's a very happy thing.  


I started by pulling soft girly colors out of my bag o' scraps. The picks edited themselves into a pastel primaries selection. Then I added the black sketch print and a couple other black or gray prints. That was all it needed to tie everything together with an edge. But a baby-appropriate edge. So it's pretty fun that I was able to get such a great color story just from my scraps. I only had to cut into a couple of my new pink Lizzy House Pearl Bracelets.


The quilting was pretty experimental. I had borrowed my mom's copy of Angela Walter's FMQ book and one night I was drinking wine and looking thru pictures in it. Then I decided, "hey I should just do some of that to my dresdens." So that's the extent of the planning that went into it. I tried swirly things in the center circles. I wish I had taken a close up of that light blue one, because it was the first and it really sucks. But the other three are pretty good.


This is an example of pretty good. Really, I should show more of the sucky stuff right? Then I just did meandering loops in the rest of the dresdens. Straight lines finished out the background, mostly because I knew I would screw things up if I tried another fmq pattern there. Still, it always feels good just to get slightly more comfortable with it. And the combination of quilting styles gave it a great crinkle.


I bound it in Bella Feather, same as the background, to keep the impact of the plates. My first choice would have been that black sketch, but I didn't have enough. I like the look of white binding a lot though.

The back is a Liberty Lifestyle print from Bloomsbury Gardens. The quilt finished at about 43" square.

Now I'm working my way through the WIP list and I hope to have more finishes to show for it soon!


Tuesday, March 5, 2013

Oliver & S Spring Patterns: The Pinwheel Tunic & Dress


Last week you got to see my reversible version of the new Oliver & S Roller Skate pattern.  This week the "Rolling Tour" is back with the last new spring pattern from Liesl and her team, the Pinwheel Tunic and Slip Dress.


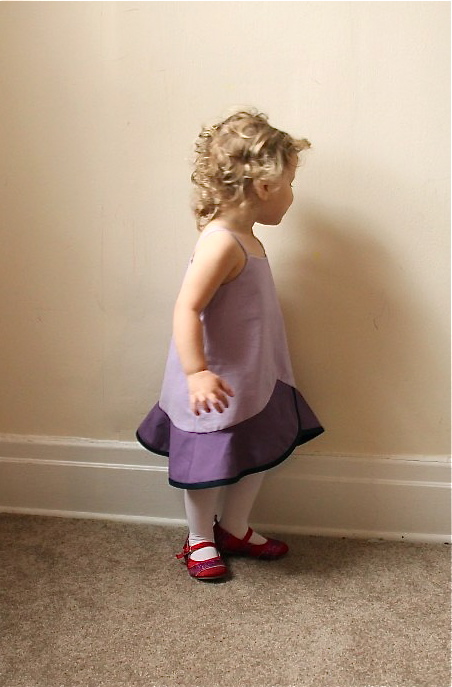
Like the Roller Skate, this pattern has several options that can be used to achieve lots of looks. But in my opinion, this one is more of the "special occasion" pattern because of the great flounce factor. It's completely different from anything out there today- a dress that is actually made of layers, a tunic worn over a slip dress. I wanted to make both pieces to be worn together, but also get two different garments that she could wear apart and look different from each other. So I went with a selection of four solid cottons from Sewn Studio. They are Moda Bella in green, caribbean, lilac, and aubergine. 


I LOVE the way the layered flounces look on Elsie in these colors. This will definitely be the perfect Easter Sunday dress this year. I made her the 18-24 month size. I've been starting to use size 2 on the O&S patterns so they last longer, but I knew this one would look off if it was too roomy on her. I'm glad I did that because the fit is perfect. 


Here is the purple slip dress without the tunic. This will be really sweet in summer with some sandals and a new bucket hat. I love the way the dress is constructed, with the straps sewn in between the main dress and the facings. I'd love to use the top of the pattern again and remix it with some different skirt styles.


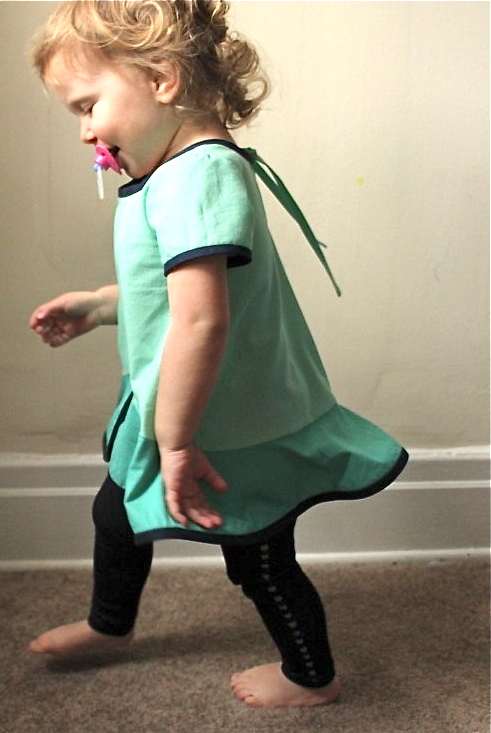
This post required photo shoots over the course of 2 days because there was no way my 22 month old was going to hang in there for all 3 looks at once. She is becoming SO hard to photograph. For the tunic portion, we had just returned from the doctor (to get staples out of her head, crazy girl. Don't worry, she's fine) and she was about to nap. Thus the pacifier and blankie- we do what we gotta do. 


I'm a huge fan of the tunic part worn with leggings. I think the simple short sleeves on top look so sweet and I love that it still fits over her head with just a tie in the back. We will get a lot of wear out of this. Come to think of it, I just knocked out St. Patrick's and Easter sewing for her!


And of course, the twirl factor is still there with the single flounce. She seems to be a big fan of the Pinwheel too! There is a lot of bias sewing on this dress, but it was great practice. I actually feel like my stitch in the ditch skills have never looked better. But I did use pre-made Moda single fold bias tape from Sewn Studio, which was a giant time-saver.  You buy it off the roll by the yard and since it's Moda it's infinitely softer and better to work with than the packaged pre-made stuff. I love having easy access to it at work and I use it whenever possible. But this pattern would be great with some homemade print bias tape, and Liesl has posted lots of bias help on the Oliver & S blog.


The pattern should be released any day now! It's been really fun to work on both of these great new styles, and as usual they did not disappoint my high expectations of Oliver & S. If you missed it, check out Kristin's adorable sleeveless tunic from yesterday, and look out for Cherie's sweet Pinwheel dress tomorrow.