
Let me just say first off- If you are making the vest this month and still hee-hawing about whether to do the bellows or not, just do it! Yes, this took extra time, but to me it's totally what makes this vest explorer-ish. I love the way mine came out and they really aren't hard to do. I'm sure Hendrix will like wearing it when I convince him it's just like Diego's vest. "SAY BELLOWS! SAY IT LOUDER! EVERYBODY SCREAM!" Most stressful kid's show ever.


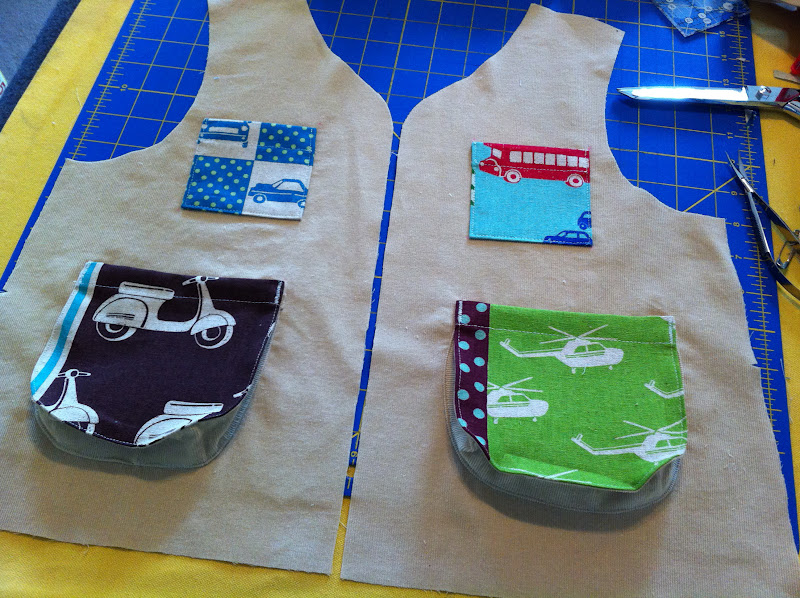
Now turn the pocket back the the wrong side and hem the top as instructed. You'll notice the the first fold you made is still there, but the rest of the bellows piece is not folded into the hem. The diagrams in the book are actually really clear for all these steps, but real fabric pictures help a little too.

I didn't take a picture of this step, but then you are just going to pin and topstitch the other long side of the bellows (still folded under) to the vest where you transferred the marks from the pattern.

Lastly, add bar tacks (a tight zig zig stitch) on both sides of the hem so that the top lays flat and doesn't hang open. I haven't done it yet in this picture, just pointing out what the sides will look like.
Link party for your explorer vests and other projects from Little Things will begin on the last day of the month and you will have a week from then to add yours. Remember, you could win the wonderful book, Growing Up Sew Liberated.
Also, I wanted to let you guys know I was interviewed this week over on Krista's awesome blog, Thar She Sews. It's all about the stuff you care about- fabric and sewing. Check it out right here.
They look great! And, looks surprisingly easy. Thanks for sharing.
ReplyDeleteWhat a cute vest that will be! I love your fabric choices! Too bad my granddaughter doesn't want one... I'd like to give those pockets a try. Thanks for showing how easy they are! Maybe I can find something else to put one on. ;)
ReplyDeleteOh man, I bet he'll love that vest! Seems like a little guy's dream. Loved your interview, too!! You rock.
ReplyDeleteCute! I really so love the bellowed pockets. And my little guy needed some convincing too, but then a week later he willingly wore it for several hours.
ReplyDeleteThanks for dropping by to see my Little Red Riding Hood Cape. Your explorer vest is looking fab! Especially those ever so neat pockets...
ReplyDeletegreat tute! he is going to looove this!
ReplyDeleteThanks for this post bc I was totally going to skip the bellows. They really do look cool though, don't they. And you make it look easy peasy...I'm never gonna make the deadline but I'm hoping for Easter, thanks for the inspiration. Ps can't wait to follow you on project rp.
ReplyDeleteSuper cute, Jessica! And great use of Echino. :-)
ReplyDeleteThanks for the great pictures, I referred to them last night, that's right--I'm sewing along this month :)
ReplyDelete